Should we use SharePoint REST or Microsoft Graph API in Power Automate?
Should we use SharePoint REST or Microsoft Graph API in Power Automate?
When working with Microsoft 365, we see many overlapping tools and features, and we will need (to provide) much guidance around ‘when to use what’ for users. While most comparisons address users, I want to cover some more IT-related scenarios in this blog post. Specifically, I want to compare two different RESTful APIs, which we can use in Power Automate and Azure Logic Apps to send HTTP requests. If you are not familiar with that, don’t fret; continue to read my blog post about how to get started with http requests in Power Automate, I will grab a coffee ☕ in the meanwhile.
Back again? Cool. Let me introduce you to our
use case
We want to create a new SharePoint list and add some columns based on the user’s input using Power Automate or Azure Logic Apps. When we look at the different available SharePoint actions in Power Automate, we will see that there is no ‘create a list’ and no ‘add column to SharePoint list’ action, but that we could try out something with ‘send an HTTP request to SharePoint’
Option No. 1: SharePoint REST
The ‘send an HTTP request to SharePoint’ action uses SharePoint REST API. To create a list, we can look up working with lists and lists items and see that we need to send a POST request to the https://{site_url}/_api/web/lists endpoint and specify in the body of our list how it should look like. We can define the title and description of the list and also set the Basetemplate (in case you want to do the same with a library etc.):
POST https://{site_url}/_api/web/lists
Authorization: "Bearer " + accessToken
Accept: "application/json;odata=verbose"
Content-Type: "application/json"
Content-Length: {length of request body as integer}
X-RequestDigest: "{form_digest_value}"

{
   "__metadata": {
"type": "SP.List"
  },
  "AllowContentTypes": true,
  "BaseTemplate": 100,
  "ContentTypesEnabled": true,
  "Description": "My list description",
  "Title": "Test"
 }
Now how do we do this in Power Automate without writing much code?
mobile flow button
To make things easier, I will use the mobile flow trigger with three text inputs:
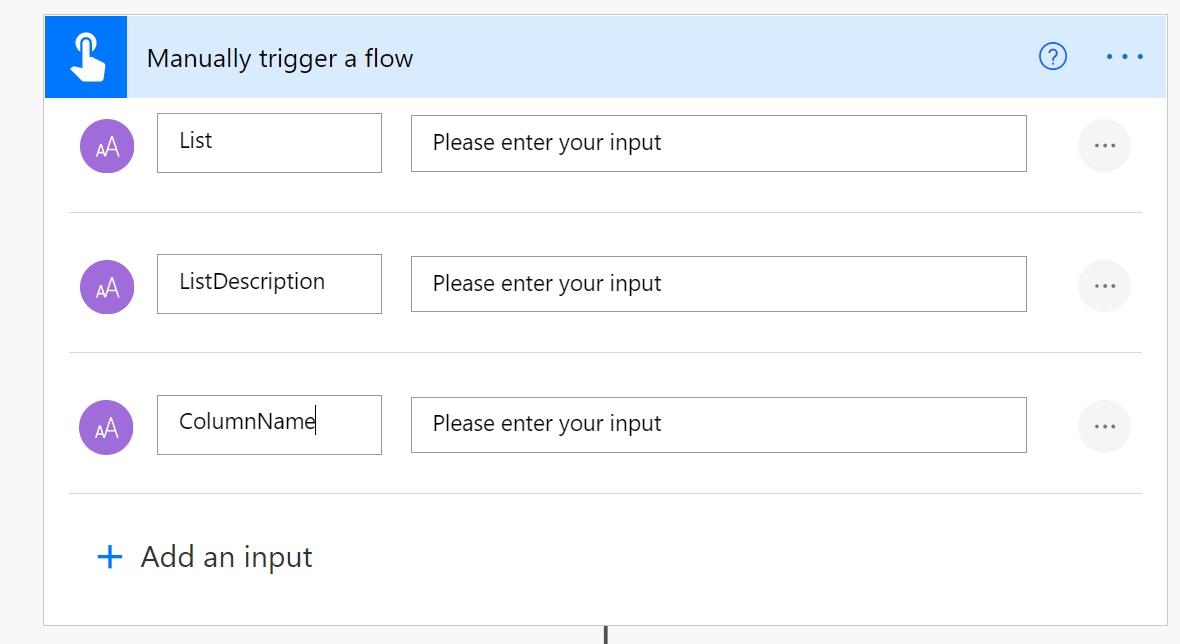
You can also trigger the flow from a list, a form, an app, a bot, or whatever suits your use case.
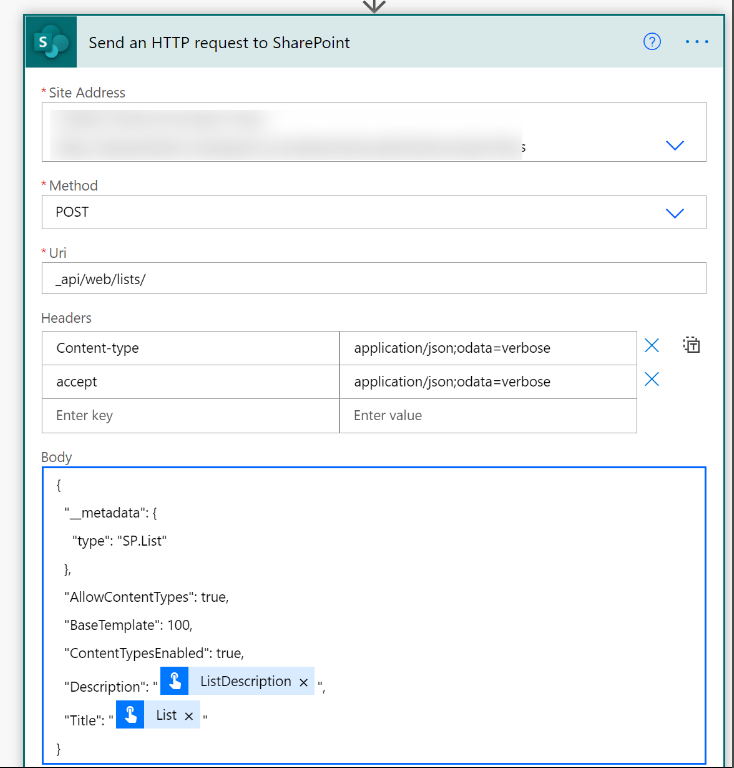
Send an HTTP request to SharePoint - create a list
Now we need to add the ‘send an HTTP request to SharePoint’ action:
- Select the site of your choice from the dropdown menu
- Select method Post
- enter
_api/web/lists/as URI - enter Headers as follows:
Content-type:application/json;odata=verboseaccept:application/json;odata=verbose
- enter
  "__metadata": {
    "type": "SP.List"
  },
  "AllowContentTypes": true,
  "BaseTemplate": 100,
  "ContentTypesEnabled": true,
  "Description": "@{triggerBody()['text_1']}",
  "Title": "@{triggerBody()['text']}"
  }
as body- make sure you replace the placeholder with Dynamic Content:
Parse JSON
Now we want to add a column. Let’s have a look into the documentation, how we can do this.
POST https://{site_url}/_api/web/lists(guid'{list_guid}')/Fields
Authorization: "Bearer " + accessToken
Accept: "application/json;odata=verbose"
Content-Type: "application/json"
Content-Length: {length of request body as integer}
X-RequestDigest: "{form_digest_value}"

{
  "__metadata": {
    "type": "SP.Field"
  },
  "Title": "field title",
  "FieldTypeKind": FieldType value,
  "Required": "true/false",
  "EnforceUniqueValues": "true/false",
  "StaticName": "field name"
}
We need another ‘send an HTTP request to SharePoint’ action, and we need the list Guid. To get the list Guid, we need to add a Parse JSON action. If you are not familiar with that - I blogged about it: How to use Parse JSON action in Power Automate
Parse JSON
- Let your flow run - just the mobile trigger and the ‘send an HTTP request to SharePoint’ action
- Go to your flow run history
- Copy the outputs from the ‘send an HTTP request to SharePoint’ action
- add a ‘Parse JSON’ action to your flow
- select
bodyfrom the ‘send an HTTP request to SharePoint’action as Content - click Generate from sample
- paste the copied JSON code in here
- click Done
When we now have a look into our Dynamic Content, we will see many more options, also the list Guid, which is named Id here.
Send an HTTP request to SharePoint 2 - add a column
Now we add another ‘send an HTTP request to SharePoint’ action, which will create us a column:
- Select the site of your choice from the dropdown menu
- Select method Post
- enter
_api/web/lists(guid'@{body('Parse_JSON')?['d']?['Id']}')/Fieldsas URI (replace the placeholder with Dynamic content) - enter Headers as follows:
Content-type:application/json;odata=verboseaccept:application/json;odata=verboseenter in the Body:
{
  "__metadata": {
    "type": "SP.Field"
  },
  "Title": "@{triggerBody()['text_2']}",
  "FieldTypeKind": 2,
  "Required": "false",
  "EnforceUniqueValues": "false",
  "StaticName": "@{triggerBody()['text_2']}"
}
- Please replace again all placeholder by Dynamic content
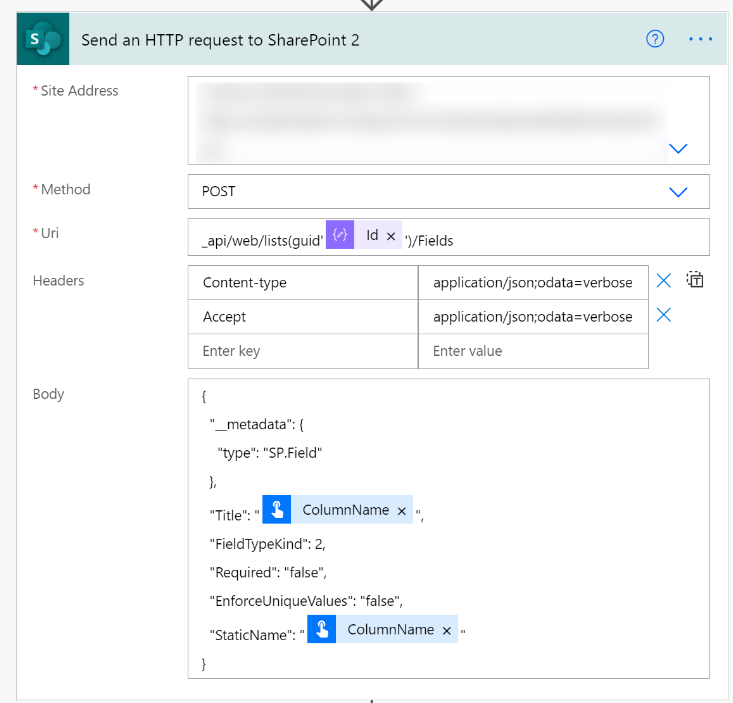
Should you stumble upon the FieldTypeKind, please find reference here - 2 means ‘single line of text’.
If you want to run your flow, please think about changing the list name because you already created a list!
If we now control our newly created SharePoint list, we will see that our new column doesn’t show up in the default view but that we need to enable the column- bummer!
Send an HTTP request to SharePoint 3 - add column to view
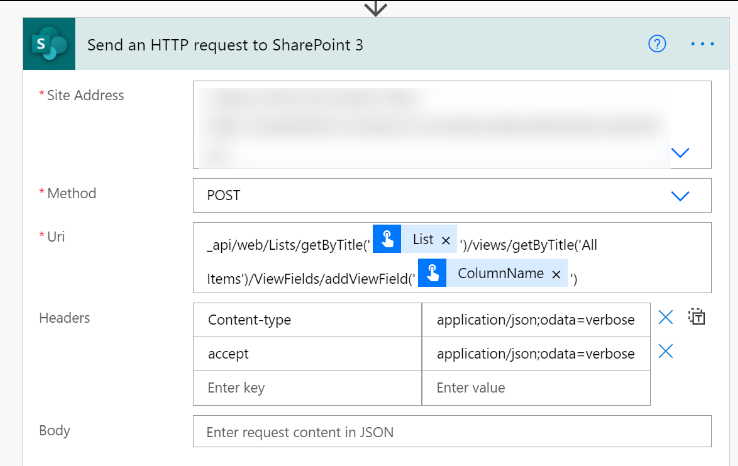
To have the column in the default view (or another view), we need to add another ‘send an HTTP request to SharePoint’ action:
- Select the site of your choice from the dropdown menu
- Select method Post
- enter
_api/web/Lists/getByTitle('@{triggerBody()['text']}')/views/getByTitle('All Items')/ViewFields/addViewField('@{triggerBody()['text_2']}')as URI - (replace the placeholder with Dynamic content)
- enter Headers as follows:
Content-type:application/json;odata=verboseaccept:application/json;odata=verbose
- Body is empty
Advantages of this solution
- no need to register an application in Azure AD
- send an HTTP request to SharePoint is not a premium connector, which means that you won’t need a Power Automate Standalone license
Disadvantages of this solution:
- with an ‘http request to SharePoint’ action you have - compared to the power of Microsoft Graph API - limited options, as you can only send requests to SharePoint, but not to other services in Microsoft 365-
- to add the new column to our default view, we need 3 HTTP requests - which makes the flow unnecessarily more complex
Option No. 2: Microsoft Graph API
Let’s see how we can create a SharePoint list or library and columns in it using Microsoft Graph. Microsoft Graph is a super powerful set of APIs that gives you a consistent experience for authentication, documentation, and samples. You can try it out on Microsoft Graph Explorer. For full documentation please continue here. If you are not familiar with using Microsoft Graph in Power Automate, please continue to read here… time for another coffee for me then :-)
mobile flow trigger
Again, to make things easy, we will use the same trigger as in Option No. 1.:

HTTP action
Now that we registered our app in Azure AD, we can continue with the HTTP action in Power Automate.
To create a list, we will look up documentation here and see that we will need to send a POST request to
https://graph.microsoft.com/v1.0/sites/{site-id}/lists
And that we will need to add permissions to be able to call this API. Our HTTP request requires authentication, which can be done via Azure Active Directory OAuth, but we will first need to represent our app (yes, this flow that calls Microsoft Graph is an application) in Azure AD.
We will follow these steps to register an app in Azure AD:
- Go to portal.azure.com and log in
- Click app registrations
- Click New App registration
- Give your app a nice name
- Save tenant ID and Client(app) ID somewhere (notepad or similar)
- Click API PERMISSIONS and select Microsoft Graph
Now look up the permissions needed for this action: Create a new list:
| Permission type | Permissions (from least to most privileged) |
|---|---|
| Application | Sites.ReadWrite.All |
- Select all these permissions
- Grant Admin consent
- Click Certificates & secrets
- Click New client secret
- Type in a description
- Click Add
- Copy the value and save it in your notepad (you will need that later)
Initialize variables for Tenant ID, App ID and App Secret
Create three different string variables with the copied values of Tenant ID, App ID, and App Secret
HTTP action to create a list
Add an HTTP (not ‘send an HTTP request to SharePoint action) action to your flow and fill it out as follows:
- Method: Post
- URI:
https://graph.microsoft.com/v1.0/sites/{site-id}/lists- You can obtain the site-id from a request in Graph Explorer:https://graph.microsoft.com/v1.0/sites?search=keyword - add Content-Type: application/json to the Headers
- enter as body:
{
    "displayName": "@{triggerBody()['text']}",
    "columns": [
        {
            "name": "@{triggerBody()['text_2']}",
            "text": {}
        }
    ],
    "list": {
        "template": "genericList"
    }
}
Replace the placeholders by Dynamic Content
If you stumble off the genericList, please read here for reference about other list templates like libraries.
If you need to add more columns, you can do that by
{
    "displayName": "@{triggerBody()['text']}",
    "columns": [
        {
            "name": "@{triggerBody()['text_2']}",
            "text": {}
        },
        {
            "name": "@{triggerBody()['text_3']}",
            "text": {}
        },
        {
            "name": "@{triggerBody()['text_4']}",
            "text": {}
        }
    ],
    "list": {
        "template": "genericList"
    }
}
and so on. Let’s go ahead and
- Click Advanced Options
- Select Active Directory OAuth
- Enter
https://login.microsoftonline.comas Authority - Enter the Tenant ID variable as Tenant
- Enter
https://graph.microsoft.comas Audience - Enter the App ID variable as Client ID
- Select Secret as Credential Type
- Enter the App Secret variable as Secret
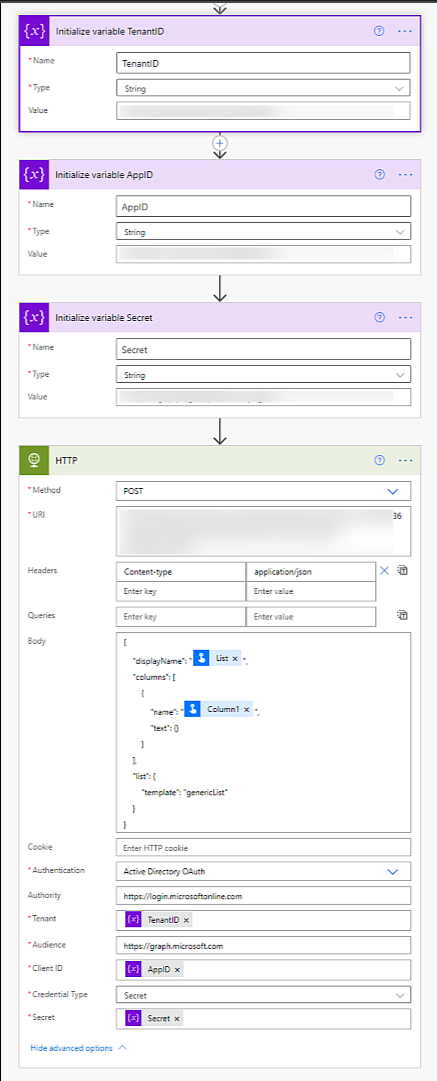
When we now run our flow, we will see that the columns that we created are already visible in the default view.
Advantages of this solution:
- We only need one HTTP request to Create a list, columns and have the columns in the default view
- If our flow gets more complex over time and we provision more things in not only SharePoint, we can do this with Microsoft Graph as well and extend our permission scope in Azure AD app registration
Disadvantages of this solution:
- Because HTTP is a premium connector, we will need a Power Apps Standalone license
- We also need to register an app in Azure AD
Bonus Chapter: What about CLI Microsoft 365?
If you read one of my previous blog posts about How to get started with CLI Microsoft 365 and Adaptive Cards, you could read between the lines that I found CLI Microsoft 365 pretty cool. Although I wanted to compare SharePoint REST and Microsoft Graph API using Power Automate in this Post, I felt it could be a cool idea to check how things would go in CLI Microsoft 365.
If you are not familiar with it, please read my blog post first or head over to the full documentation. After you installed CLI Microsoft 365, open a shell that makes you happy (I use PowerShell inside Visual Studio Code Terminal).
Login
- Run
m365 login - Copy the Login Code, click on the link
- Paste the Login Code
- Select the user you want to log in with from the list
- Return to your shell window
Create a list
- Run
m365 spo list add --title Awesome%20List --baseTemplate DocumentLibrary --webUrl https://xxx.sharepoint.com/sites/yyyby replacingxxxby your tenantname andyyyby your sitename

Add fields and more
You can now run even more commands to add fields, make them required, add them to default view, and so on, feel free to try it out!
Conclusion
As always, the answer to the question “When shall I use what” will be a typical consultant ‘It Depends.’ Depending on your experience and skillset, the scope of your app, and how you approach it, you will prefer one tool over another - the purpose of this blog was to share some options to achieve the same thing - with creating a SharePoint list as an example. Please tell me - which solution would you prefer? Which are your use cases? Please reply below; I am curious!

You May Also Like
How to let people love metadata in SharePoint and Microsoft Teams
How to let people love 💗 metadata in SharePoint and Microsoft Teams I’ve been told since I started to work with SharePoint, that people hate metadata. They don’t understand why information …
digital clutter and how we use our time
Digital Clutter and how we use our time Do you sometimes have that feeling of being busy and under pressure for the whole day (or even the entire week) and still couldn’t check off all tasks …
How can we overcome the pain with email?
Inbox Zero? I reached this goal, inbox zero. I wrote a tutorial how everyone can achieve that, too. Why is this important? For several reasons: Your inbox folder is just a mailbox. You empty your …


