How to create a (faux) table in Adaptive Cards with Power Automate
How to create a table in Adaptive Cards with Power Automate
In this blog post we learn how we can display a table in an Adaptive Card, pull data from a SharePoint list and use Power Automate to do that in one flow.
When I read in the documentation, that tables and headers are not supported, it was somehow a BUMMER 🙄, but then I asked the worlds laziest developer Hugo Bernier, if there was really now way to do it.
Our first idea was, to templatize an Adaptive Card, and then pass data into that template; but very unfortunately, this isn’t supported in Power Automate. Our second idea resolved the whole problem: We would build the JSON for our Adaptive Card like different LEGO bricks and then put them together.
We would need
- 1 brick (we will use variables in Power Automate) for the upper part of the Card, where we create a columnset,
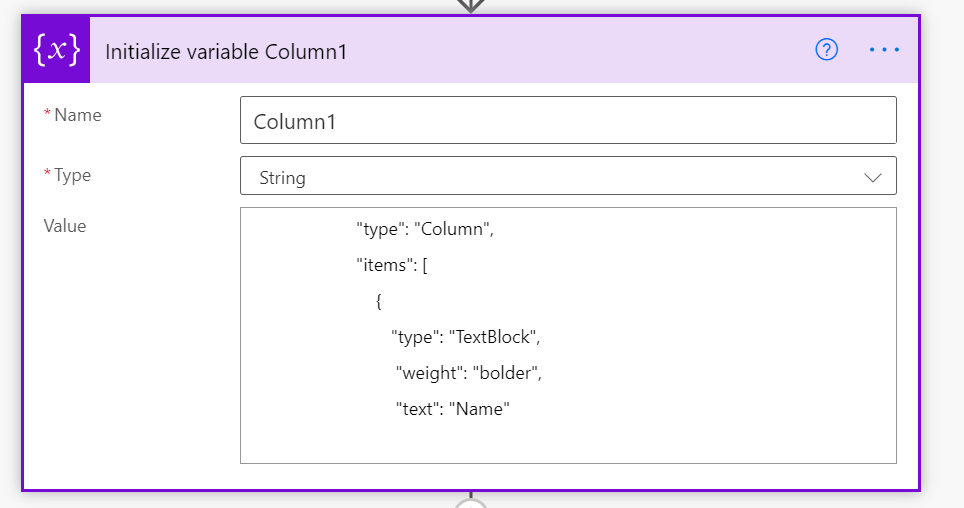
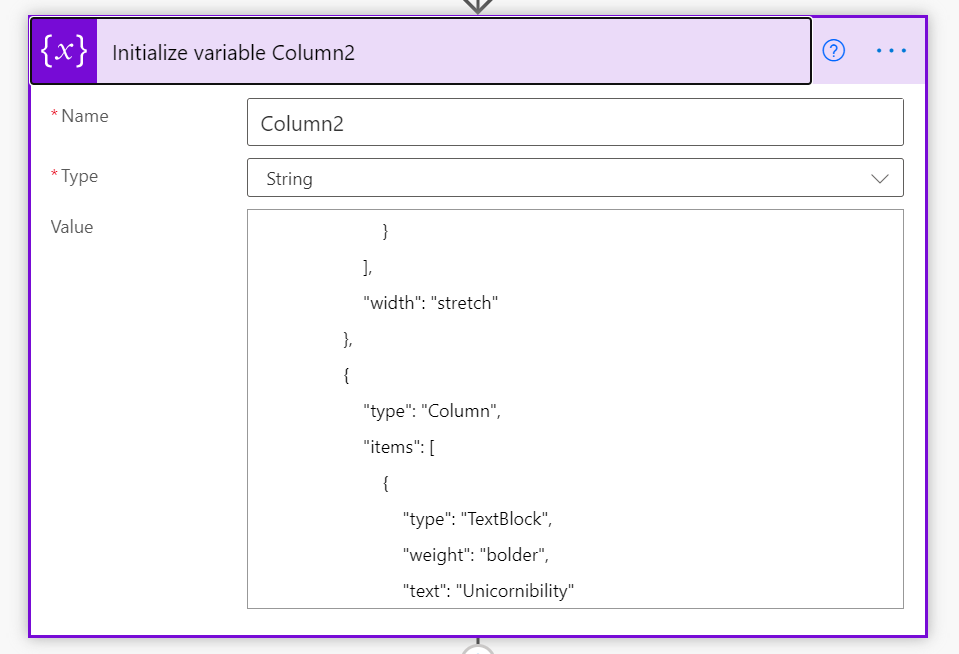
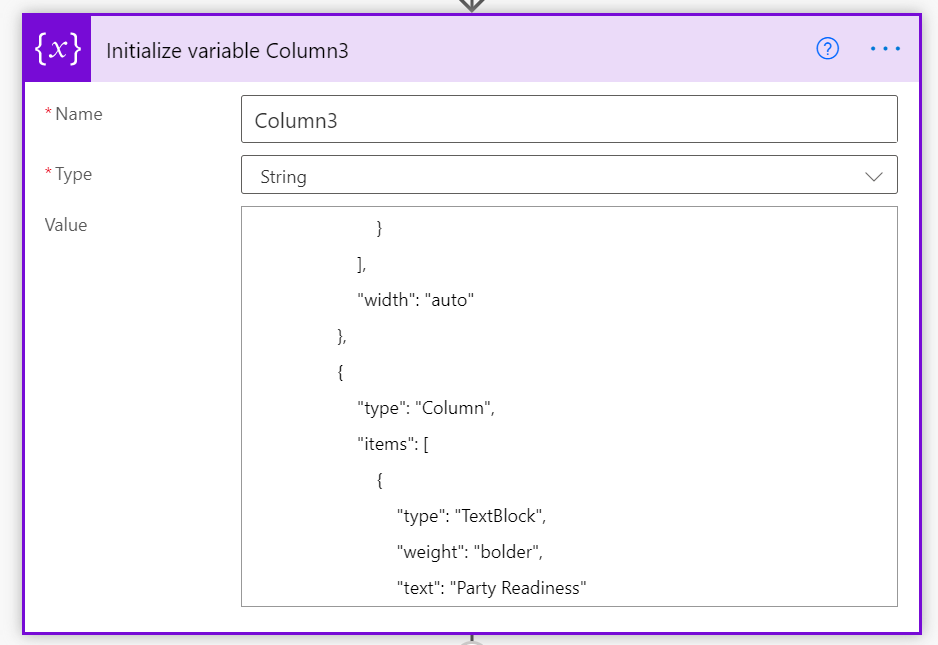
- 3 bricks for the headers of our faux table
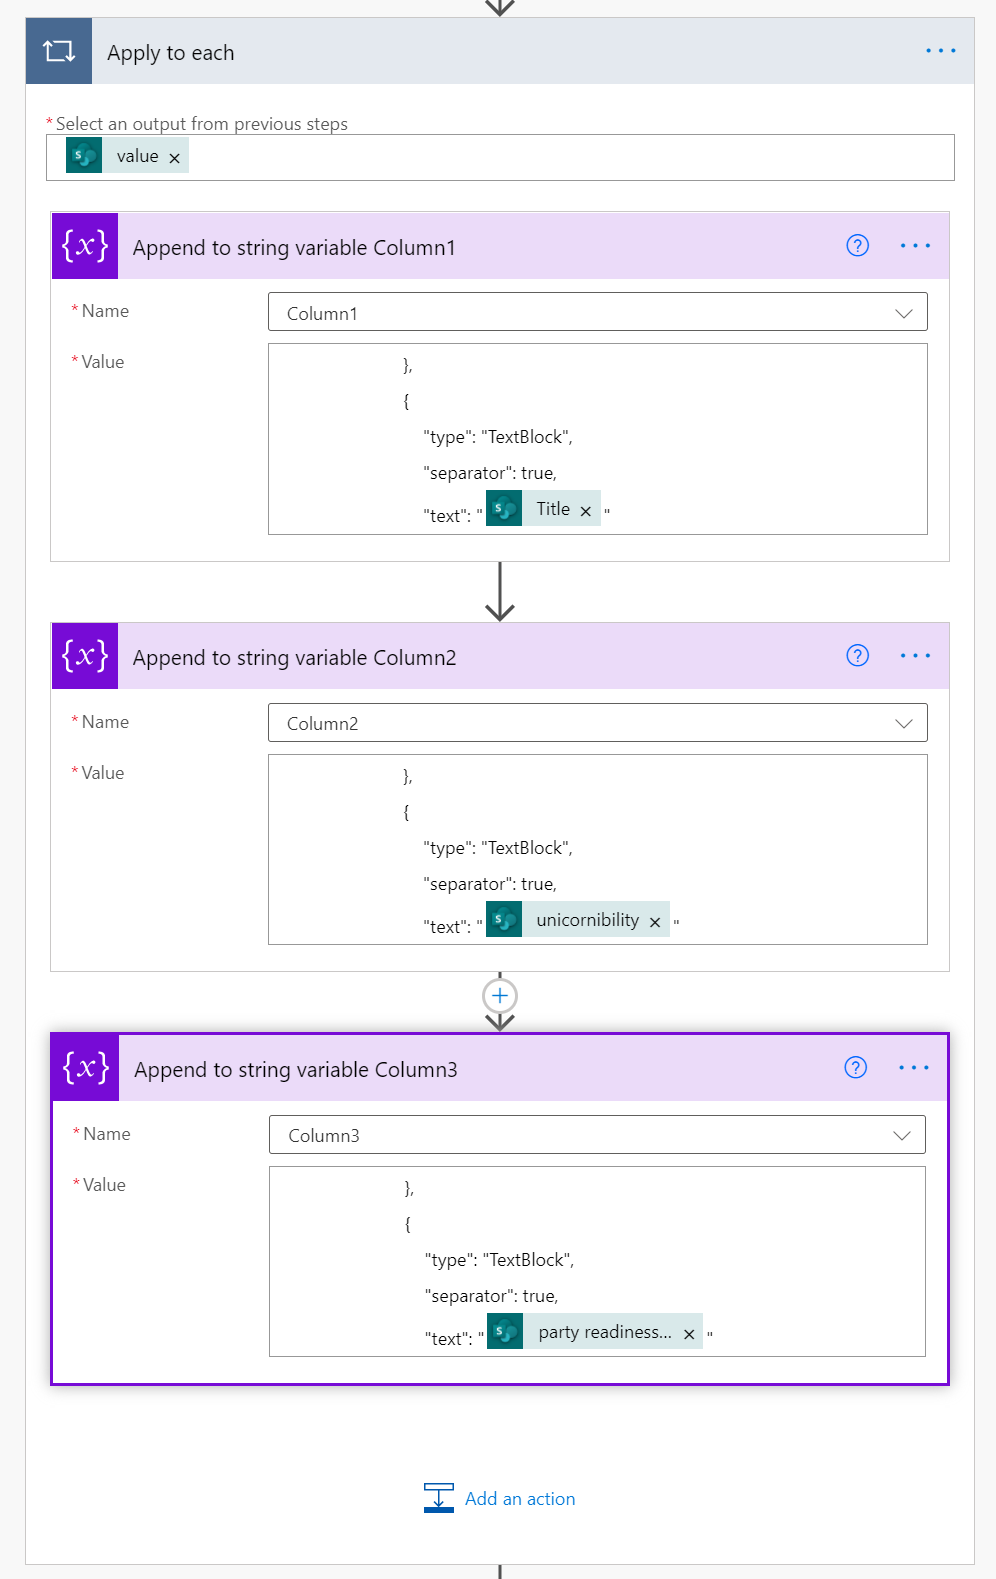
- 3 bricks for the rows over which we will loop
- 1 brick that contains our ‘Open Link’ button
- 1 brick at the end of the card to close all open
{and[with}and]
To make things a bit more approachable, here is our little
use case
We want to display items of a SharePoint list in an Adaptive Card as a table. The result should look like this:
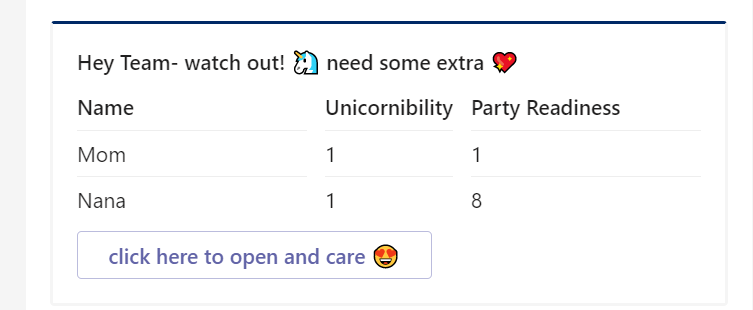
Purpose is to notify the Team each Monday about all Unicorns with a unicornibility index of less than 85 so that the team can take care of them. We do not only want to display 1 single item of our list with a factsheet but display as many items as match our query (unicornibility lt 85). We don’t want to hard-code any value in here to keep things flexible.
Let’s start building our Power Automate flow
recurrence Trigger
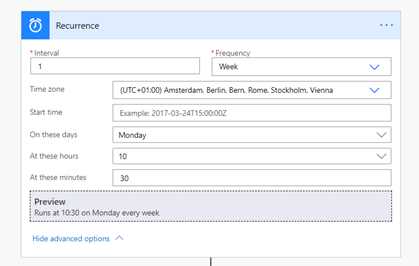
We start with a Recurrence trigger, set the interval to 1 and the Frequency to Week.
get Items (SharePoint)
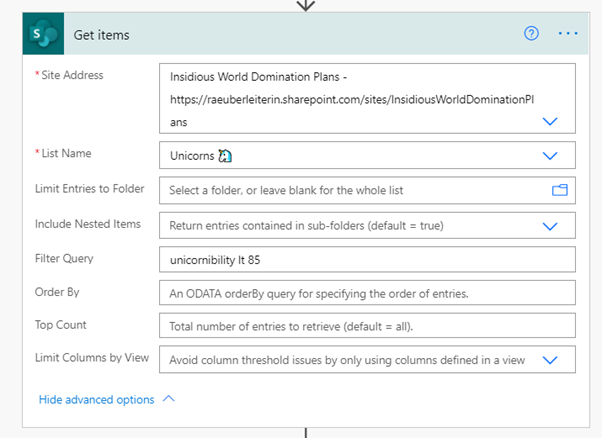
Next action is getting the items from our SharePoint list. Set Filter Query to unicornibility lt 85 to only get those items, that match our query – this will ensure a better performance than first pulling all list items and then working with conditions later. You can also limit how many items you want to retrieve.
Preparations to bind data and JSON schema of the Adaptive Card
We want to get a table into an Adaptive Card, which is not supported natively, so we need to do a little trick. We will use variables to build the different pieces of the Adaptive Card JSON, that we will later need. The Code in total would look like this:
{
    "$schema": "http://adaptivecards.io/schemas/adaptive-card.json",
    "type": "AdaptiveCard",
    "version": "1.2",
    "body": [
        {
            "type": "TextBlock",
            "text": "Hey Team- watch out! 🦄 need some extra 💖",
            "wrap": true,
            "weight": "Bolder"
        },
        {
            "type": "ColumnSet",
            "columns": [
                {
                    "type": "Column",
                    "items": [
                        {
                            "type": "TextBlock",
                            "weight": "Bolder",
                            "text": "Name"
                        },
                        {
                            "type": "TextBlock",
                            "separator": true,
                            "text": "UNICORN1"
                        },
                        {
                            "type": "TextBlock",
                            "separator": true,
                            "text": "UNICORN2"
                        }
                    ],
                    "width": "stretch"
                },
                {
                    "type": "Column",
                    "items": [
                        {
                            "type": "TextBlock",
                            "weight": "Bolder",
                            "text": "Unicornibility"
                        },
                        {
                            "type": "TextBlock",
                            "separator": true,
                            "text": "VALUE1"
                        },
                        {
                            "type": "TextBlock",
                            "separator": true,
                            "text": "VALUE2"
                        }
                    ],
                    "width": "auto"
                },
                {
                    "type": "Column",
                    "items": [
                        {
                            "type": "TextBlock",
                            "weight": "Bolder",
                            "text": "Party Readiness"
                        },
                        {
                            "type": "TextBlock",
                            "separator": true,
                            "text": "PValue1"
                        },
                        {
                            "type": "TextBlock",
                            "separator": true,
                            "text": "PValue2"
                        }
                    ],
                    "width": "stretch"
                }
            ]
        },
        {
            "type": "ActionSet",
            "actions": [
                {
                    "type": "Action.OpenUrl",
                    "title": "open here and care 💖"
                }
            ]
        }
    ]
}
Let’s break this into pieces:
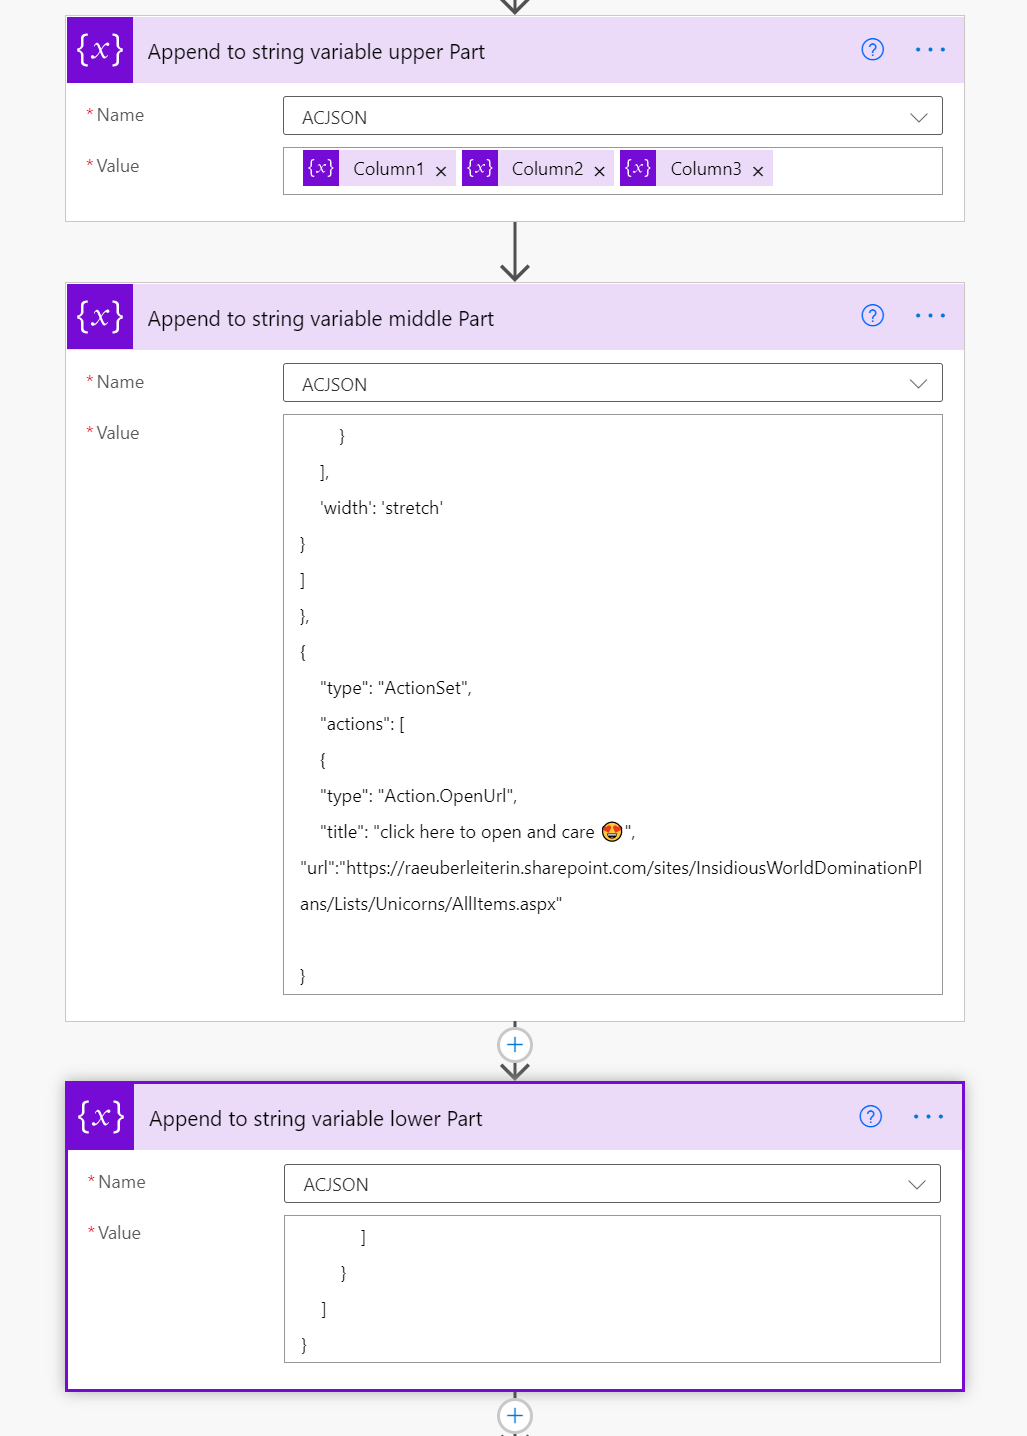
- First variable will be the upper part of the Adaptive Card in which we define the schema, a title and create a column set.
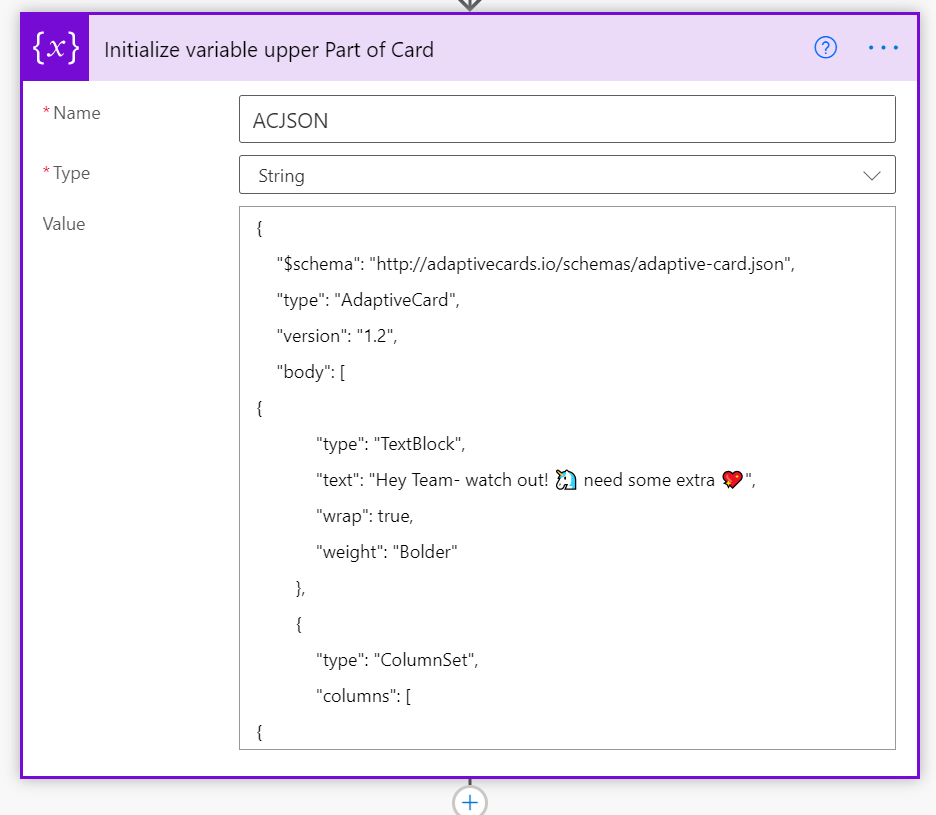
- We initialize variables for the 3 Headers “Name”, “Unicornibility” and “Party Readiness Index”
- We create an Apply to Each and loop over the values of our SharePoint list for each column by appending our variables.
- We append the upper part of our card by the 3 columns (consisting of the headers and rows) and the actionset plus end of the card
In case you wonder why we needed to somehow unclean cut the JSON – this is a bug in Power Automate. Although we defined our variables as string, Power Automate asked us to provide valid JSON. We could not provide valid JSON though, because we needed to cut the JSON into pieces. We needed therefore to find a way to make Power Automate believe, that we are not storing JSON in a string variable, and apparently a { at the beginning was a trigger for Power Automate to check if JSON was valid (which was not, but on purpose!).
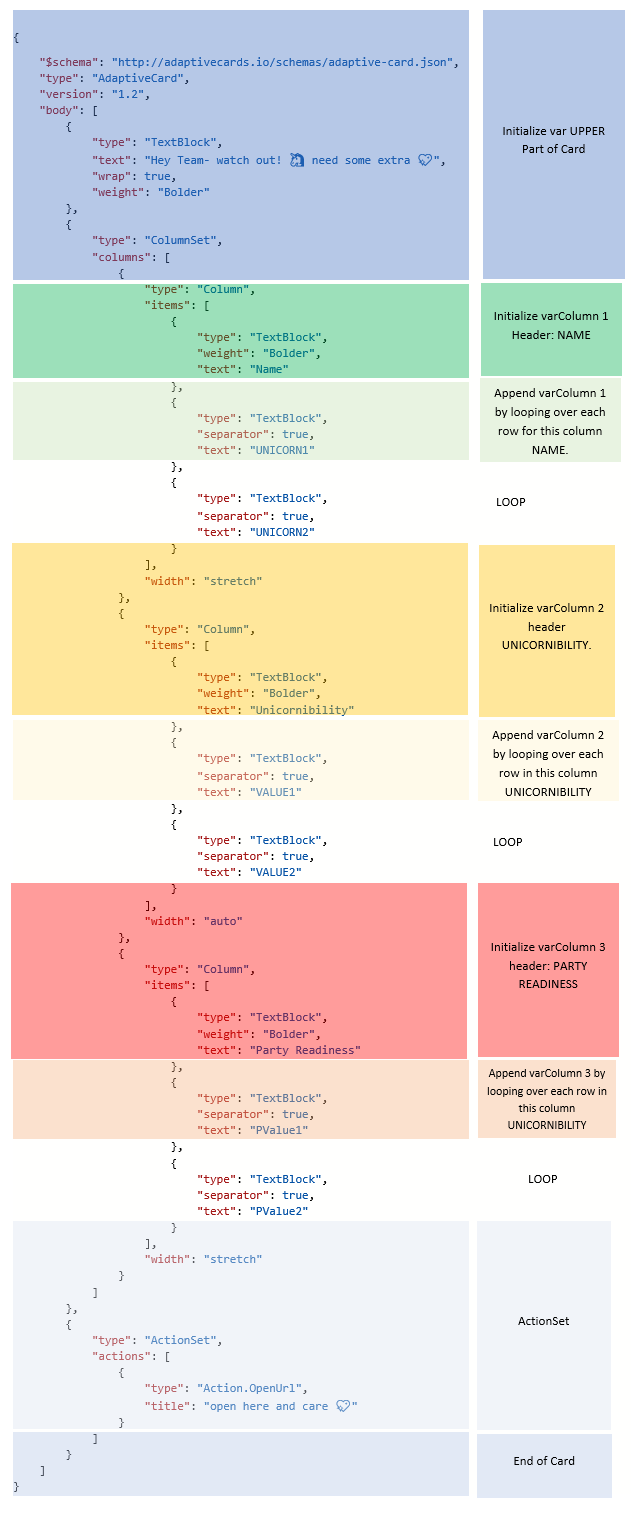
Our Code would look color coded like this:
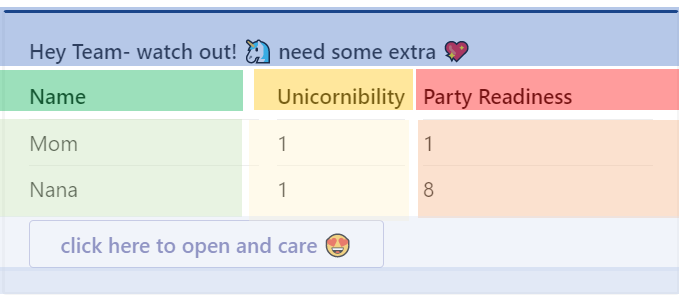
And if we now lay the color-code blocks over the Adaptive Card:
Send Adaptive Card
You may choose if you want to send the Post as the Flow bot or as a user or if you want to send this into a 1:1 chat or into a Channel. The Adaptive Card is our card variable.

Conclusion and what’s next
Although not natively supported, we can actually display a (faux) table in Adaptive Cards and bind this to a datasource. Potentially issues could occure here, as our columns are independent from each other. The Adaptive Cards renders columns, bnit not rows, which means that if we have different heights, it could be problematic to make them look good and even. What’s next? Find the limit how many rows we can display and what else we could do with Cards :’) What would you like to figure out? I am curious, please reply below!
You May Also Like
Should we use SharePoint REST or Microsoft Graph API in Power Automate?
Should we use SharePoint REST or Microsoft Graph API in Power Automate? When working with Microsoft 365, we see many overlapping tools and features, and we will need (to provide) much guidance around …
How to build a FAQ chatbot for Microsoft Teams with Power Virtual Agents
How to build an FAQ bot for Microsoft Teams with Power Virtual Agents in minutes In this blog I want to show you, how you can build, test and publish an FAQ bot for Microsoft Teams within minutes. We …
How to use a custom connector in Power Automate
How to create a custom connector in Power Automate Power Automate is a super cool tool, which gives us a lot of options. But sometimes, the built-in connectors, are not enough. In one of previous …


