How to get from Dev? Ooops! 🤭 to proper (Azure) DevOps for Power Platform
Watch out - this is part 2 of a series around very good practices in Power Platform
- Part 1: Yolo! Let’s deploy Friday?!
- 📍 You are here –> Part 2: How to get from Dev? Ooops! 🤭 to proper (Azure) DevOps for Power Platform
- Part 3: More options in Azure DevOps to manage Power Platform: to be published soon
- Part 4: How to monitor Power Platform solutions with Azure Application Insights : to be published soon
- Part 5: How to test Power Platform solutions : to be published soon
Why would we care?
There are Power Platform solutions, that are purely meant to be for personal productivity. They only impact the user who built them and it’s ok (for me) to have them as an unmanaged solution in the default environment.
For solutions though, that impact more people or that even drive mission-critical processes, it’s a good idea to
- develop them in a different environment than they are used in
- log the changes into a source control system
- publish the solution as a managed solution for users
- automate this process
If we don’t do that, it leads to solutions being subjects to change for end-users all the time - so that they can’t rely on a feature to be tested and working as planned. It also means that developers can’t revert/undo changes and it eventually leads to lots of manual and chaotic ad-hoc work, which puts unneccesary stress on admins and developers:
- We operate at open heart when developing solutions while users keep using them
- We can’t roll back to previous versions
- Code only exists as opaque zip files in an environment
How do we care?
Basics
Let’s first cover some basics so that everyone is on the same page: All Power Platform components are packaged and distributed across environments using solutions There are 2 types of solutions, unmanaged and managed solutions. Unmanaged solutions are a collection of references to components, there are no restrictions on what can be added, removed, or modified, and they are recommended only during development of the solution. Managed solution’s components can’t be added or removed or modified. They are recommended when a solution is not actively being customized. Source control should be your source of truth for storing and collaborating on your components.
How do we do this? There are several options:
- Power Platform Pipelines (built-in, super easy to use, super limited as well.)
- GitHub actions
- Power Platform Build Tools for Azure DevOps
I will explain how this works for Azure DevOps, as I use this in nearly all my projects at my customers.
What is Azure DevOps Build Tools for Power Platform
- Azure DevOps Pipelines automatically build code projects and ship them to any target
- They support both GitHub and Azure repos (but there is no explicit value for me to store the codein GitHub when I use Azure DevOps)
- Azure DevOps Build Tools for Power Platform are a collection of build and release tasks related to Power Platform
Prerequisites / little bit of prep work
As we do not want to develop the solution in the same environment as we want users to use, we’d need at least 2 environments.
I’m a big fan of a 4 environment setup
Overview of environments
- DEV - only for development purposes, only developers and maintainers have access to it
- BUILD - only used to store the exported unmanaged solution and export it as managed solution (this separates the solution from the solution that is currently and ongoing developed in DEV). I want a separate (and new!) environment to build the solutions so that no Gremlins (coined by J. Rapp) could interfere (connection references, environment variables, etc.)
- TEST - only for User Acceptance Testing - A subset of endusers can test functionality of this release.
- PROD - production use of apps in the organization
💡 Obviously, if there is a requirement for a new environment in the organization, it’s a good idea to then have this set of environments.
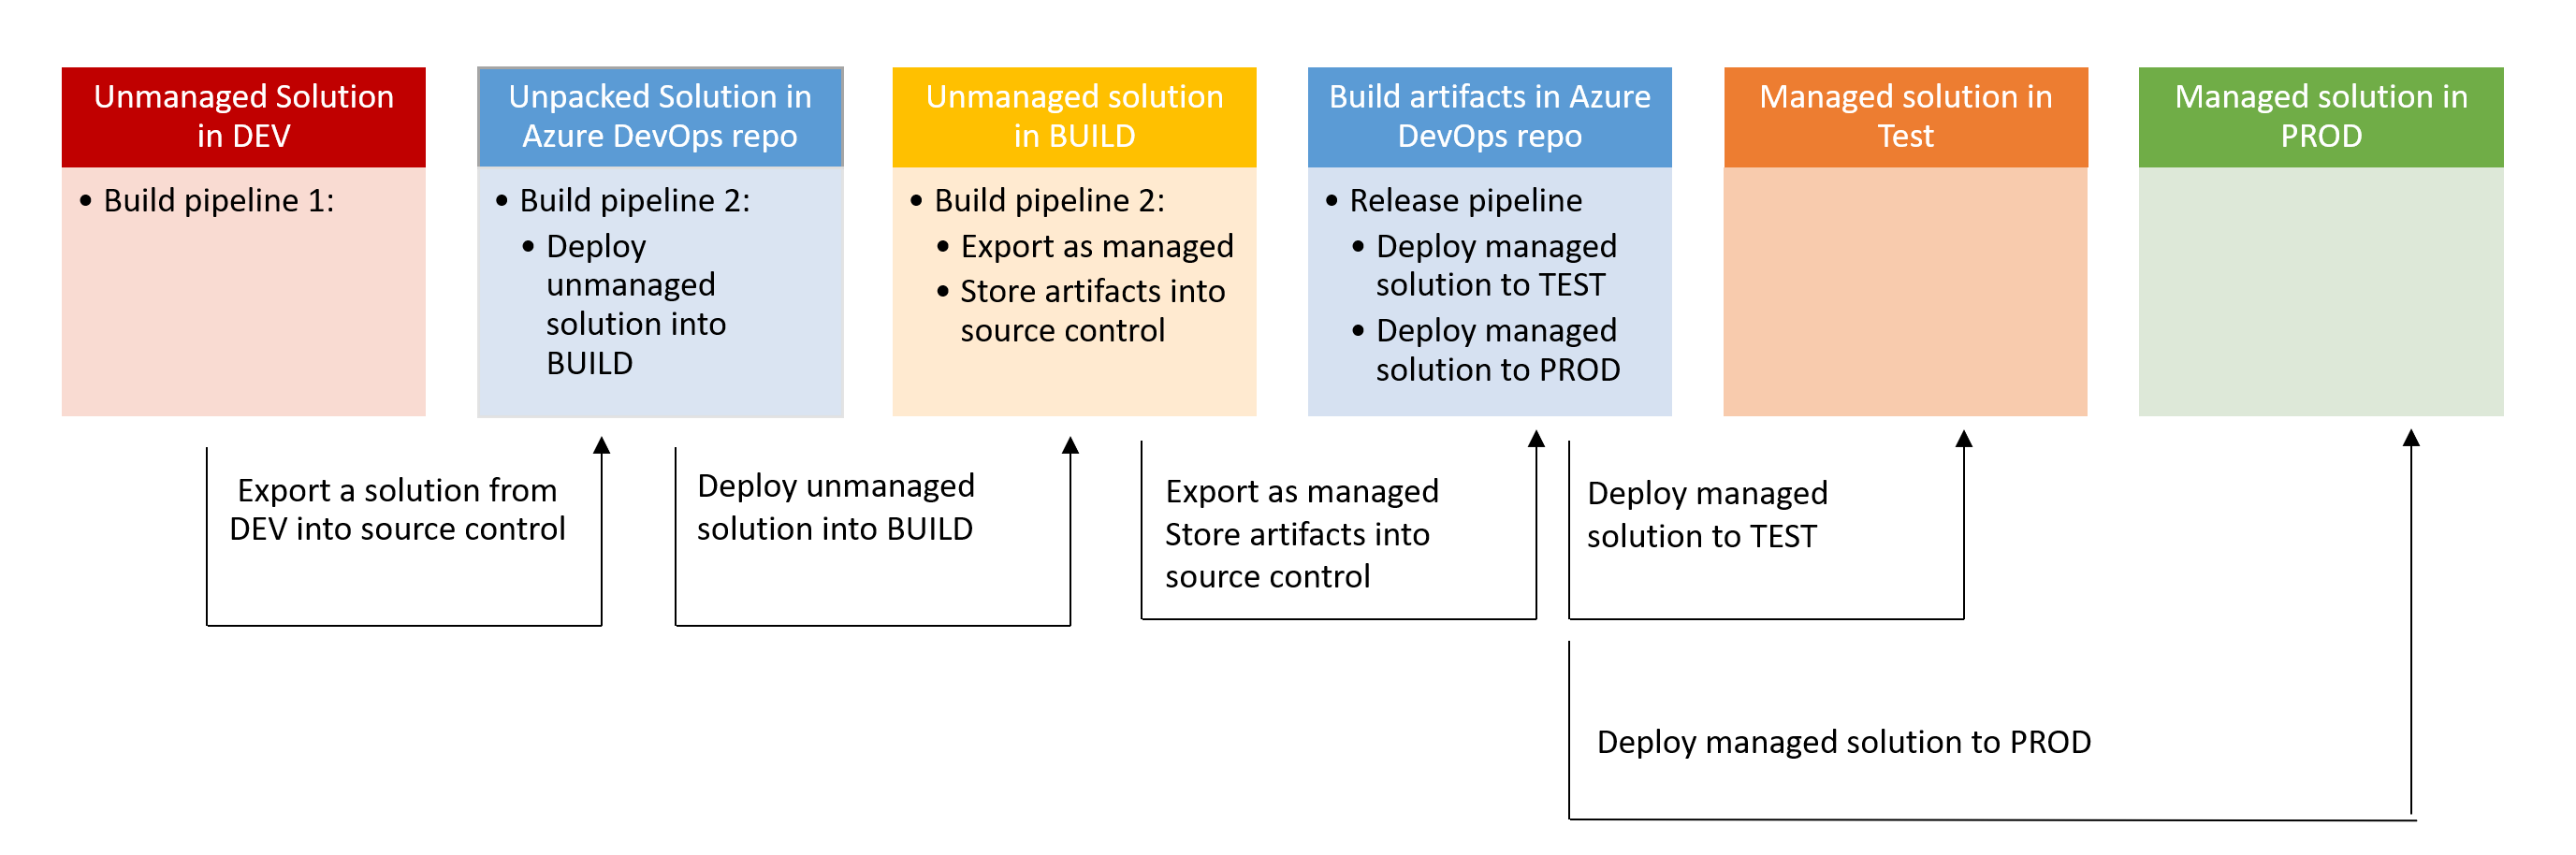
Process of building and releasing versions
Every new feature, all bug fixes are implemented in DEV. Once the release passed the technical tests in DEV, it is build in BUILD and then finally released to TEST, where end users can try out and test the release. If they approve it, the release gets published to PROD. If they don’t approve it, development starts again in DEV and bug fixes/features get implemented in the next sprint.
Setup instructions
You will obviously need to have an Azure DevOps organization, and within it a new project. In this project
- Create a repository to hold your code
- Optional, but a good idea: Clone this repo so you can work locally in VS Code
- Optional, but also a good idea: invite co-workers to the project
- Open Project Settings (lower left corner) –> Repositories –> Security and select Contribute permissions for both (!)
- Project Collection Service Accounts permissions
- Build Service permissions
Create environments
As a first step, we need to ensure that we have all environments in place:
- Open aka.ms/ppac
- Create environments for DEV, BUILD, TEST, PROD - make sure all of them have a Dataverse database
Authentication
To authenticate in Azure DevOps against actions in Dataverse, you will need to
- create an app registration in Microsoft Entra ID
- link this app registration to an app user in the respective Dataverse environment
- create a service connection in Azure DevOps
Let’s get our hands dirty.
Create an app registration
You can either create the app registration with a single line command in CLI for Microsoft 365. I posted a detailed blog post here.
m365 aad app add --name 'myApp001' --withSecret
or create it in the UI:
- Open portal.azure.com
- Select Microsoft Entra ID
- Select App registrations –> New app registration
- Give it a name, select Register
- Select Certificates and secrets, create a secret, take note of it. (No I mean for real - you will not be able to se the value again if you navigate away.)
- Also copy the values of the App id and Tenant id - we need them later.
💡 If you think that you should grant API permissions for Dynamics CRM -> user_impersonation, please don’t be fooled. This is not necessary, as access to Dataverse exclusively handled by Security Roles. You can read more about it in this blog post:Why your Power Platform service principal doesn’t need a Dynamics user_impersonation scope
Create an Application user
Now we need to make sure that we create an Application user in all of our 4 environments.
- Open aka.ms/ppac
- Select your environment
- Select Settings
- Select Application users under Users & permissions
- Select new app user
- Select add an app
- Select the app registration from Microsoft Entra Id
- Select the business unit
- Select the pen icon next to Security roles and add the
System Administrator role - Select Save
💡Remember to do this for all environments!
Create Service connections in Azure DevOps
To be able to use the Power Platform Build Tools in Azure DevOps, we first need to install them. You can find the download here
- Return to Azure DevOps, select Project settings –> Pipelines –> Service connections
- Select new service Connection
- Select Power Platform
- Select Application Id and secret as authentication method
- Obtain the Instance URL from your DEV environment ( Open make.powerapps.com, Select the DEV environment, Select the gear icon ⚙️ in the top right corner, Select Settings, copy the Instance URL)
- Paste this value to Server URL
- Paste Tenant id, App id, and App secret from your app registration into the respective fields
- Save the connection under name DEV Service Principal
- Repeat this steps for BUILD, TEST, and PROD
Create Build pipeline 1 - Export from DEV
This Build Pipelines objective is to export a solution from DEV into source control (Azure DevOps repos)
It’s a good practice to write your pipelines in YAML - This way you can also log the code that describes your pipeline into source control. Here is the snippet:
Please note that
- I have a variable called
SolutionNameso that I can reuse this pipeline for any other Power Platform solution - I like to have my zip file in the
solutionfolder and the unpacked files in thesourcecodefolder
pool:
  name: Azure Pipelines
#Your build pipeline references the ‘SolutionName’ variable, which you’ve selected to be settable at queue time. Create or edit the build pipeline for this YAML file, define the variable on the Variables tab, and then select the option to make it settable at queue time. See https://go.microsoft.com/fwlink/?linkid=865971

steps:
- task: microsoft-IsvExpTools.PowerPlatform-BuildTools.tool-installer.PowerPlatformToolInstaller@2
  displayName: 'Power Platform Tool Installer '

- task: microsoft-IsvExpTools.PowerPlatform-BuildTools.export-solution.PowerPlatformExportSolution@2
  displayName: 'Power Platform Export Solution  - unmanaged'
  inputs:
    authenticationType: PowerPlatformSPN
    PowerPlatformSPN: 'DEV Service Principal'
    SolutionName: '$(SolutionName)'
    SolutionOutputFile: 'solution/$(SolutionName).zip'

- task: microsoft-IsvExpTools.PowerPlatform-BuildTools.unpack-solution.PowerPlatformUnpackSolution@2
  displayName: 'Power Platform Unpack Solution '
  inputs:
    SolutionInputFile: 'solution/$(SolutionName).zip'
    SolutionTargetFolder: '$(Build.SourcesDirectory)\sourcecode'
    ProcessCanvasApps: true

- script: |
   echo commit all changes
   git config user.email "<my email>
   git config user.name "<my name>"
   git checkout -B main
   git add --all
   git commit -m "adds source code files from DEV"
   git push --set-upstream origin main
  displayName: 'Command Line Script'
If you prefer to build the pipeline in a visual editor (and later on copy/paste the yaml), this is how it works: First, enable classic editor in the projects settings.Then,
- Select Pipelines –> New Pipeline –> Use the Classic Editor
- Select the Source as Azure Repos Git, select your Project, Repository and Branch and select continue
- Select Start with empty job
- Select Agent Job 1 and check Allow Scripts to access OAuth token
- Add task Power Platform Tool Installer
- Add task Power Platform Export Solution
- As Service Connection select
Dev Service Principal - Provide the solution name (not the displayName) and the folder for the output - select the … menu for that. You can also use variable for that.
- Uncheck the Export as Managed solution checkmark
- Add task Power Platform Unpack solution
- Specify Input file (its the output file location from previous task)
- Specify target folder to output th unpacked files (can sit at the root of the project - use the … menu)
- Add a task Command Line script, and paste the below script
echo commit all changes
git config user.email “<your git email>”
git config user.name "<your git user name>"
git checkout -B main
git add --all
git commit -m "code commit"
git push --set-upstream origin main
- Save and queue the pipeline and wait for it to run successfully
Create Build pipeline 2 - Build Managed Solution
Now onto building pipeline 2
Objective here is to deploy the unmanaged solution to our BUILD environment, so that we can still continue to modify code in DEV.
Here is the yaml view:
pool:
name: Azure Pipelines
variables:
SolutionName: '$(SolutionName)'
steps:
- task: microsoft-IsvExpTools.PowerPlatform-BuildTools.tool-installer.PowerPlatformToolInstaller@2
displayName: 'Power Platform Tool Installer '
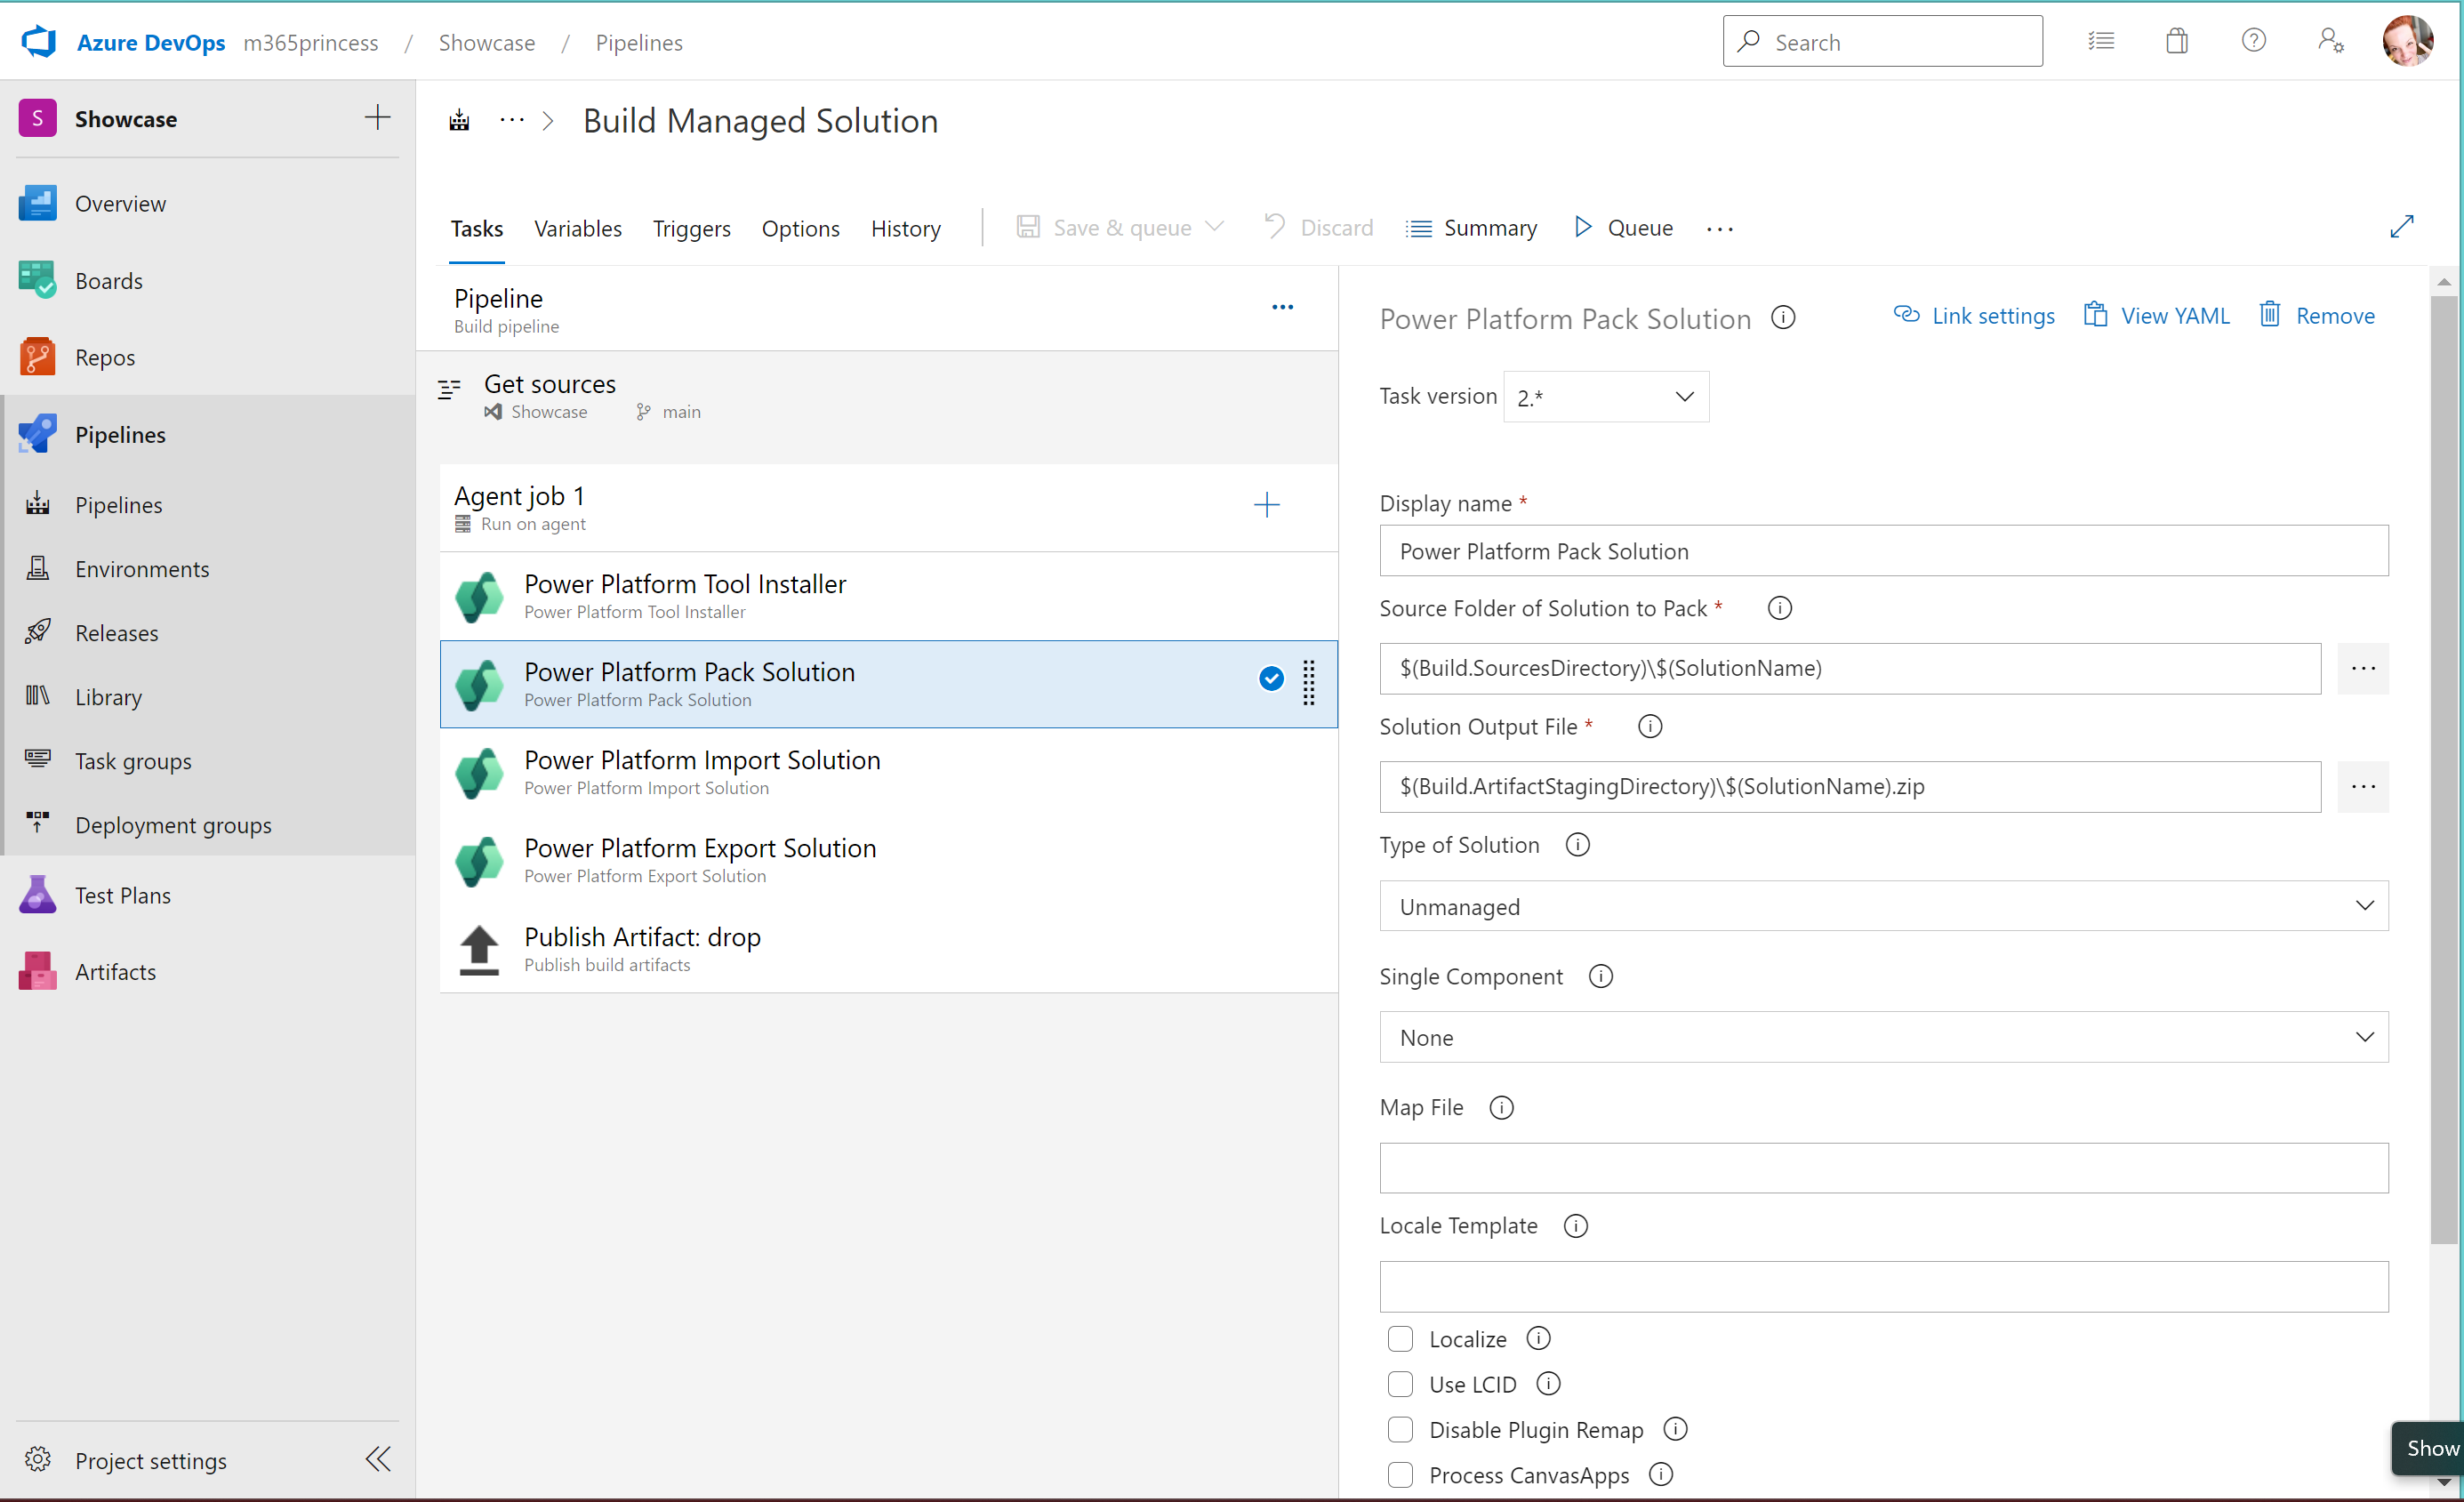
- task: microsoft-IsvExpTools.PowerPlatform-BuildTools.pack-solution.PowerPlatformPackSolution@2
displayName: 'Power Platform Pack Solution '
inputs:
SolutionSourceFolder: sourcecode
SolutionOutputFile: '$(Build.ArtifactStagingDirectory)\$(SolutionName).zip'
- task: microsoft-IsvExpTools.PowerPlatform-BuildTools.import-solution.PowerPlatformImportSolution@2
displayName: 'Power Platform Import Solution '
inputs:
authenticationType: PowerPlatformSPN
PowerPlatformSPN: 'BUILD Service Principal'
SolutionInputFile: '$(Build.ArtifactStagingDirectory)\$(SolutionName).zip'
- task: microsoft-IsvExpTools.PowerPlatform-BuildTools.export-solution.PowerPlatformExportSolution@2
displayName: 'Power Platform Export Solution - managed'
inputs:
authenticationType: PowerPlatformSPN
PowerPlatformSPN: 'BUILD Service Principal'
SolutionName: '$(SolutionName)'
SolutionOutputFile: '$(Build.ArtifactStagingDirectory)/$(SolutionName)_managed.zip'
Managed: true
OverwriteLocalSolution: false
- task: PublishBuildArtifacts@1
displayName: 'Publish Artifact: drop'
inputs:
PathtoPublish: '$(Build.ArtifactStagingDirectory)\'
For the classic editor, use the following
Now onto building pipeline 2
- Add tasks
- Power Platform Tool Installer
- Power Platform Pack Solution
- Power Platform Import Solution
- Power Platform Export Solution
- Publish Artifact drop
Power Platform Pack Solution
This task will pack the unpacked files that are currently sitting in DEV as an unmanaged solution:
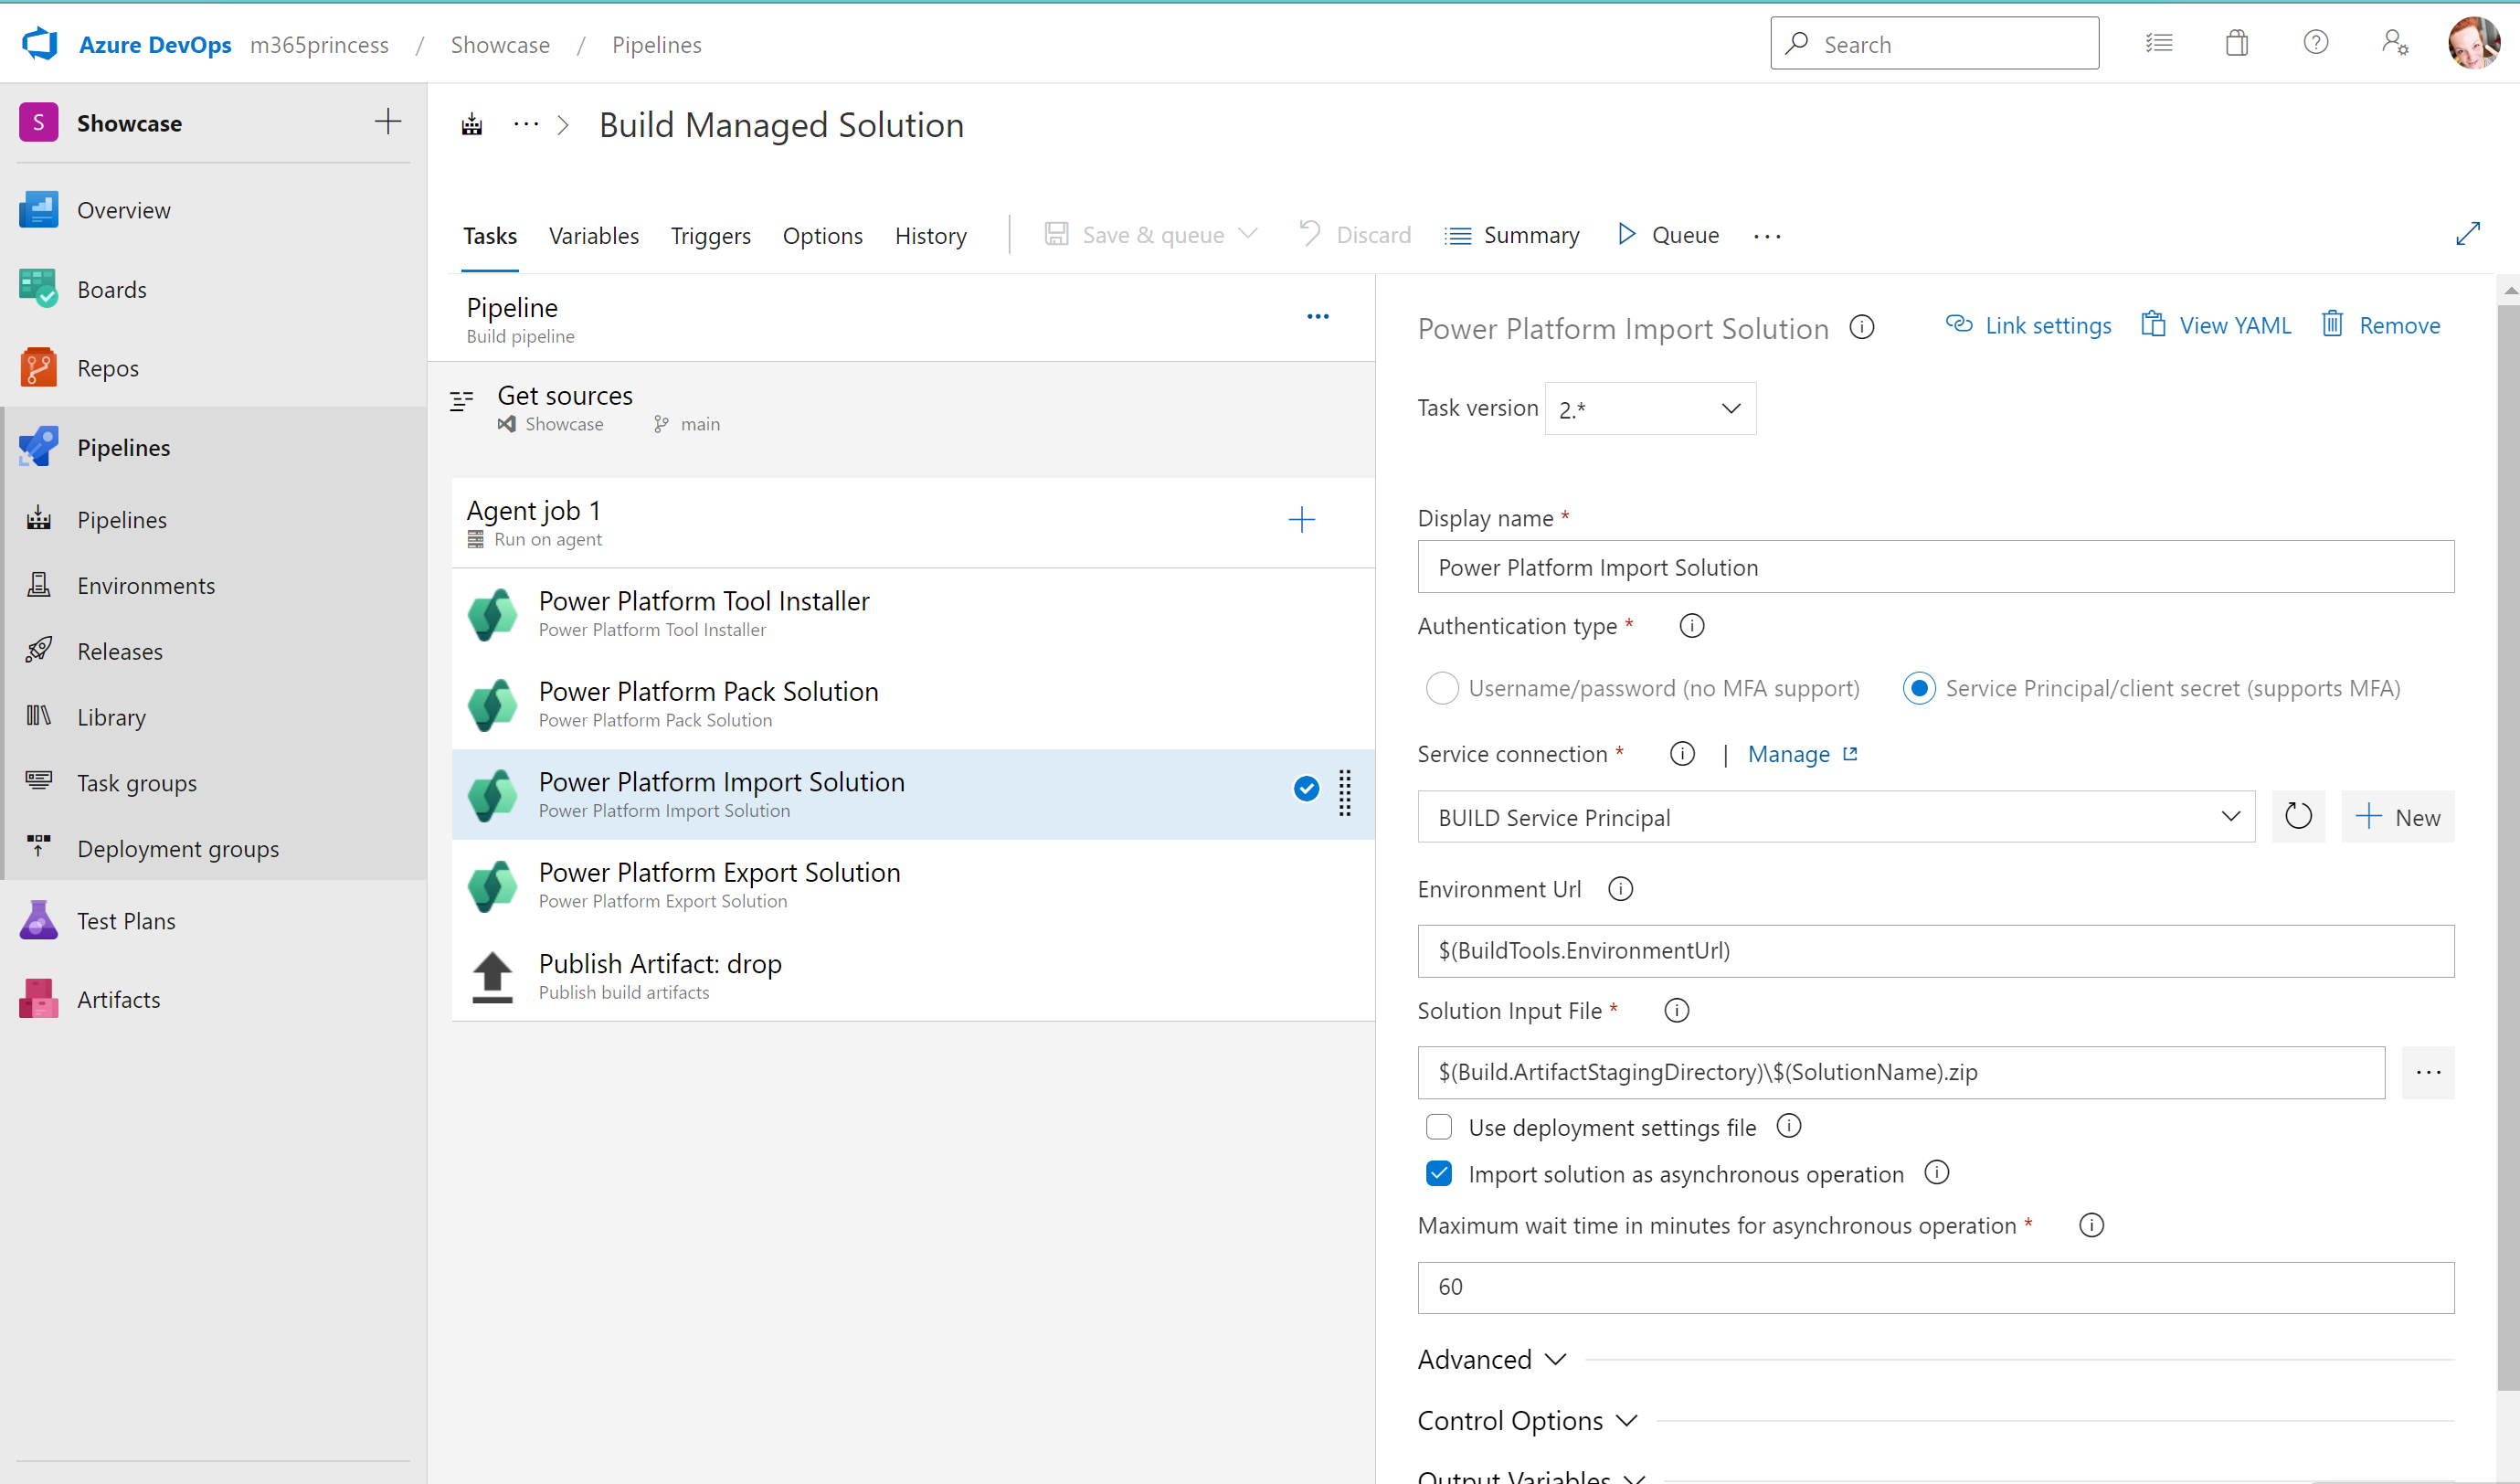
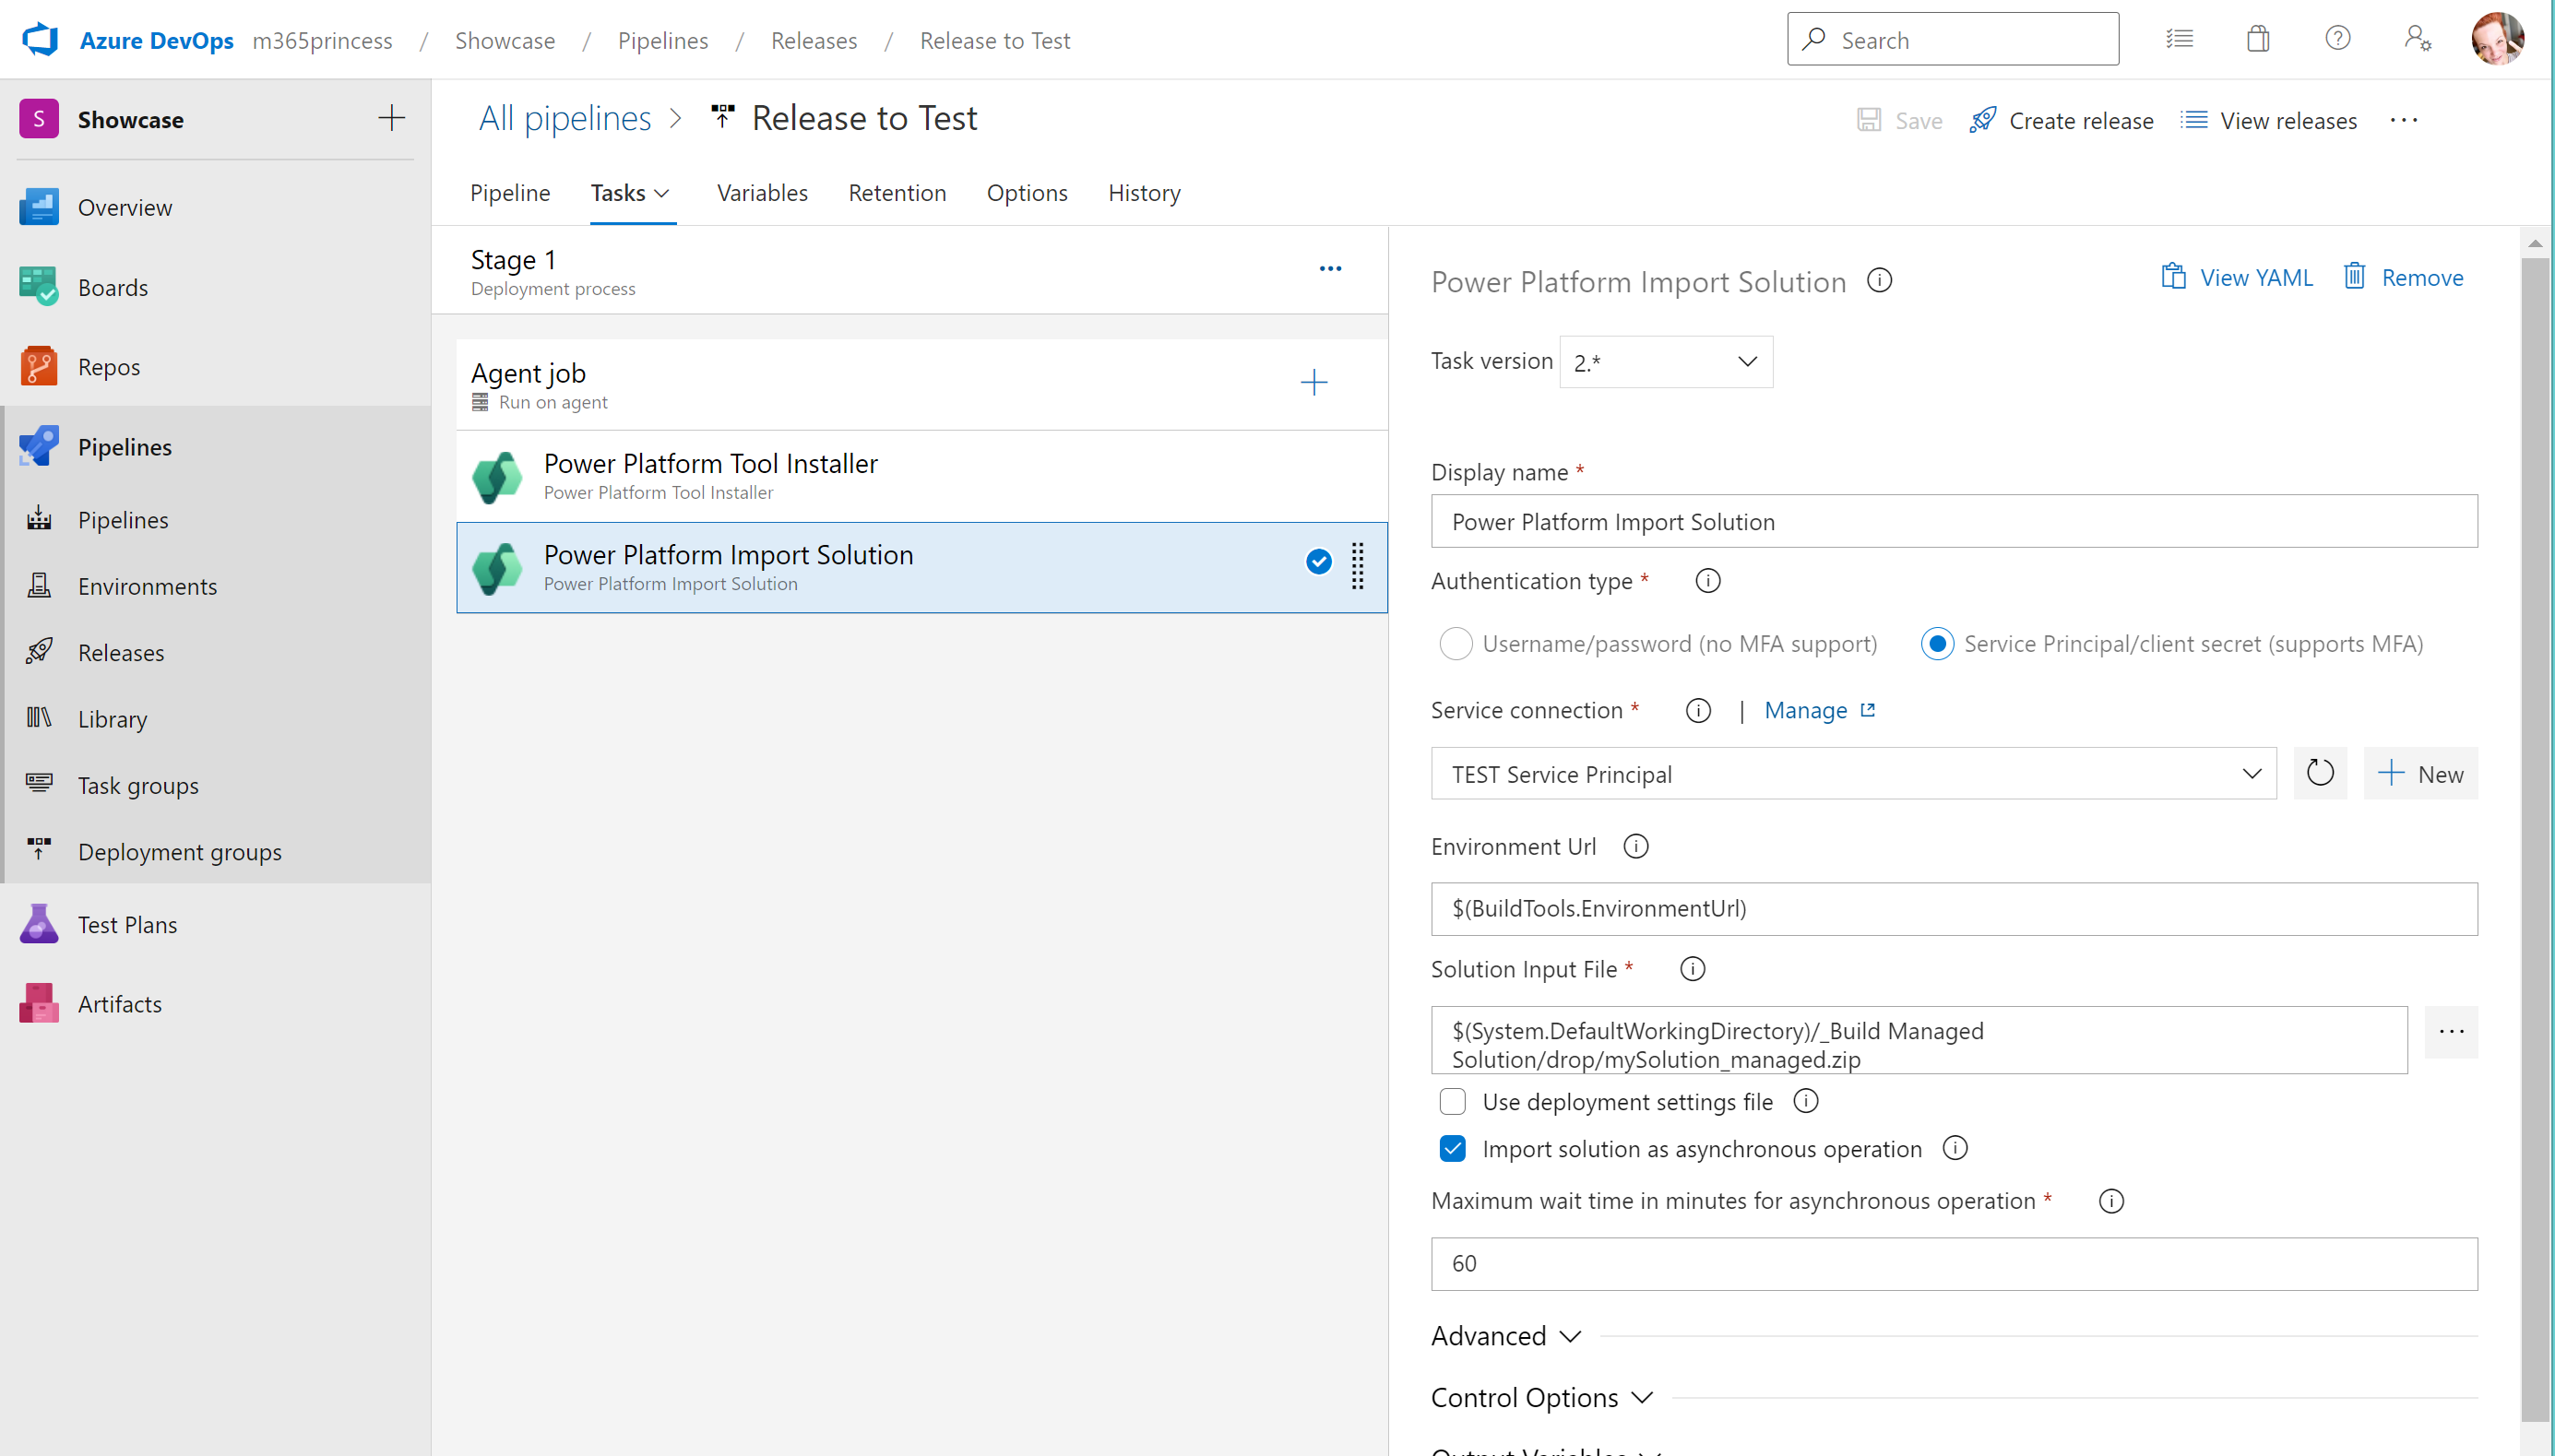
Power Platform Import Solution
This task will now import the unmanaged solution into our BUILD environment.
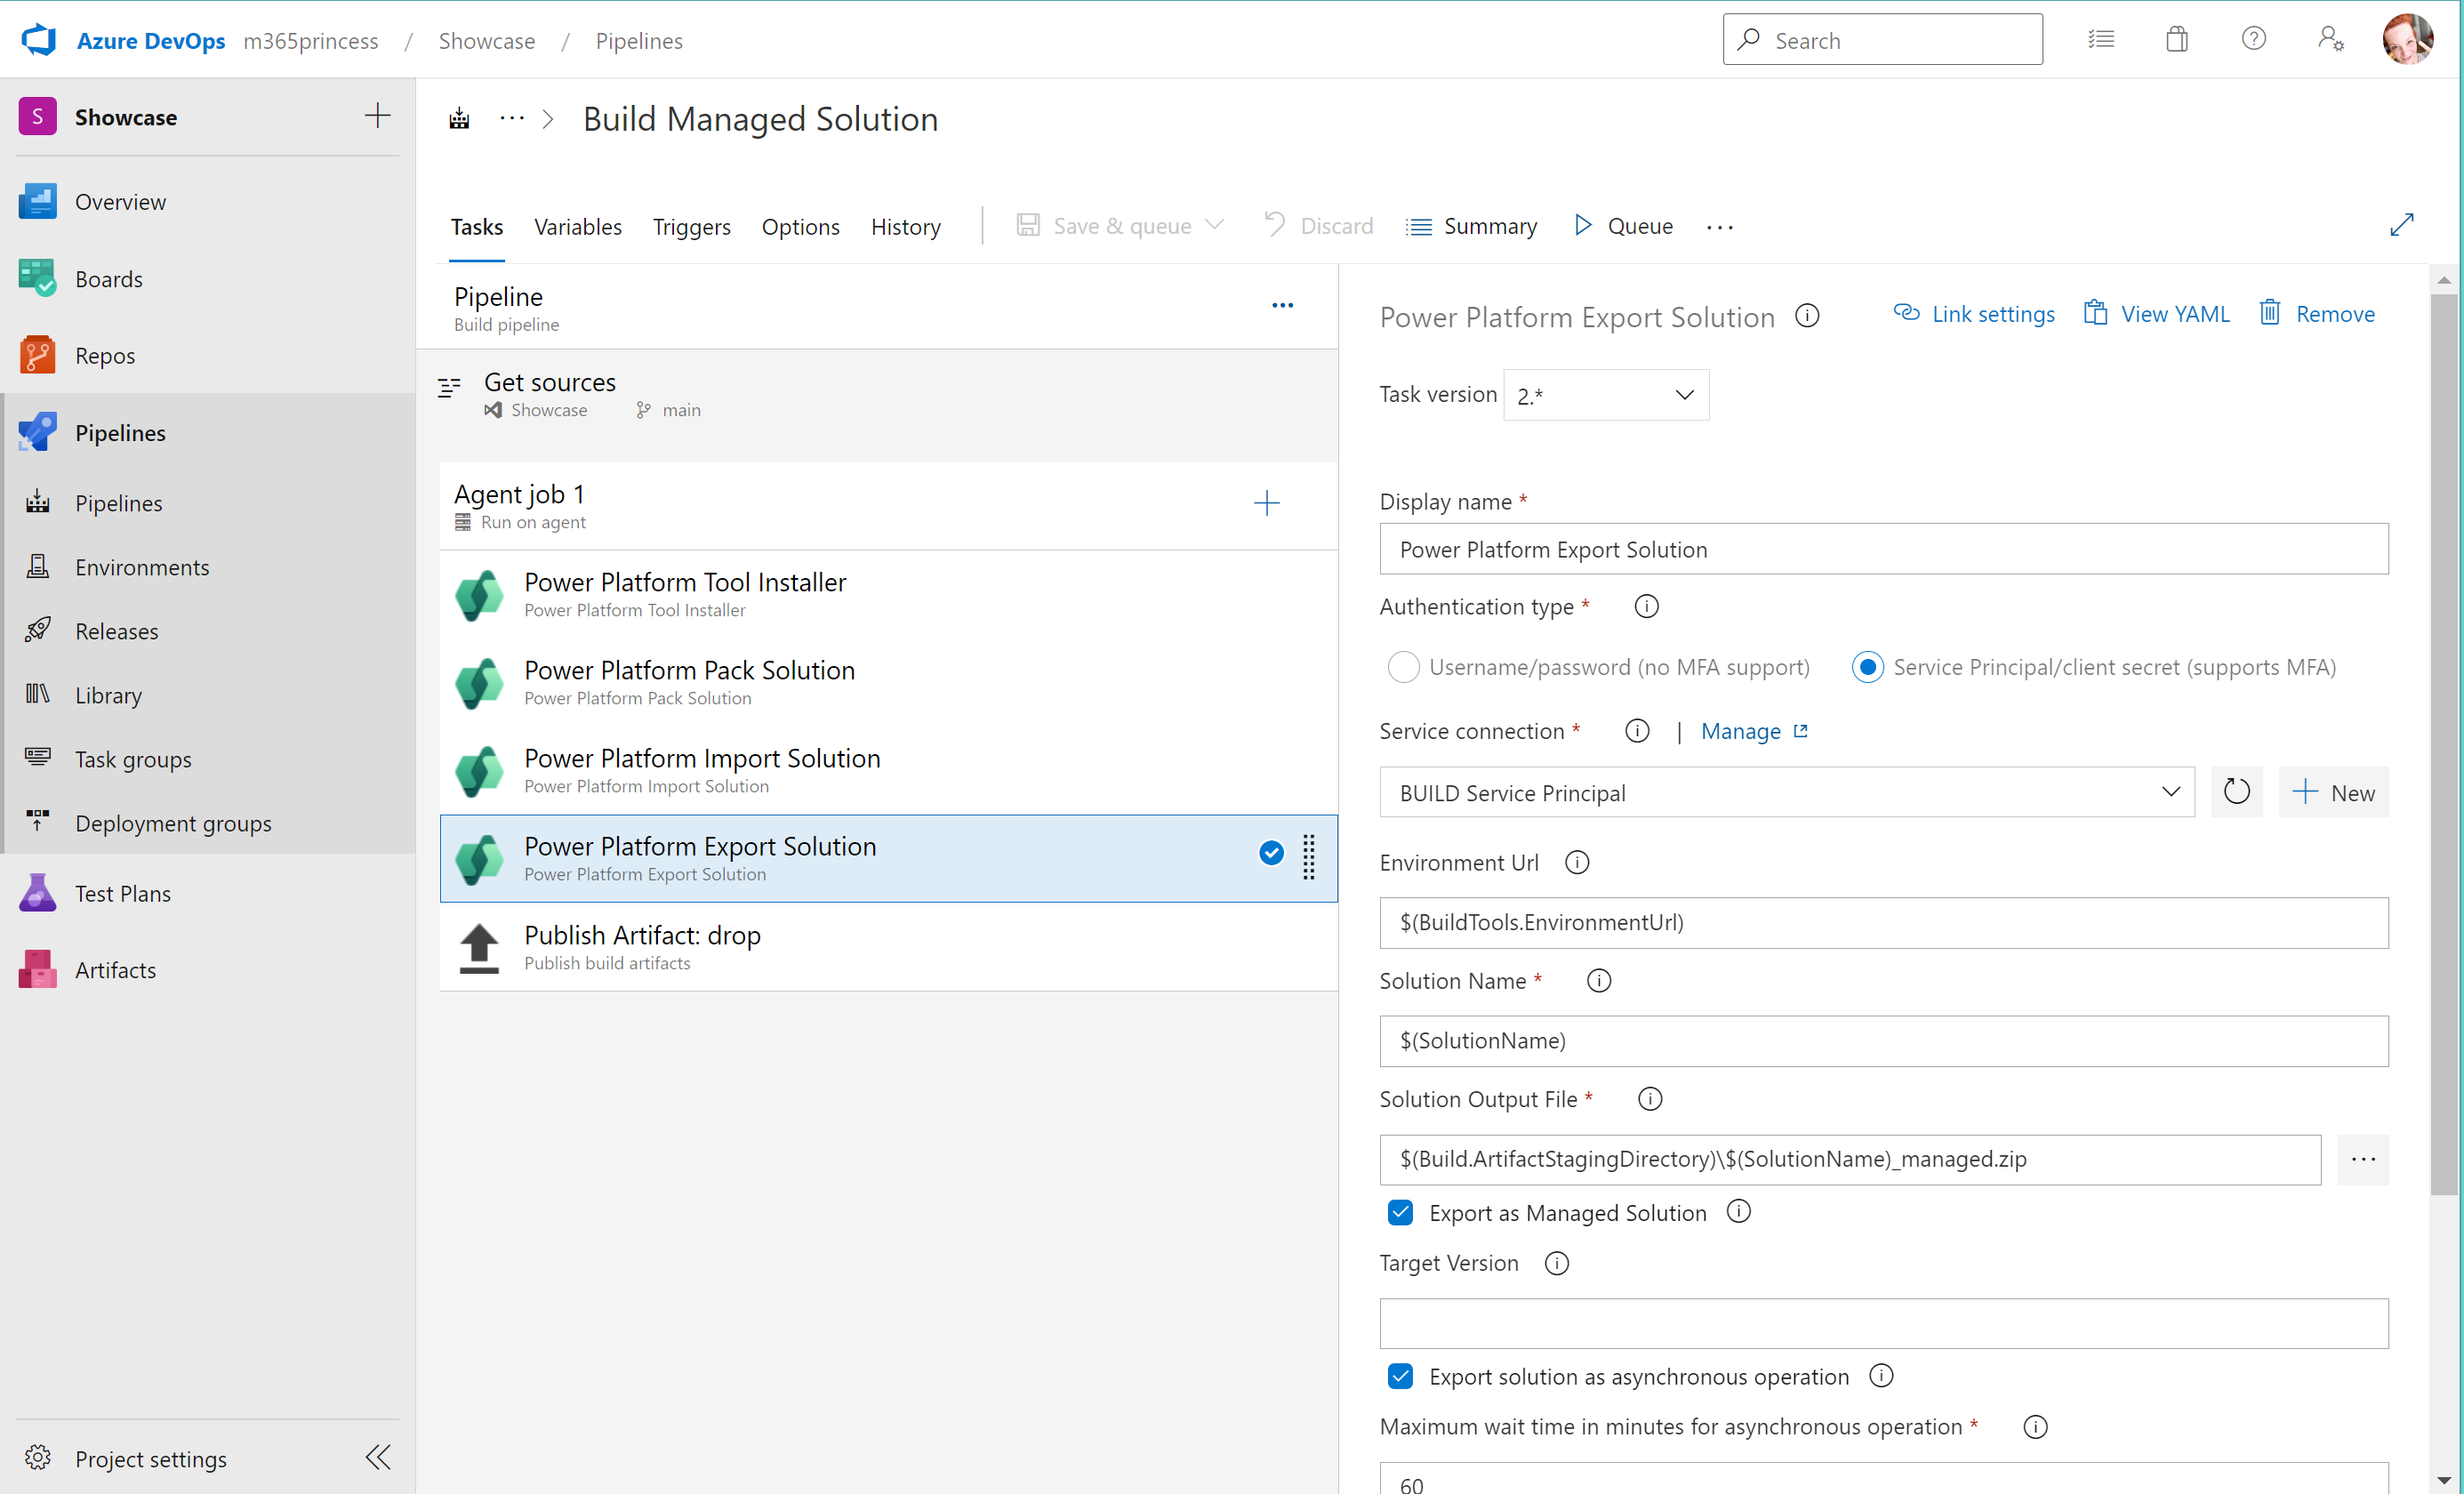
Power Platform Export Solution
This task exports the solution as a managed solution:
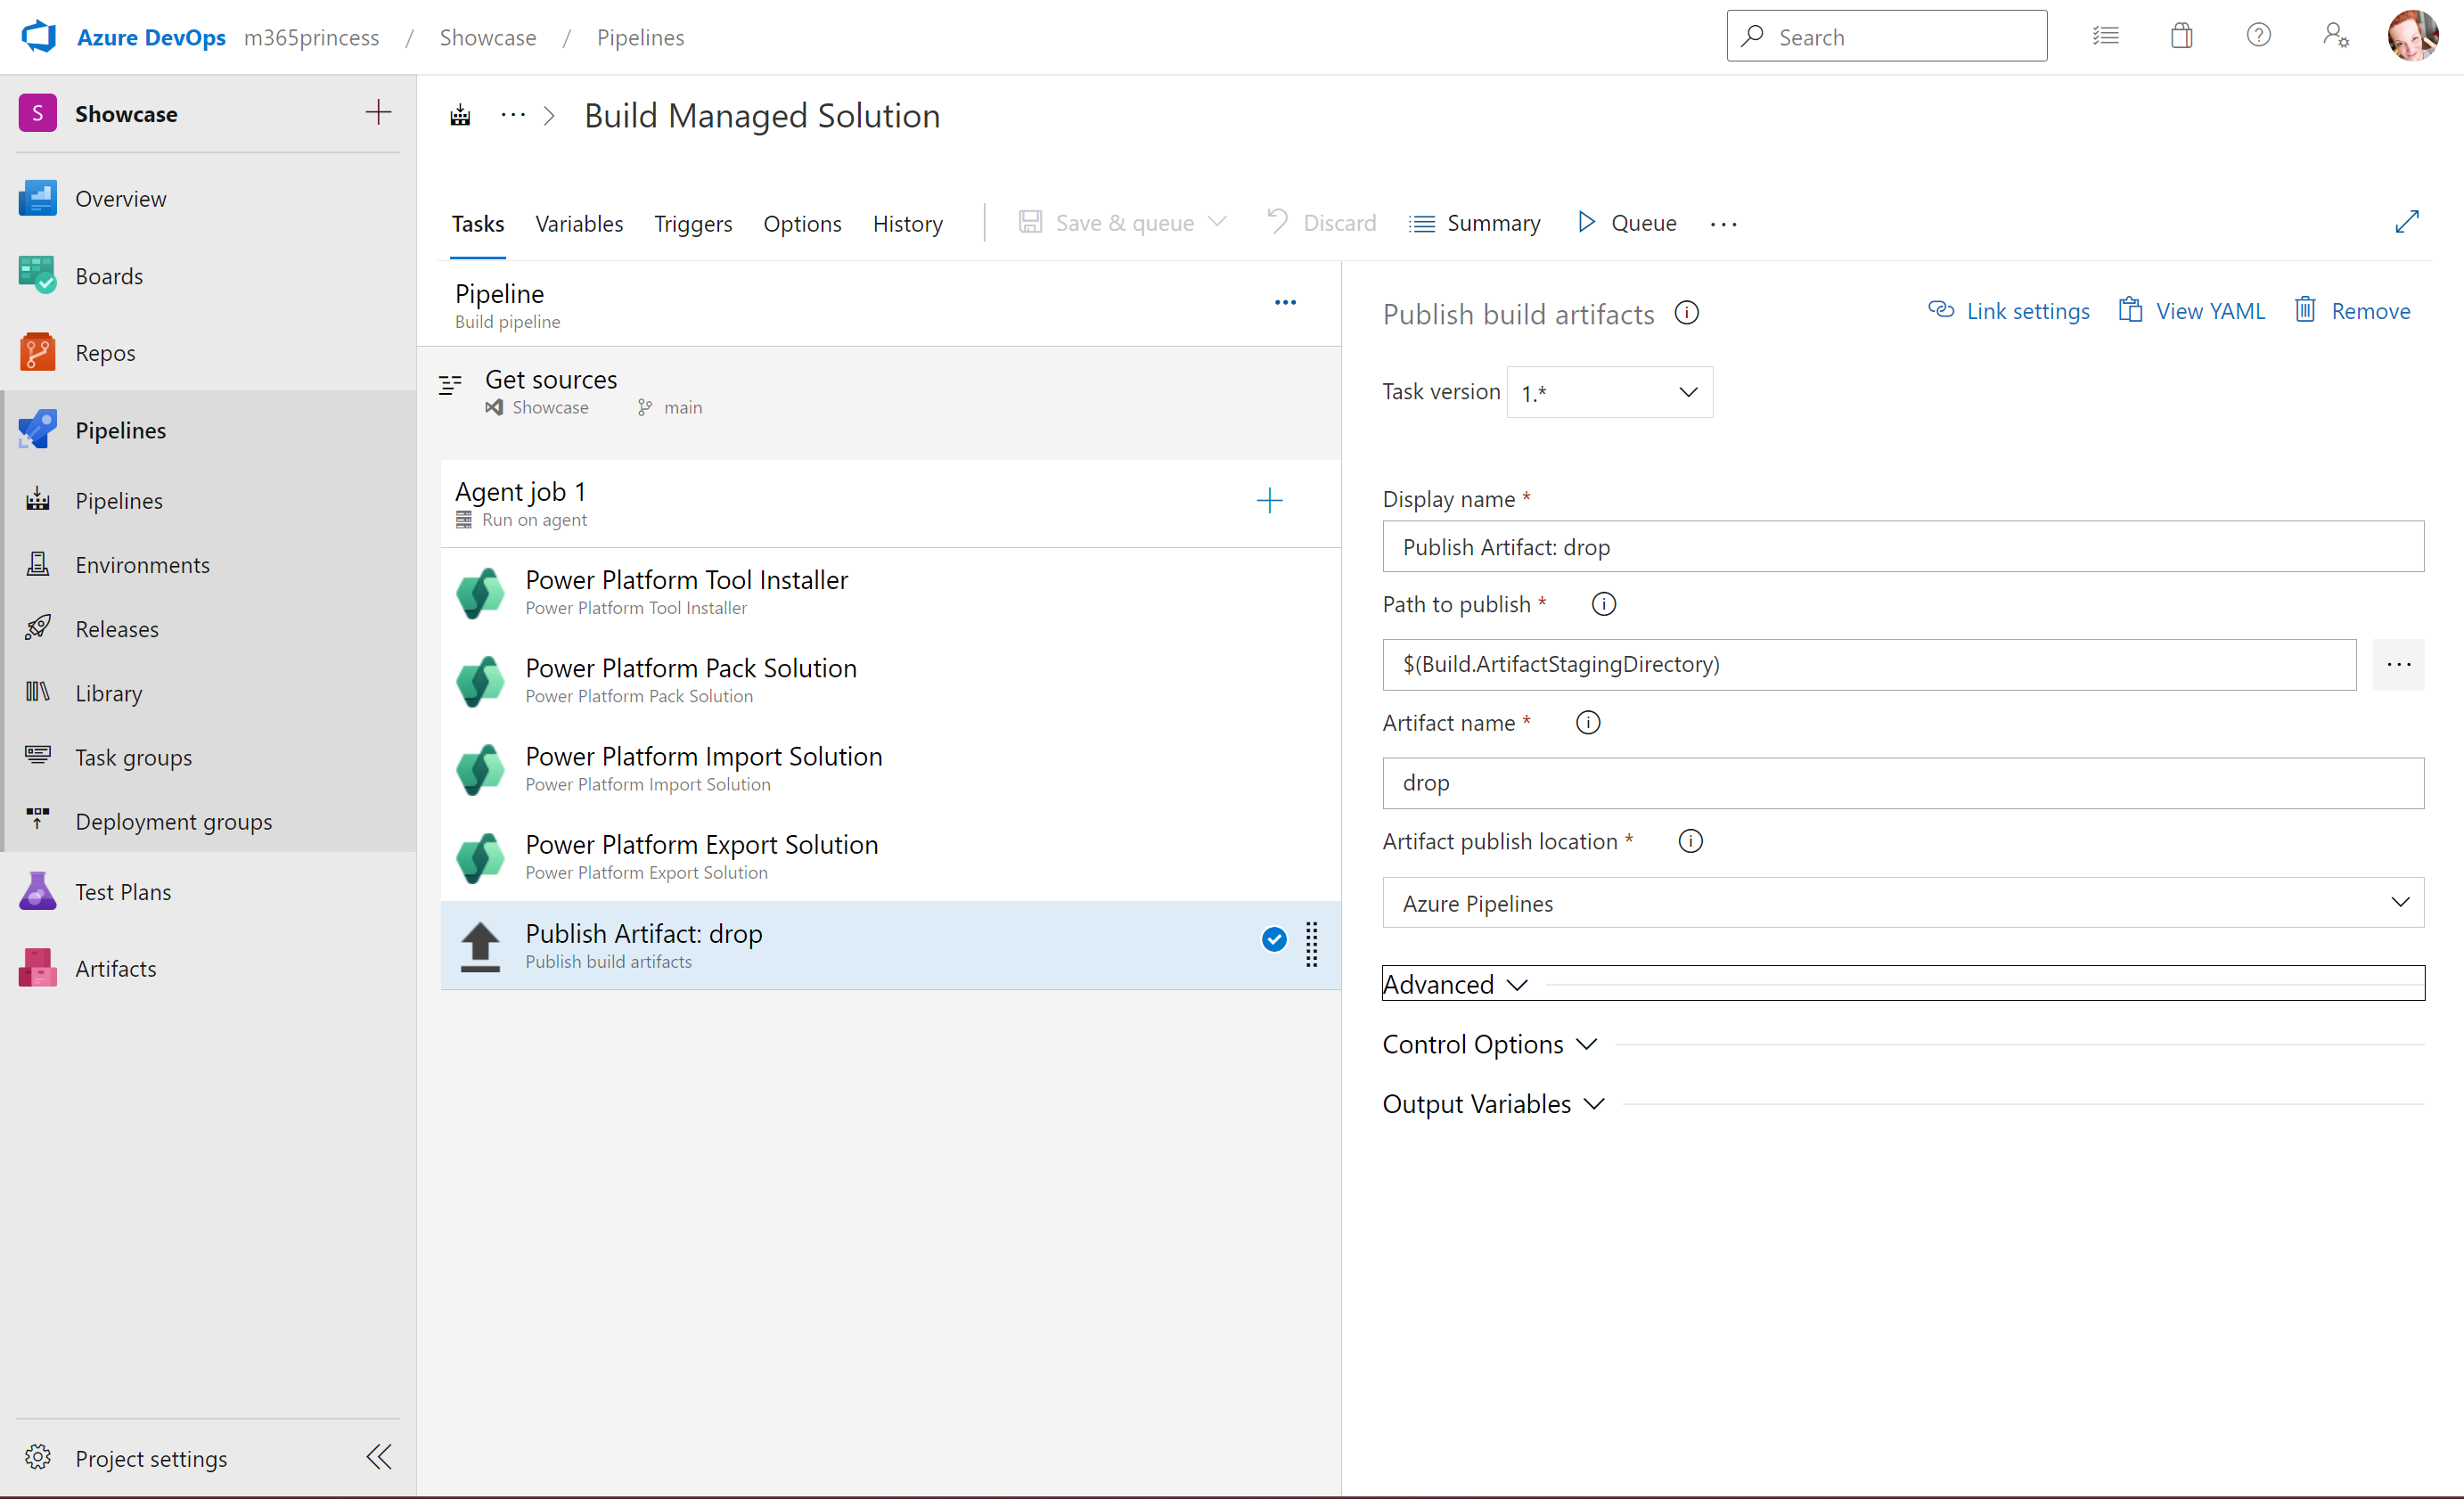
Publish Artifact Drop
As a last step, we will now publish the build artifacts
Release pipeline to TEST
Now that we have our managed solution in the BUILD environment, we will want to release it to TEST or to PROD (depends on requirements of User Acceptance Testing)
- Under Pipelines, select Releases
- Under Artifacts, select your project and the source (its the Build pipeline 2 - Build Managed Solution)
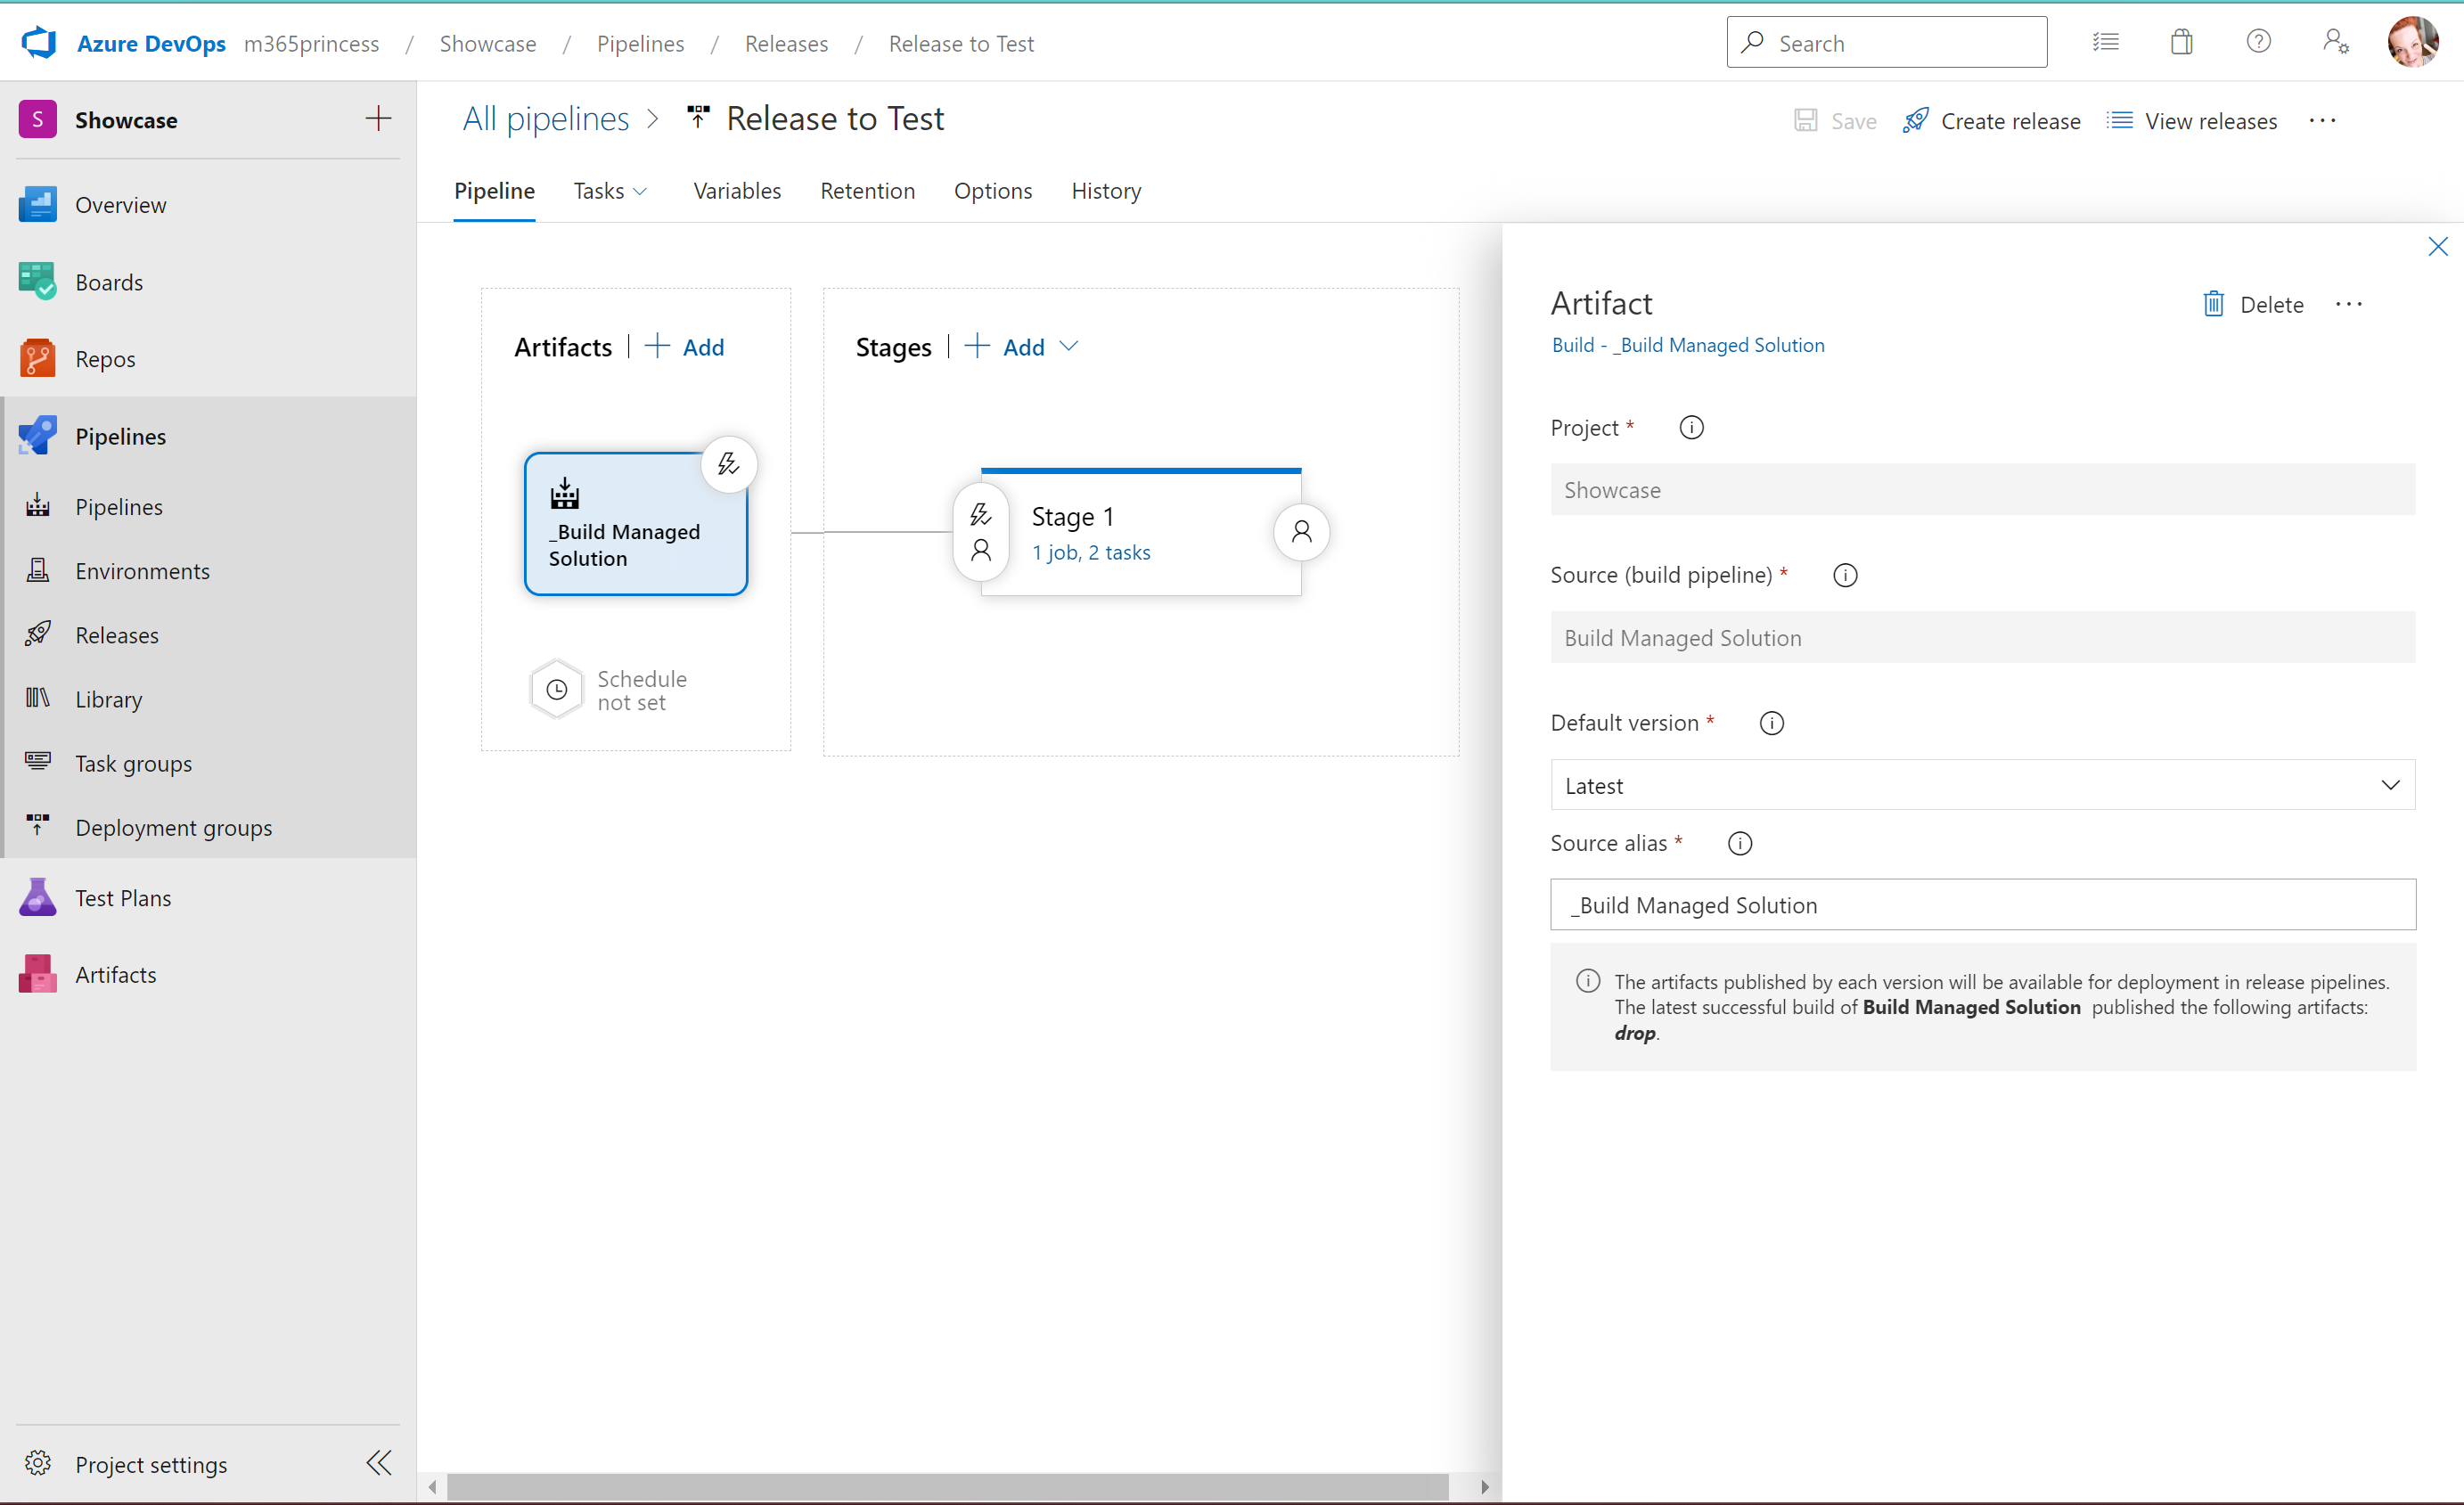
- For Stage 1, add 2 tasks
- Power Platform Tool Installer
- Power Platform Import Solution
- Create a Release
- Deploy the Release
Release pipeline to PROD
Create another Release pipeline for PROD
Process of CI/CD
The process of Continuos Improvement/Continuos Deployment (CI/CD) describes how we can now iterate in a secure way to improve our app, while making sure that users are not affected by changes happening in DEV, have the chance to exactly test in TEST what they will get in PROD and developers can feel at ease as all code is stored in source control and commits can be easily tracked.
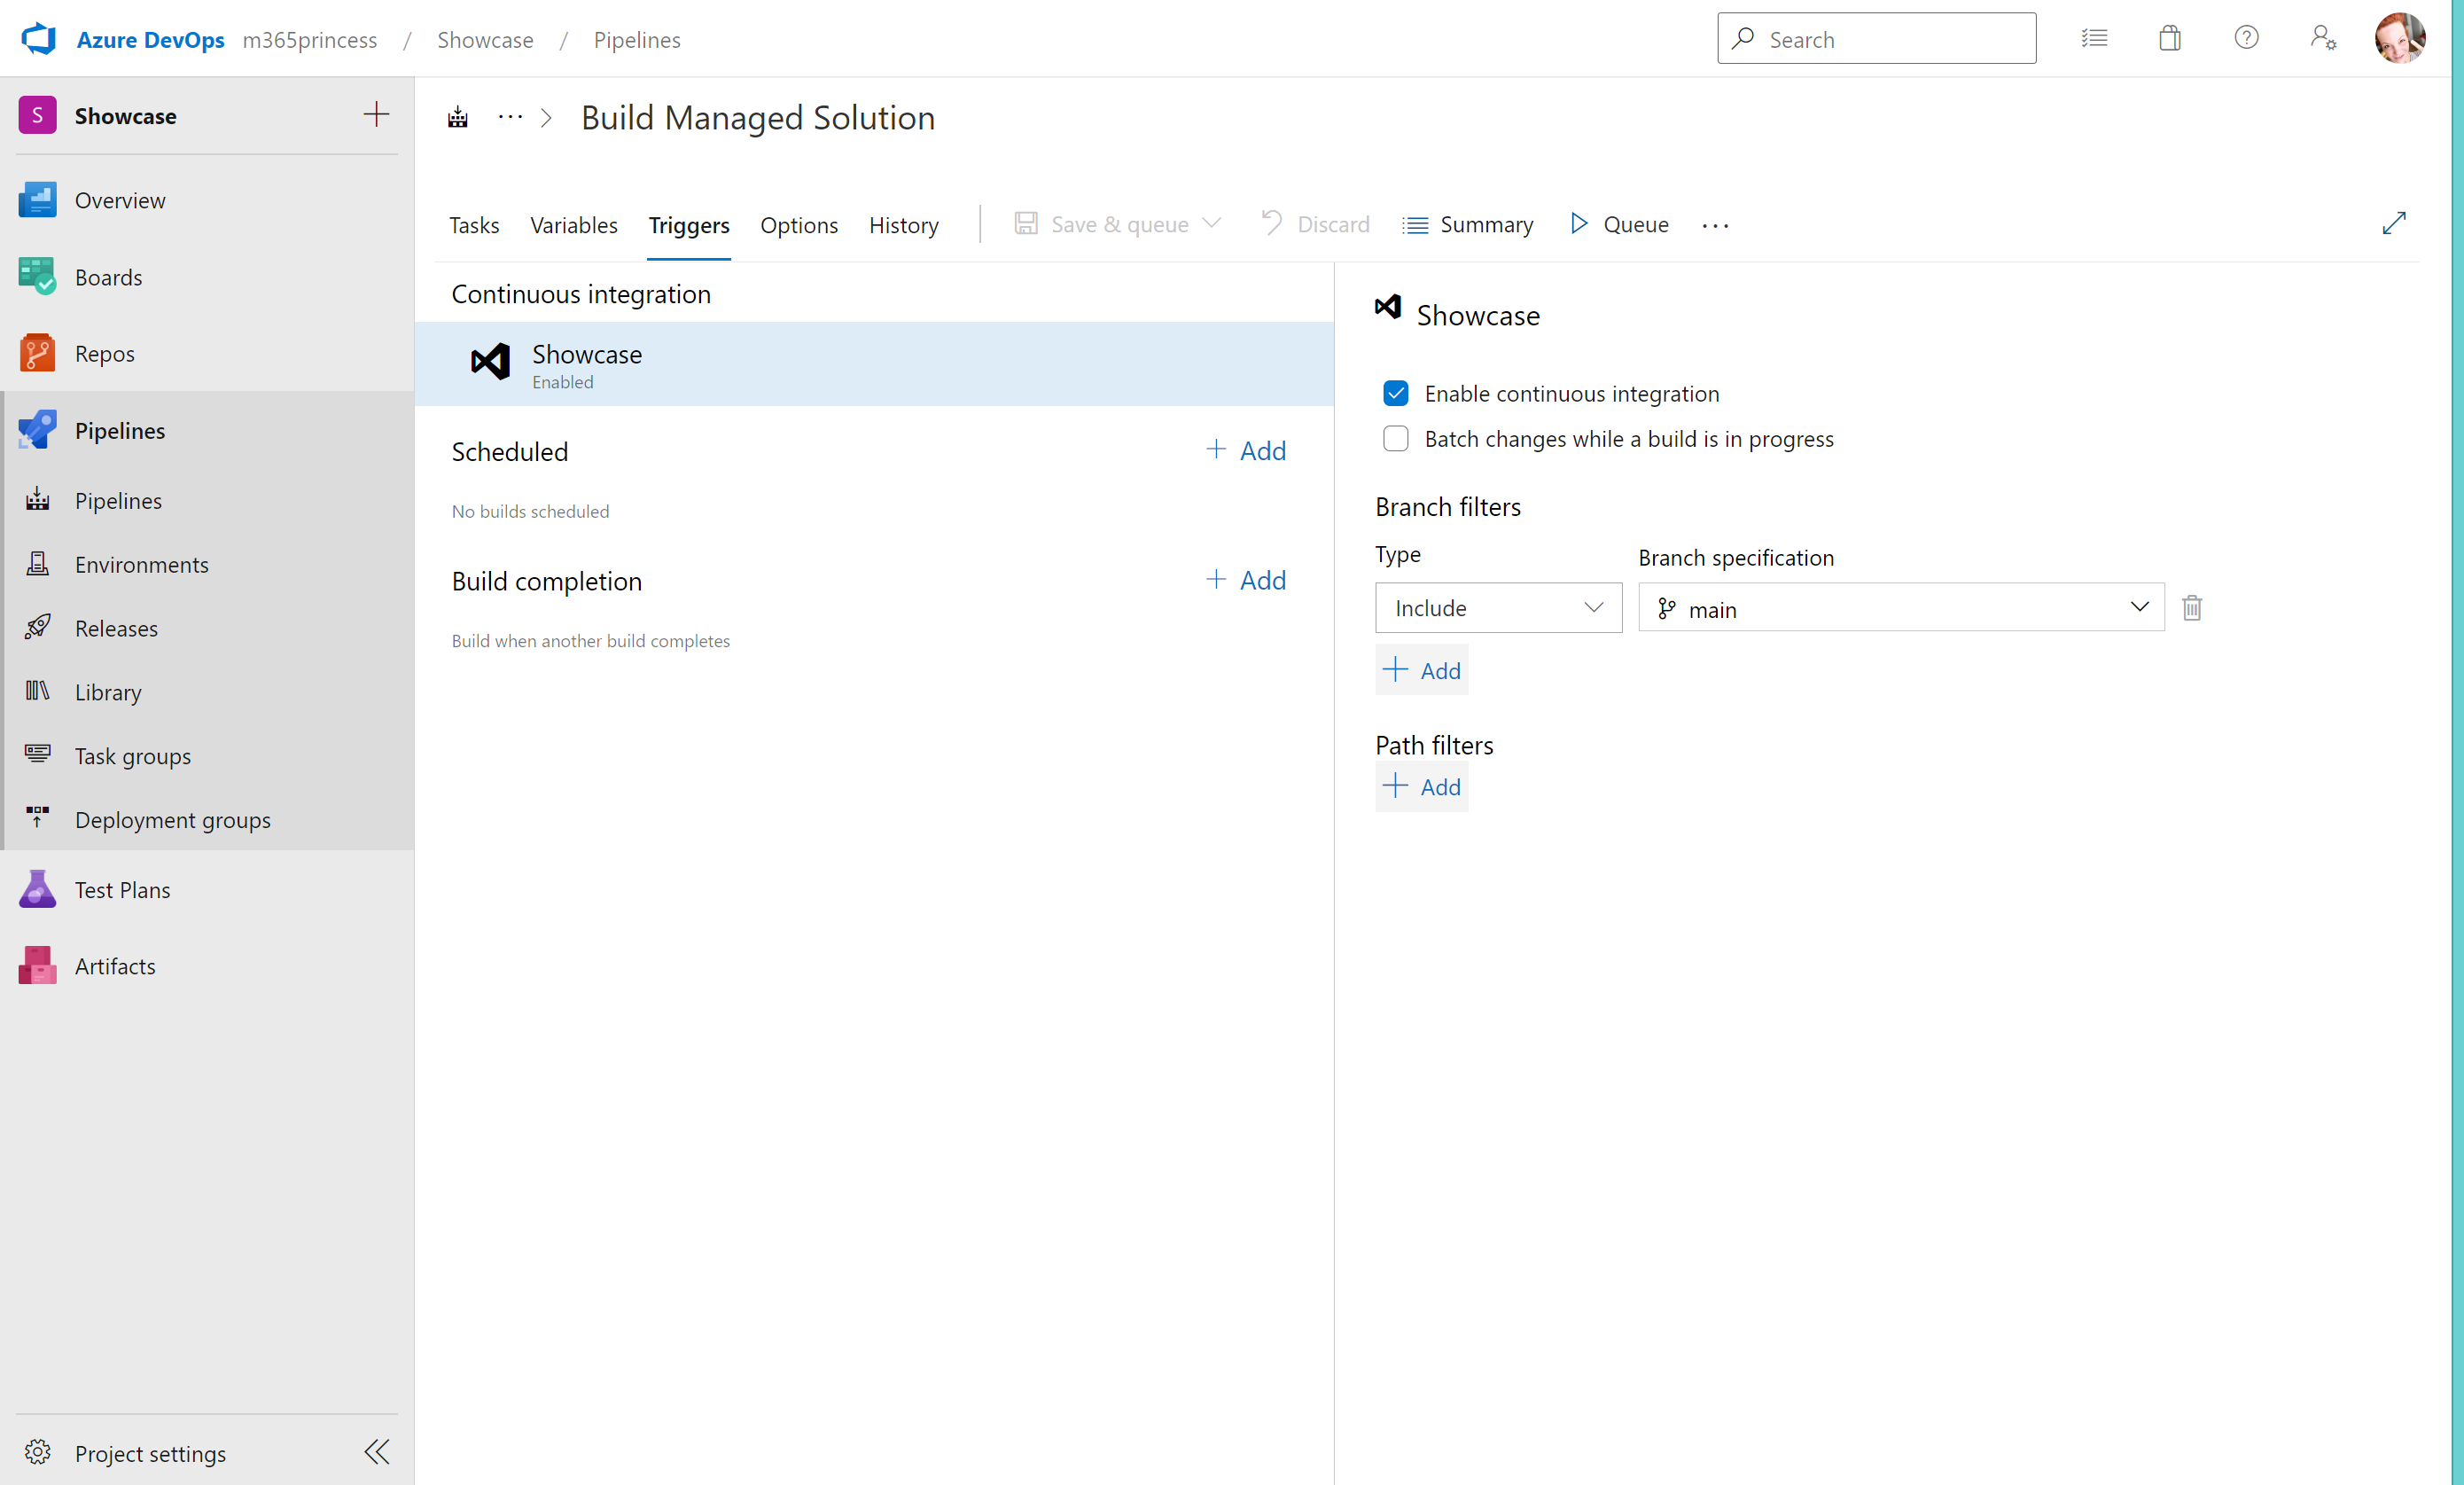
For our Build pipeline 2 - Build Managed Solution we can turn on a setting enable continuos integration which means, that every time, we push code to our main branch this job runs and builds a Managed solution in BUILD.
We do push code to our main branch by letting our Build pipeline 1 - Export from DEV run 💡 - which we trigger manually in Azure Devops.
For the Release pipeline, there is a similar setting:
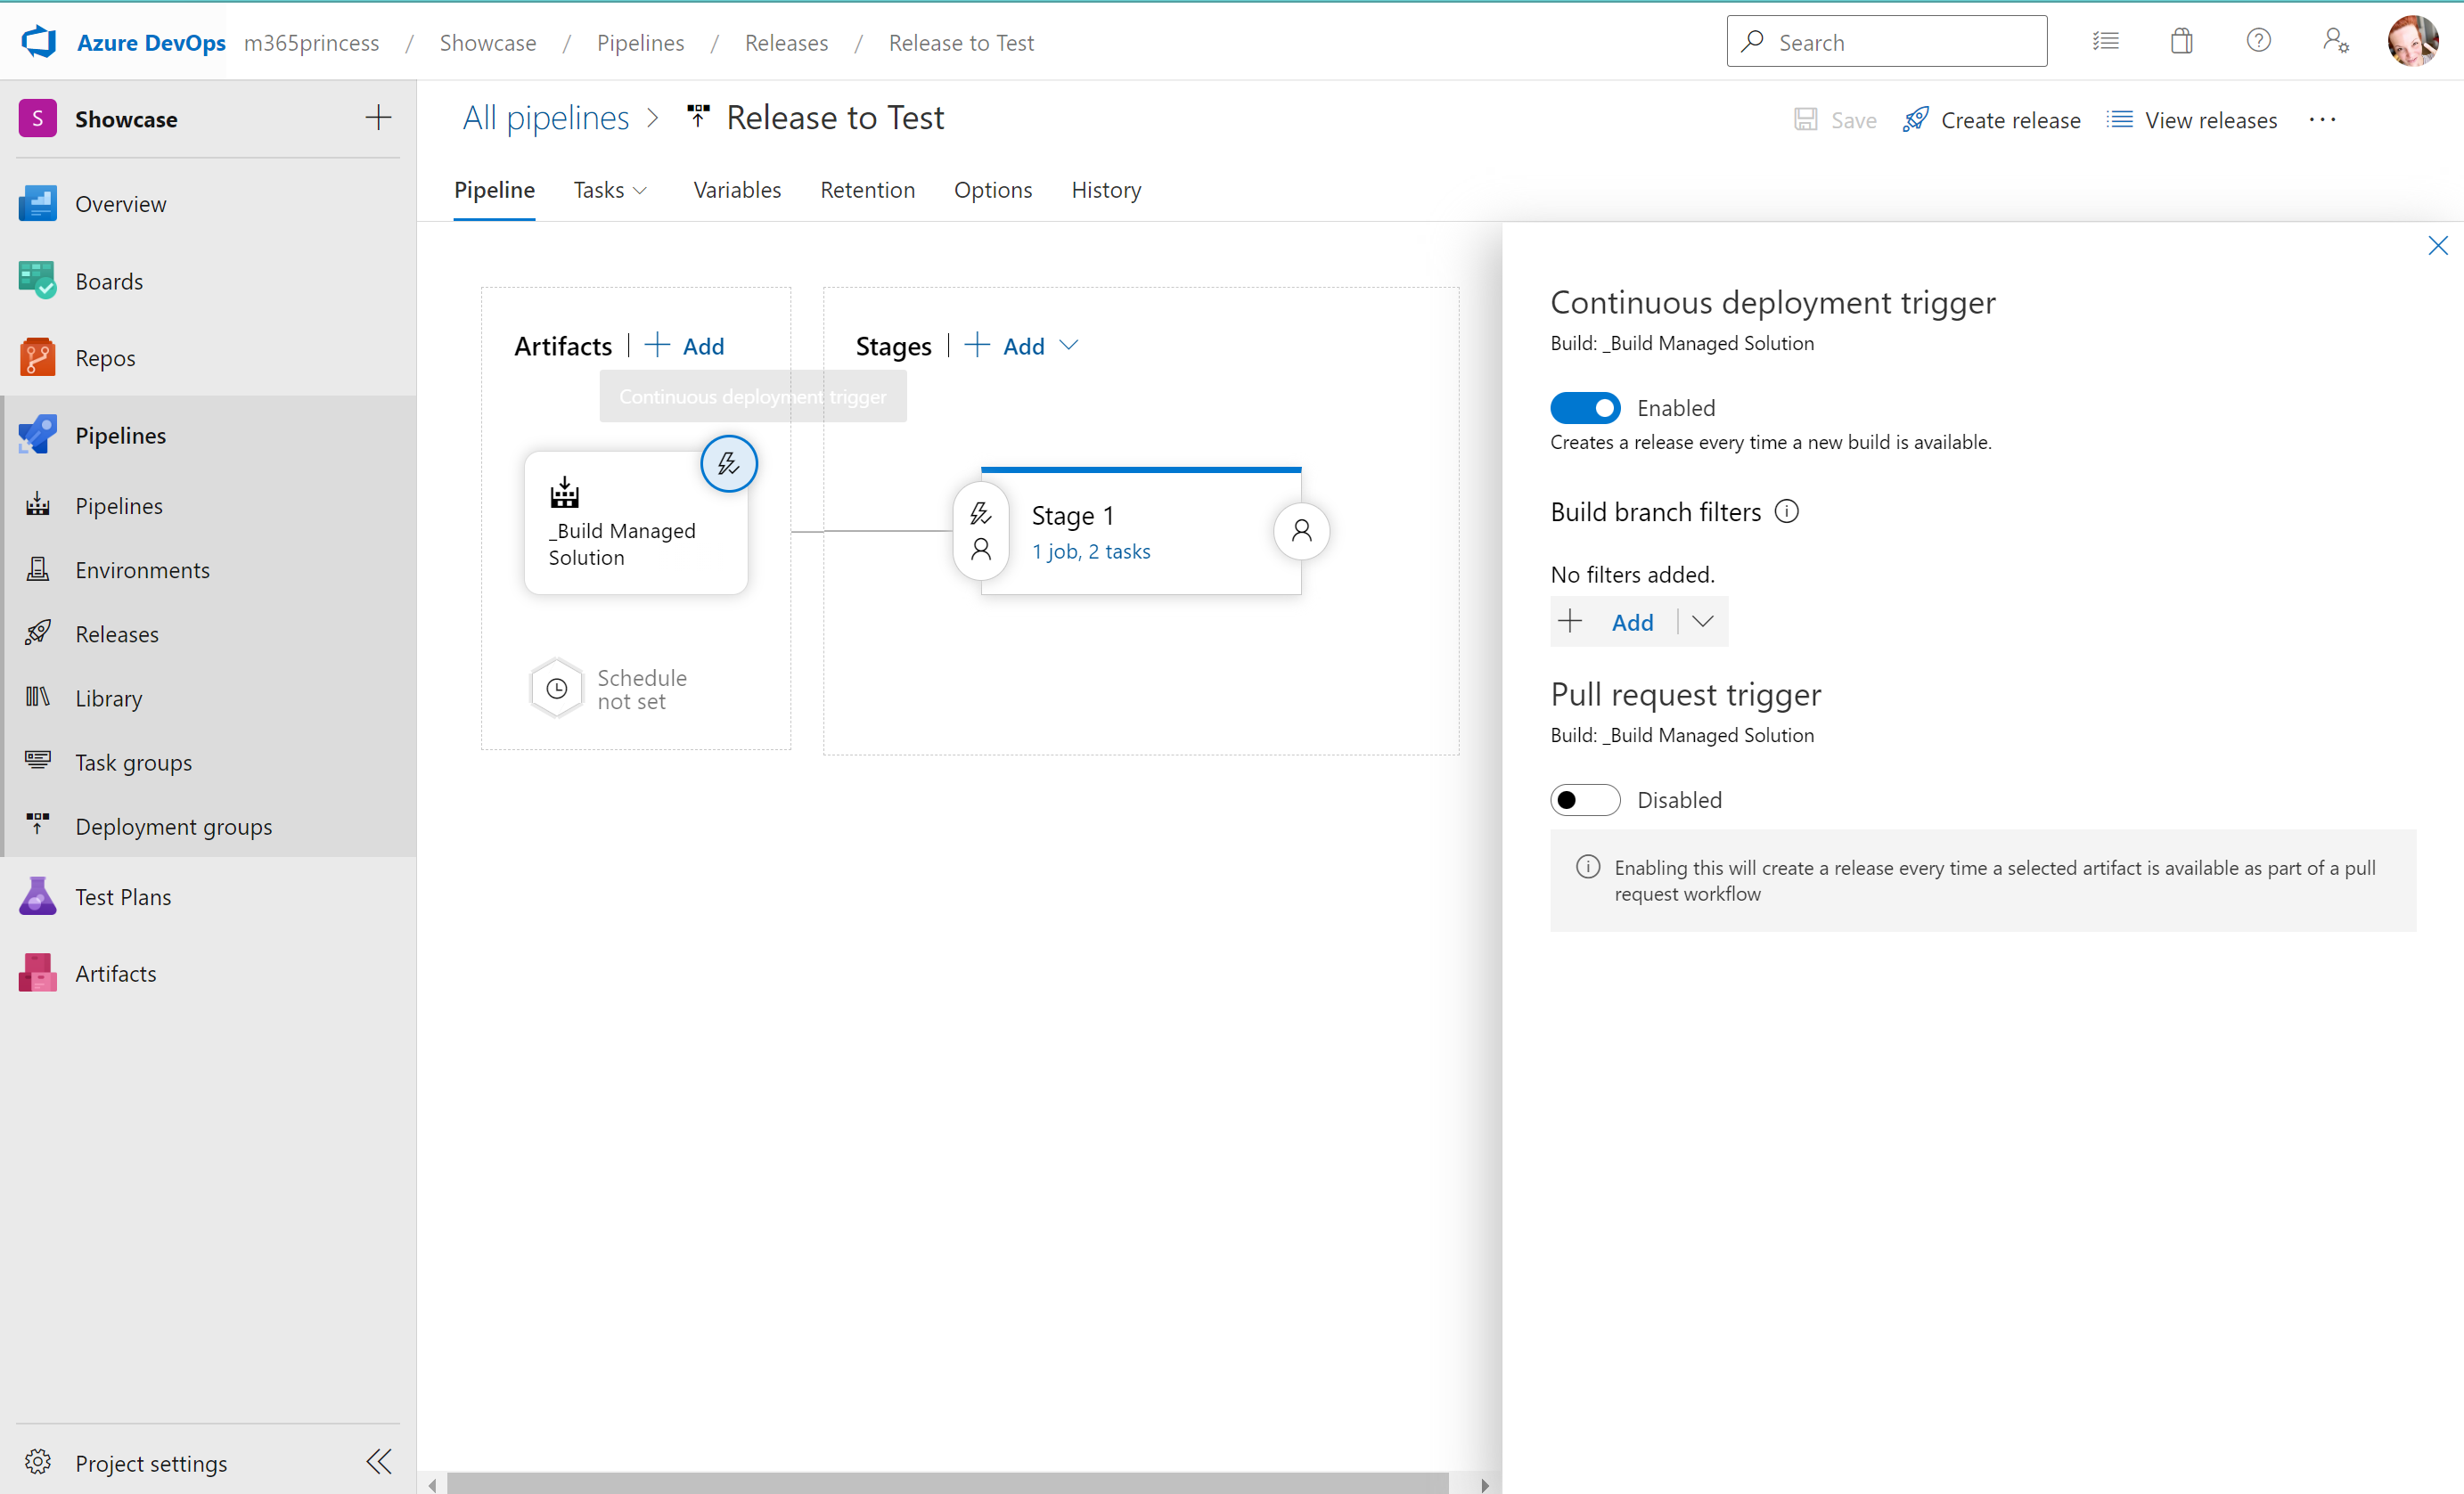
Once it is enabled, it triggers automatically, if a new Build is available, aka when our Build pipeline 2 - Build Managed Solution ran successfully. This means, that with these settings being switched on, we start a chain reaction every time, we run Build pipeline 1 - Export from DEV - and it results in a new release of a managed solution in TEST.
Users can now do the user acceptance training, log experienced issues or change requests for the next release and then we can manually trigger the Release to PROD pipeline so that we export the solution to the PROD environment. In case of severe issues with the release, which only get discovered during user acceptance testing, release to PROD will be deferred, changes to the app are being addressed in DEV, and then the pipelines are triggered again manually to run the entire process again.
Conclusion
With this basic setup, we solve the issues described at the beginning of the post - and deployments now don’t take up human time anymore - as noone needs to manually import and export zip files. Also we safely separated developing solutions from using them and took care that the solution in the PROD environment is a managed one.
From here, you can now expand your pipeline. I will cover some examples in one of my next blog posts - stay tuned!

My name is
Luise Freese
You May Also Like

How to upload files to SharePoint for Dataverse integration in a Power Apps canvas app
Use Case Recently, someone asked me if it was possible to utilize the SharePoint integration in Dataverse not only from a model-driven app, but also from a canvas app. Challenge accepted! Tl;dr: yes, …

How to build a deskbooking tool with Microsoft Planner and Power Automate
Use Case Recently, a customer asked if it was possible to low code build a desk booking tool without using Power Apps. Tl;dr: yes, it is! We will leverage the UI of Microsoft Planner and use Power …

How to organize your homeoffice with NFC tags and Apple
tl;dr With NFC tags and an iPhone you can quickly build a nice system to organize and find all your cables, adapters and more! NFC tags What is an NFC tag? An NFC tag (Near field communications) tag …