
Create a portfolio site with GitHub pages and reveal.js
In this post I want to show how you can create a simple portfolio site with GitHub pages and reveal.js
GitHub pages lets you host your website directly from the GitHub repository
But instead of having a lengthy README.md file with a lot of images in it, we want to use reveal.js to create a cool look&feel:
reveal.js is an open-source HTML presentation framework that lets you create rich, interactive slides using open web technologies.
The result should look a little something like this:
To go from 0 to hero, we will need to accomplish the following steps:
I will show how todo this on Windows and using Visual Studio code, if you run on a different OS or code editor, it might look a bit different, but the steps stay the same.
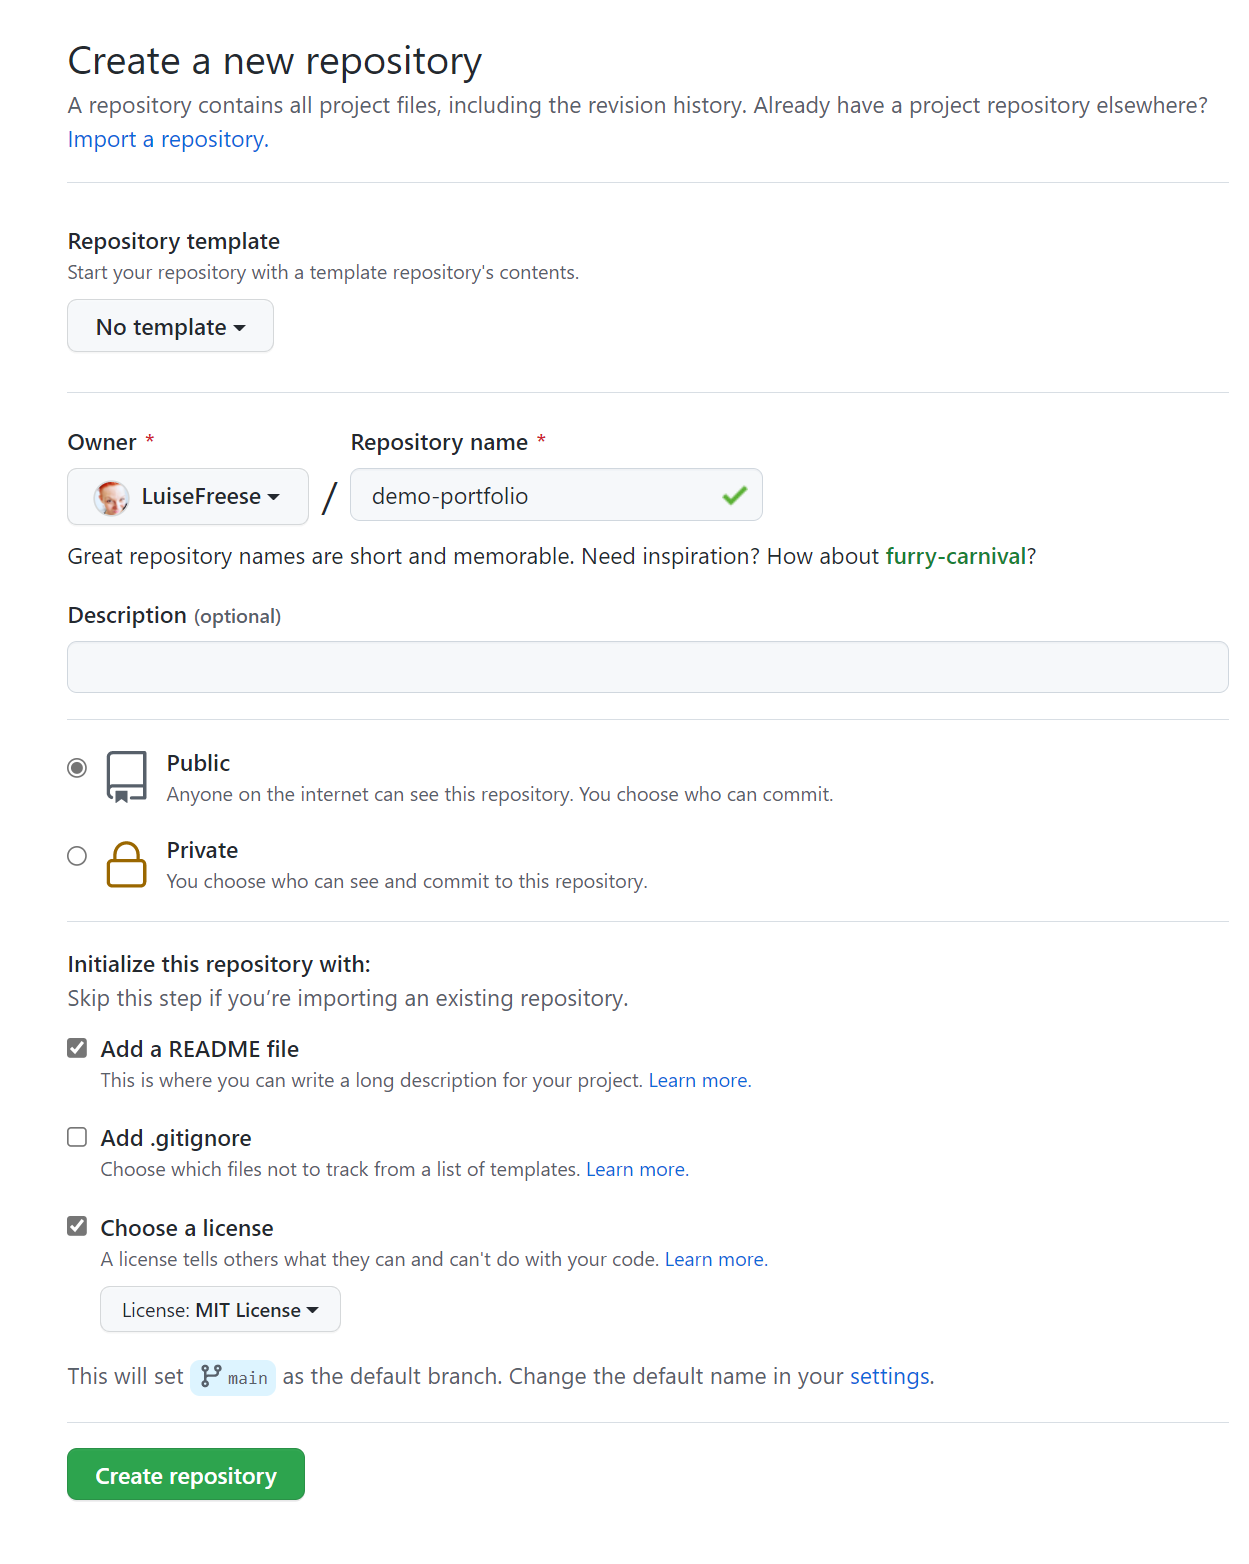
create a repository
- open github.com
- log in. If you don’t have an account, sign up, it’s free.
- select New
Give it a name
Check Add a README file
Check Choose a license
Select a License that suits your needs
Select Create repository
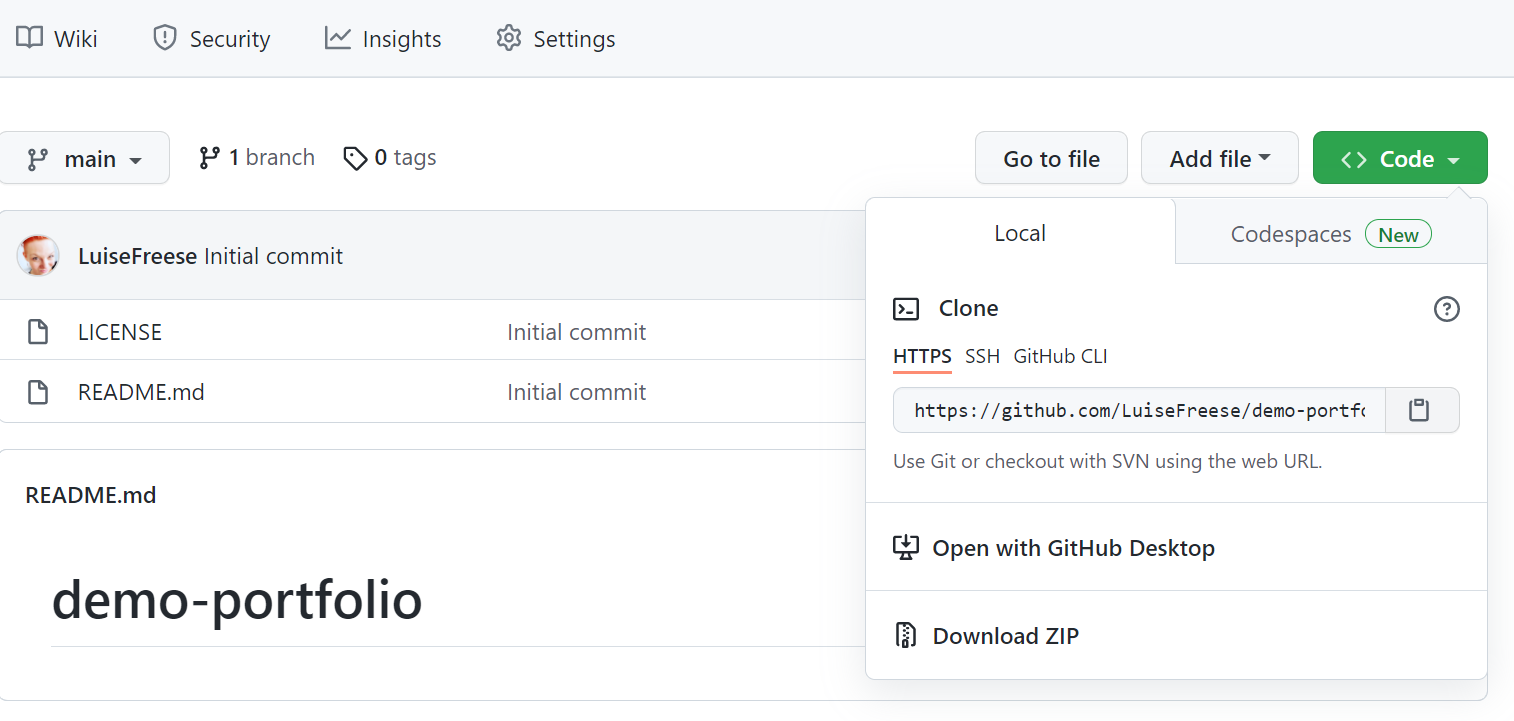
Now let’s clone this repository so that we have it locally available:
Select Code, then copy the URL to your clipboard
Open Visual Studio Code terminal or (I run PowerShell, your commands might look different if you run another shell)
Navigate to a folder where you want to clone the repository
Type
git clone <COPIED URL GOES HERE>Navigate to your new folder with
cd <YOUR REPO NAME GOES IN HERE>Open your project in a new VSCode instance with
code .(yes, there is abetweencodeand the.)
reveal.js
preparations
To install reveal.js, we will need to prepare our repository a bit:
- Create a new
docsfolder at the root of your (nearly) empty repository withmkdir docs - Navigate to this
docsfolder withcd docs - Create a
mediafolder (this is where you will store all your portfolio images in) withmkdir media
installation
- Download the reveal.js zip file from here: reveal.js basic setup
- unzip the file into the docs folder of your repository
create slides
- open the
index.htmlfile - replace the existing two sections with your content, link to images that you will store in the media folder.
<!DOCTYPE html>
<html>
  <head>
    <meta charset="utf-8" />
    <meta
      name="viewport"
      content="width=device-width, initial-scale=1.0, maximum-scale=1.0, user-scalable=no"
    />

    <title>Demo Portfolio</title>

    <link rel="stylesheet" href="dist/reset.css" />
    <link rel="stylesheet" href="dist/reveal.css" />
    <link rel="stylesheet" href="dist/theme/black.css" />

    <!-* Theme used for syntax highlighted code -->
    <link rel="stylesheet" href="plugin/highlight/monokai.css" />
  </head>
  <body>
    <div class="reveal">
      <div class="slides">
        <section>Unicorn slide<img src="media/unicorn.png" /></section>
        <section>Cupcake slide <img scr =media/cupcake.png"></section>
      </div>
    </div>

    <script src="dist/reveal.js"></script>
    <script src="plugin/notes/notes.js"></script>
    <script src="plugin/markdown/markdown.js"></script>
    <script src="plugin/highlight/highlight.js"></script>
    <script>
      // More info about initialization & config:
      // * https://revealjs.com/initialization/
      // * https://revealjs.com/config/
      Reveal.initialize({
        hash: true,

        // Learn about plugins: https://revealjs.com/plugins/
        plugins: [RevealMarkdown, RevealHighlight, RevealNotes],
      });
    </script>
  </body>
</html>
create GitHub pages
We will now create the GitHub page
- open your GitHub repository again
- Select Settings
- Select Pages
- Select main as Branch
- Select /docs as folder
- Select Save
Now let’s publish :-)
In terminal, type
git add .to add all changes to your staging areagit commit -m "<YOUR COMMIT MESSAGE HERE>"git push
If you work on Windows, it might be that you see warnings for all files:
The file will have its original line endings in your working directory
warning: LF will be replaced by CRLF in reveal.js-master/test/test.html.
The end of a line in a unix system represented with a line feed (LF), while on windows a line ends with a carriage return (CR) and a line feed (LF) => (CRLF). We get this warning on Windows when the file was originally uploaded from a unix system. What to do about it?
You can either decide to not care (everything should be working fine, just those warning can be a little annoying), you can read more about line endings and in case you are really the only developer working on these files, you can change settings with git config core.autocrlf true.
Now check again the GitHub Pages site - it should confirm:
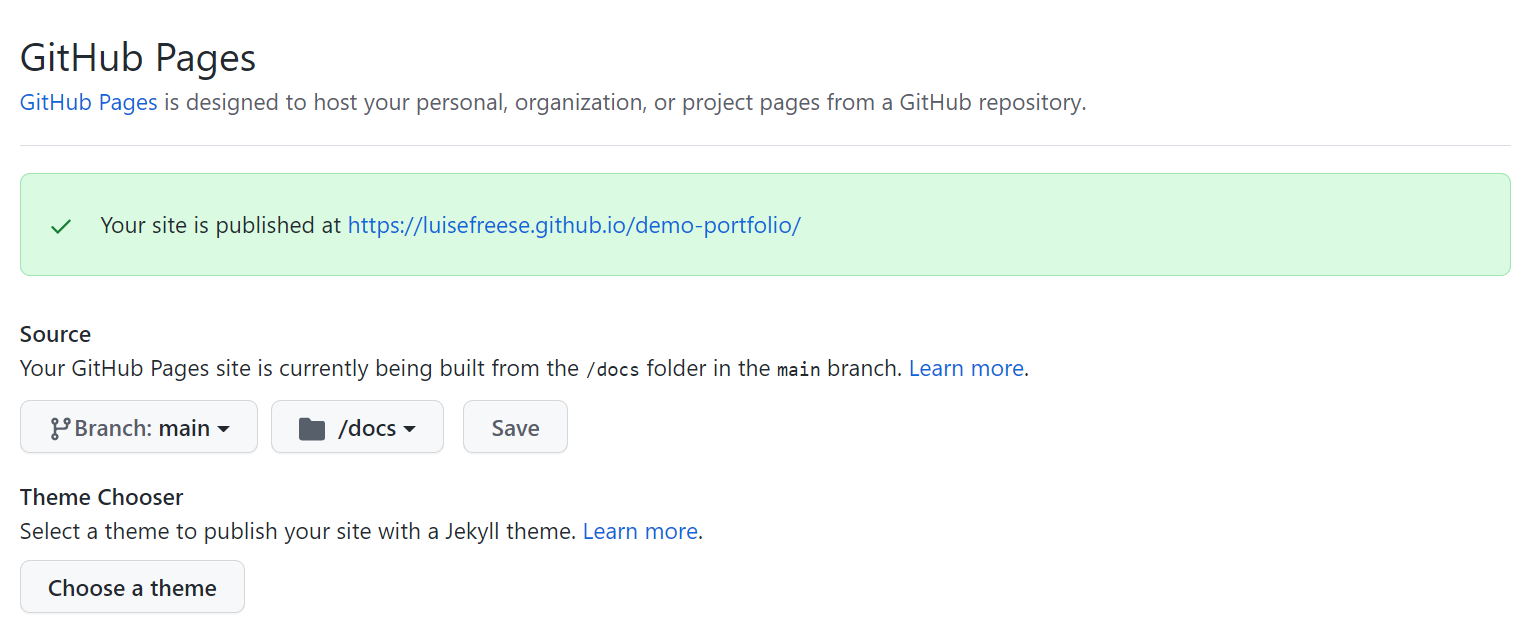
If you now select the link, you should see your GitHub pages site!
How to continue:
- make vertical slides
- change to a different theme
- tell others :-)
I hope you liked this little tutorial!

My name is
Luise Freese
You May Also Like

Putting some more FUN into Azure Functions, Managed Identity & Microsoft Graph
I want to show, how you can use a Managed Identity in Azure Functions to get an access token for Microsoft Graph API. I will later expand on that scenario and make the solution available to be …

The friendly SMS reminder with Logic Apps, Azure Functions & Key Vault
Yay, this is a new blog post series on how to put the FUN in Azure Functions 🙂 Recently, I was learning about Azure Functions and came up with a sweet use case what I could do to combine Azure …
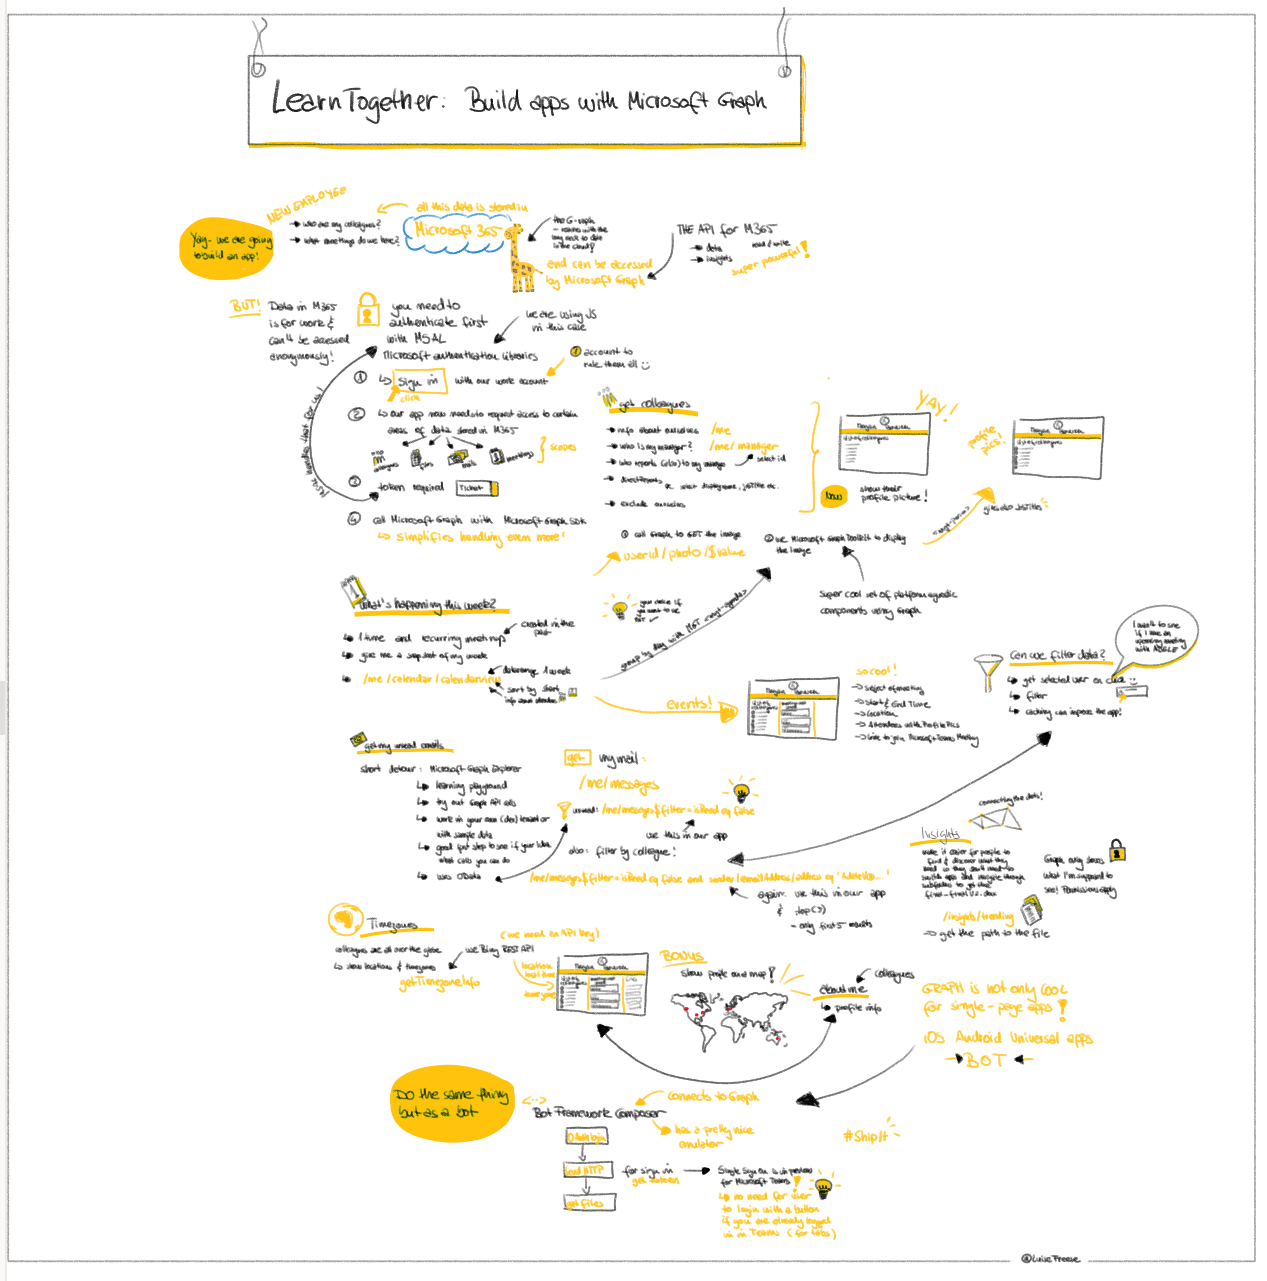
LearnTogether: Build Apps with Microsoft Graph
This week, I had the great pleasure to attend Microsoft’s Learn Together: Build apps for Microsoft Graph event. I also did sketchnotes of the event, you may find high resolution files (images, gifs …