
How to move your blog from Wordpress to Hugo
If you are a little bit like me, you started to blog some years ago on Wordpress and now don’t like it anymore. It’s clumsy and slow and kinda uncool and you would like to have a better experience for authoring your blog posts. A couple of months ago, I moved my own blog m365princess.com from WordPress to Hugo. This blog post explains what you need to do to do the same and how you can manage your website then in Visual Studio Code.
I will guide you how to
- convert your WordPress HTML posts into markdown files with blog2md
- how to host your site with git and GitHub
- host the files with Netlify
- author, manage and publish your blog posts with VS Code and Front Matter
This means, that you need to have
- git installed
- a GitHub account
- a Netlify account
- Hugo installed
- Visual Studio Code installed
- Front Matter installed
All of the above is free/ has a Freemium model. In case you are not familiar with git and GitHub, I got your back, read How to get started with GitHub and Git, then continue here.
git and GitHub
After you read that post I will assume that you have git installed and that you are the proud owner of a GitHub account.
Create a new repository on GitHub
Clone this repository locally
- Select the green Code button on your repository
- Select the Copy button
- Open VS Code
- Open a new terminal
- Navigate to a parent folder where you like to have have your repository in
- Type in
git clone <the copied value from the repository>to get a local copy
Navigate into this folder
cd <repositoryname>create a new folder either
mkdir <hugoblog>Create a new branch so that you have a stage to deploy from with
git checkout -b <your branch name>
Netlify
Once you created your Netlify account, you can connect your GitHub repository to it. In the dashboard
- Select Add new site
- Select Import an existing project
- Select the GitHub button to connect
- Log in
- Select Configure Netlify on GitHub
- Log in
- Select the repository you created earlier
- Select save
The repository should now appear on the Netlify site.
- Select it
- Ignore all the fields (for now, we can set this up later)
- Select Deploy site
You will see a 404 - this normal!
- Select Site information
- Select Change site name and change it to something more friendly, like
Luise-new-blog
With this, the new address for your site is https://luise-new-blog.netlify.app. Yet again, if you click on it - don’t be disappointed about the 404 error.
You can later change the CNAME record of your website so that your preferred URL points to that new site.
Hugo
We will now install HUGO on your computer. I’m on Windows 10, pretty sure it works similar to that on Windows 11 that way as well. If you are on MaC/Linux, please look up your preferred way to install on Hugo
- Create a folder
Hugo - Create two subfolders in the
Hugofolder and name thembinandSites - Download the latest .zip file from Hugo releases
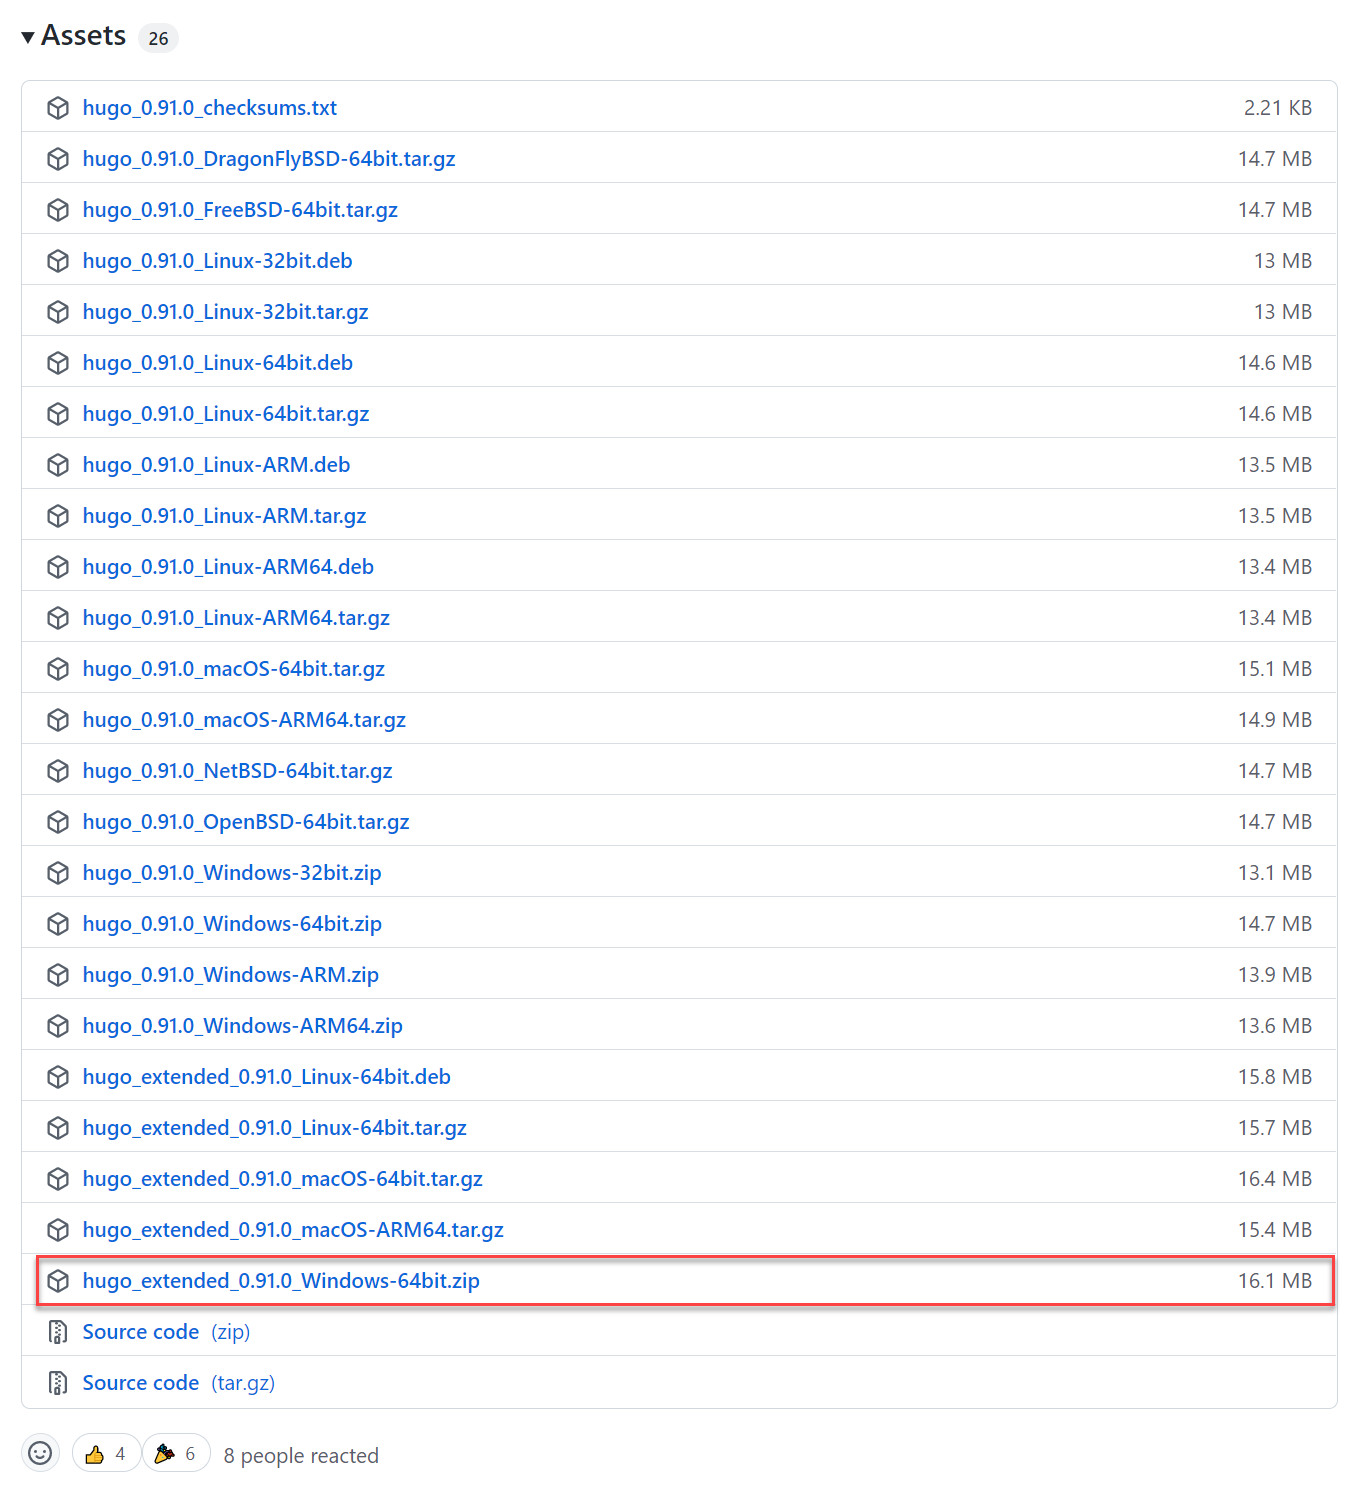
- Extract the zip file into the
binfolder - Add the
binfolder to PATH:- Open the Windows settings
- Select Advanced system settings
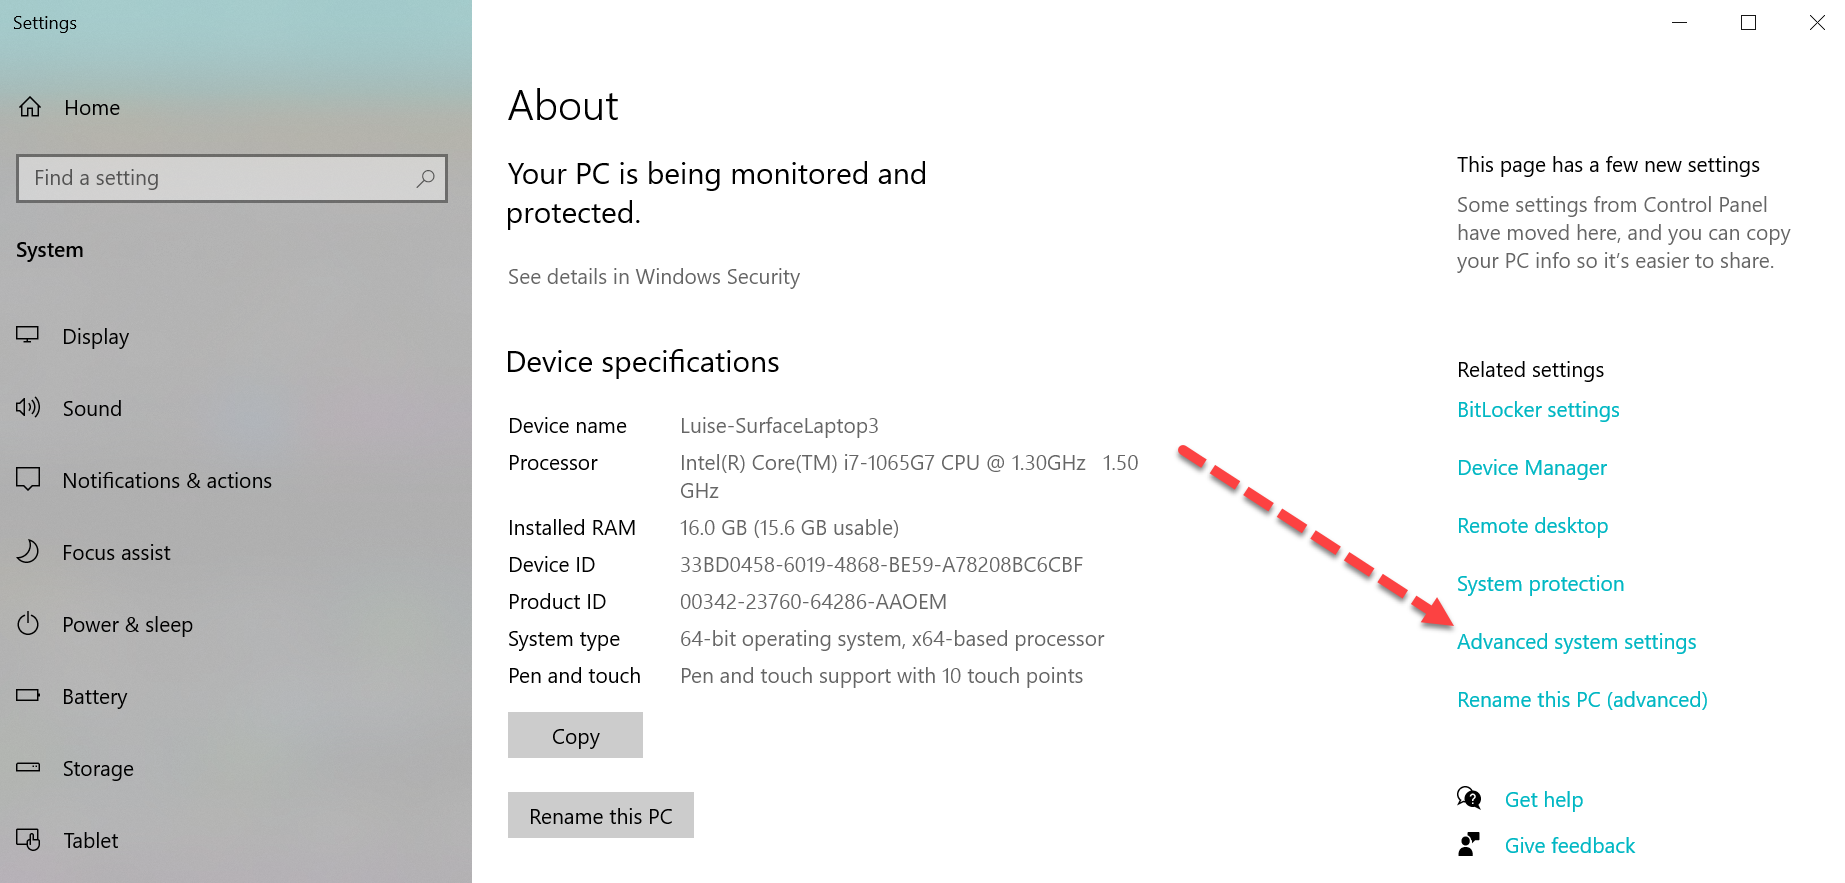 - Select
 Environment variables
- Select Path in the user variables
- Select Edit
- Select New
- Type in the Path to your bin folder
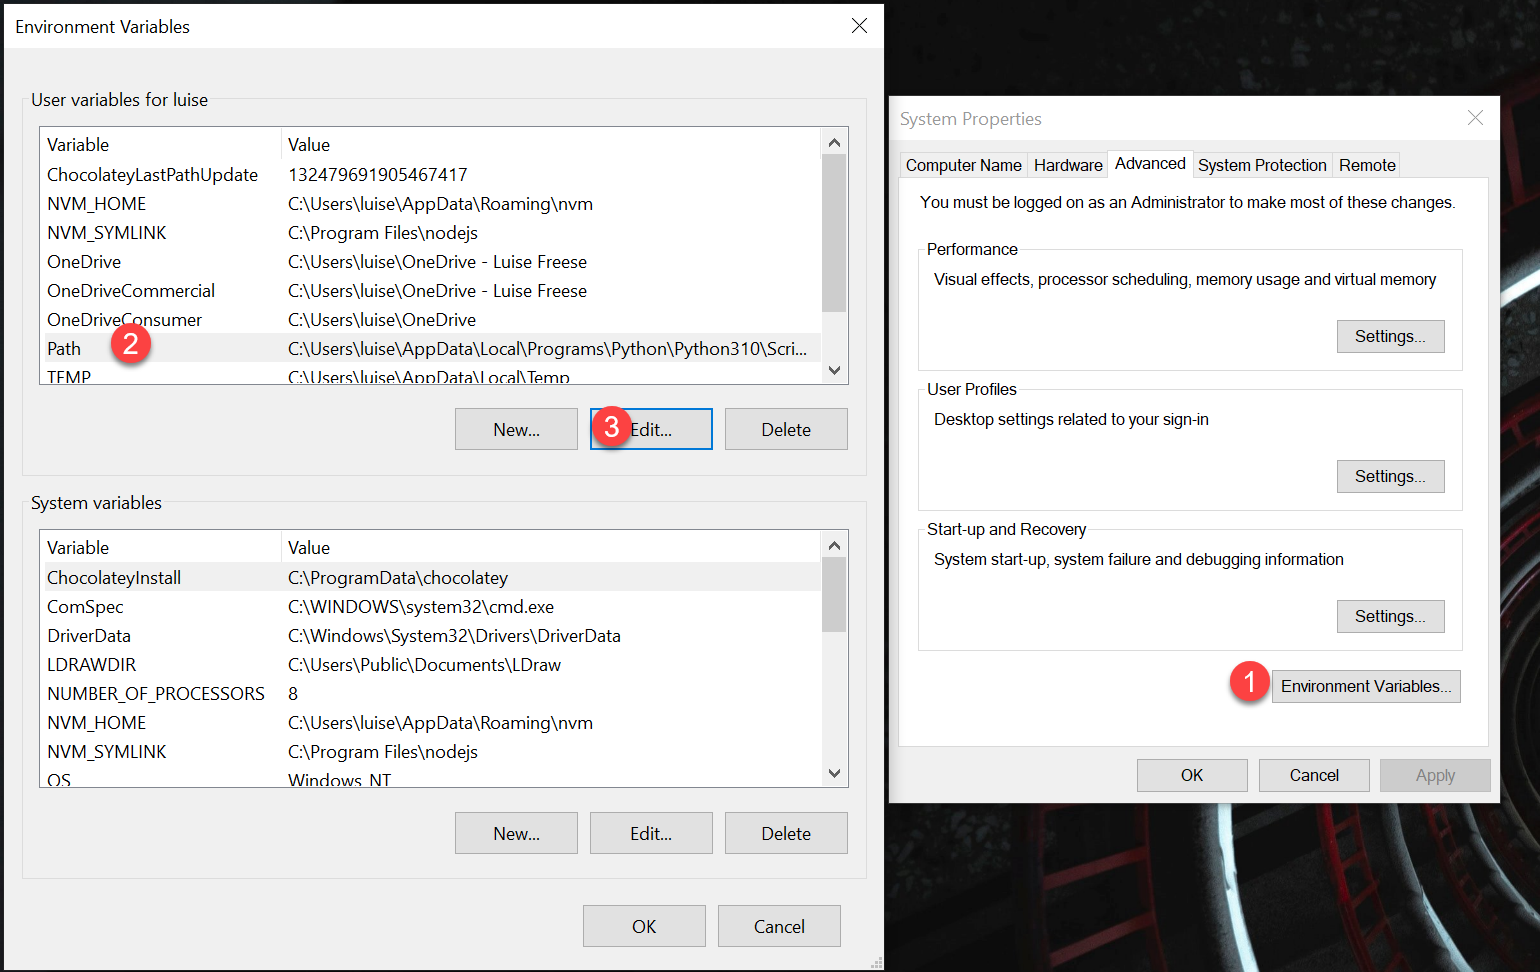 - Select OK
- You may close settings
- Select OK
- Select OK
- You may close settings
- Test if you did things right by opening a terminal (I use VS Code) and type
hugo help- it should respond with this:
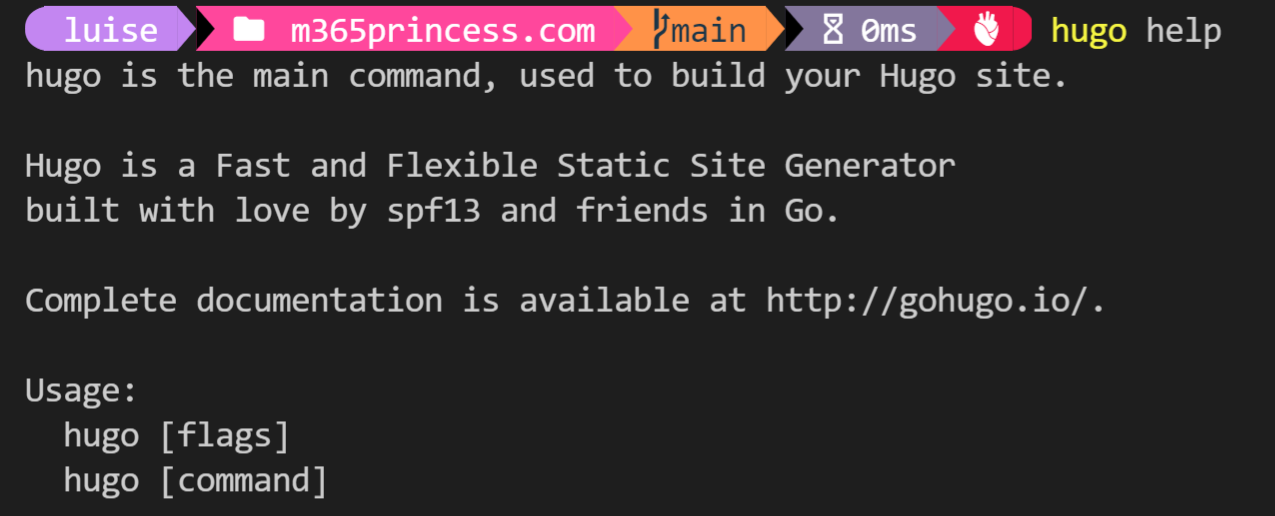
build your site
- navigate to your
Sitesdir - type in
hugo new site <your sitenamegoes here> --force

Hugo has a built-in live server, so that you can work locally. You can start it with hugo server - it will tell you on which localhost address you can preview your empty site - for me it localhost:1313.
To have a cool site, you need to
- define its structure in the
config.tomlfile - have your blog post .md files in the
contentsfolder - have your images in the
static/imagesfolder - either create a new theme or install a theme
Let’s tackle this one step at a time:
config.toml
Let’s make sure we have the site name and blog URL (the friendly URL from Netlify)
title = "Luise's new blog"
baseURL = "https://luise-new-blog.netlify.app"
Later, you can set up navigation in this file as well.
contents
blog posts
To have your (old) blog posts in here, we will first need to convert the HTML pages to .md files. You can either use a browser-based tool like Code-Beautify or run blog2md, which is what I prefer.
- Export all blog posts from WordPress
- Select Tools
- Select Export
- Select Posts
- Select Download Export File
- This will output an xml file
- Install blog2md
- Transform the xml file to md files with blog2md
node index.js w <Path to your xml file> <folder where you want your old blog posts to live.>- Do a little cleanup, and delete the blog2md repository clone and the npm dependency
handle metadata with Front Matter
You will notice, that in each and every .md file, you will not only find the content of your previous HTML page, but also metadata, encapsulated by --- - this part is called front matter. Front matter is the first section of a book and gives information on author, publishing house and so on. These preliminary matter made its way to digital content as well, as a blog post usually has an author, publishing date, URL, preview image and so on. As every new blog post will need front matter, you could come up with some awkward workaround of copy/paste that and then adjust it every time to your needs. But lets face it: Thats not how we want to work.
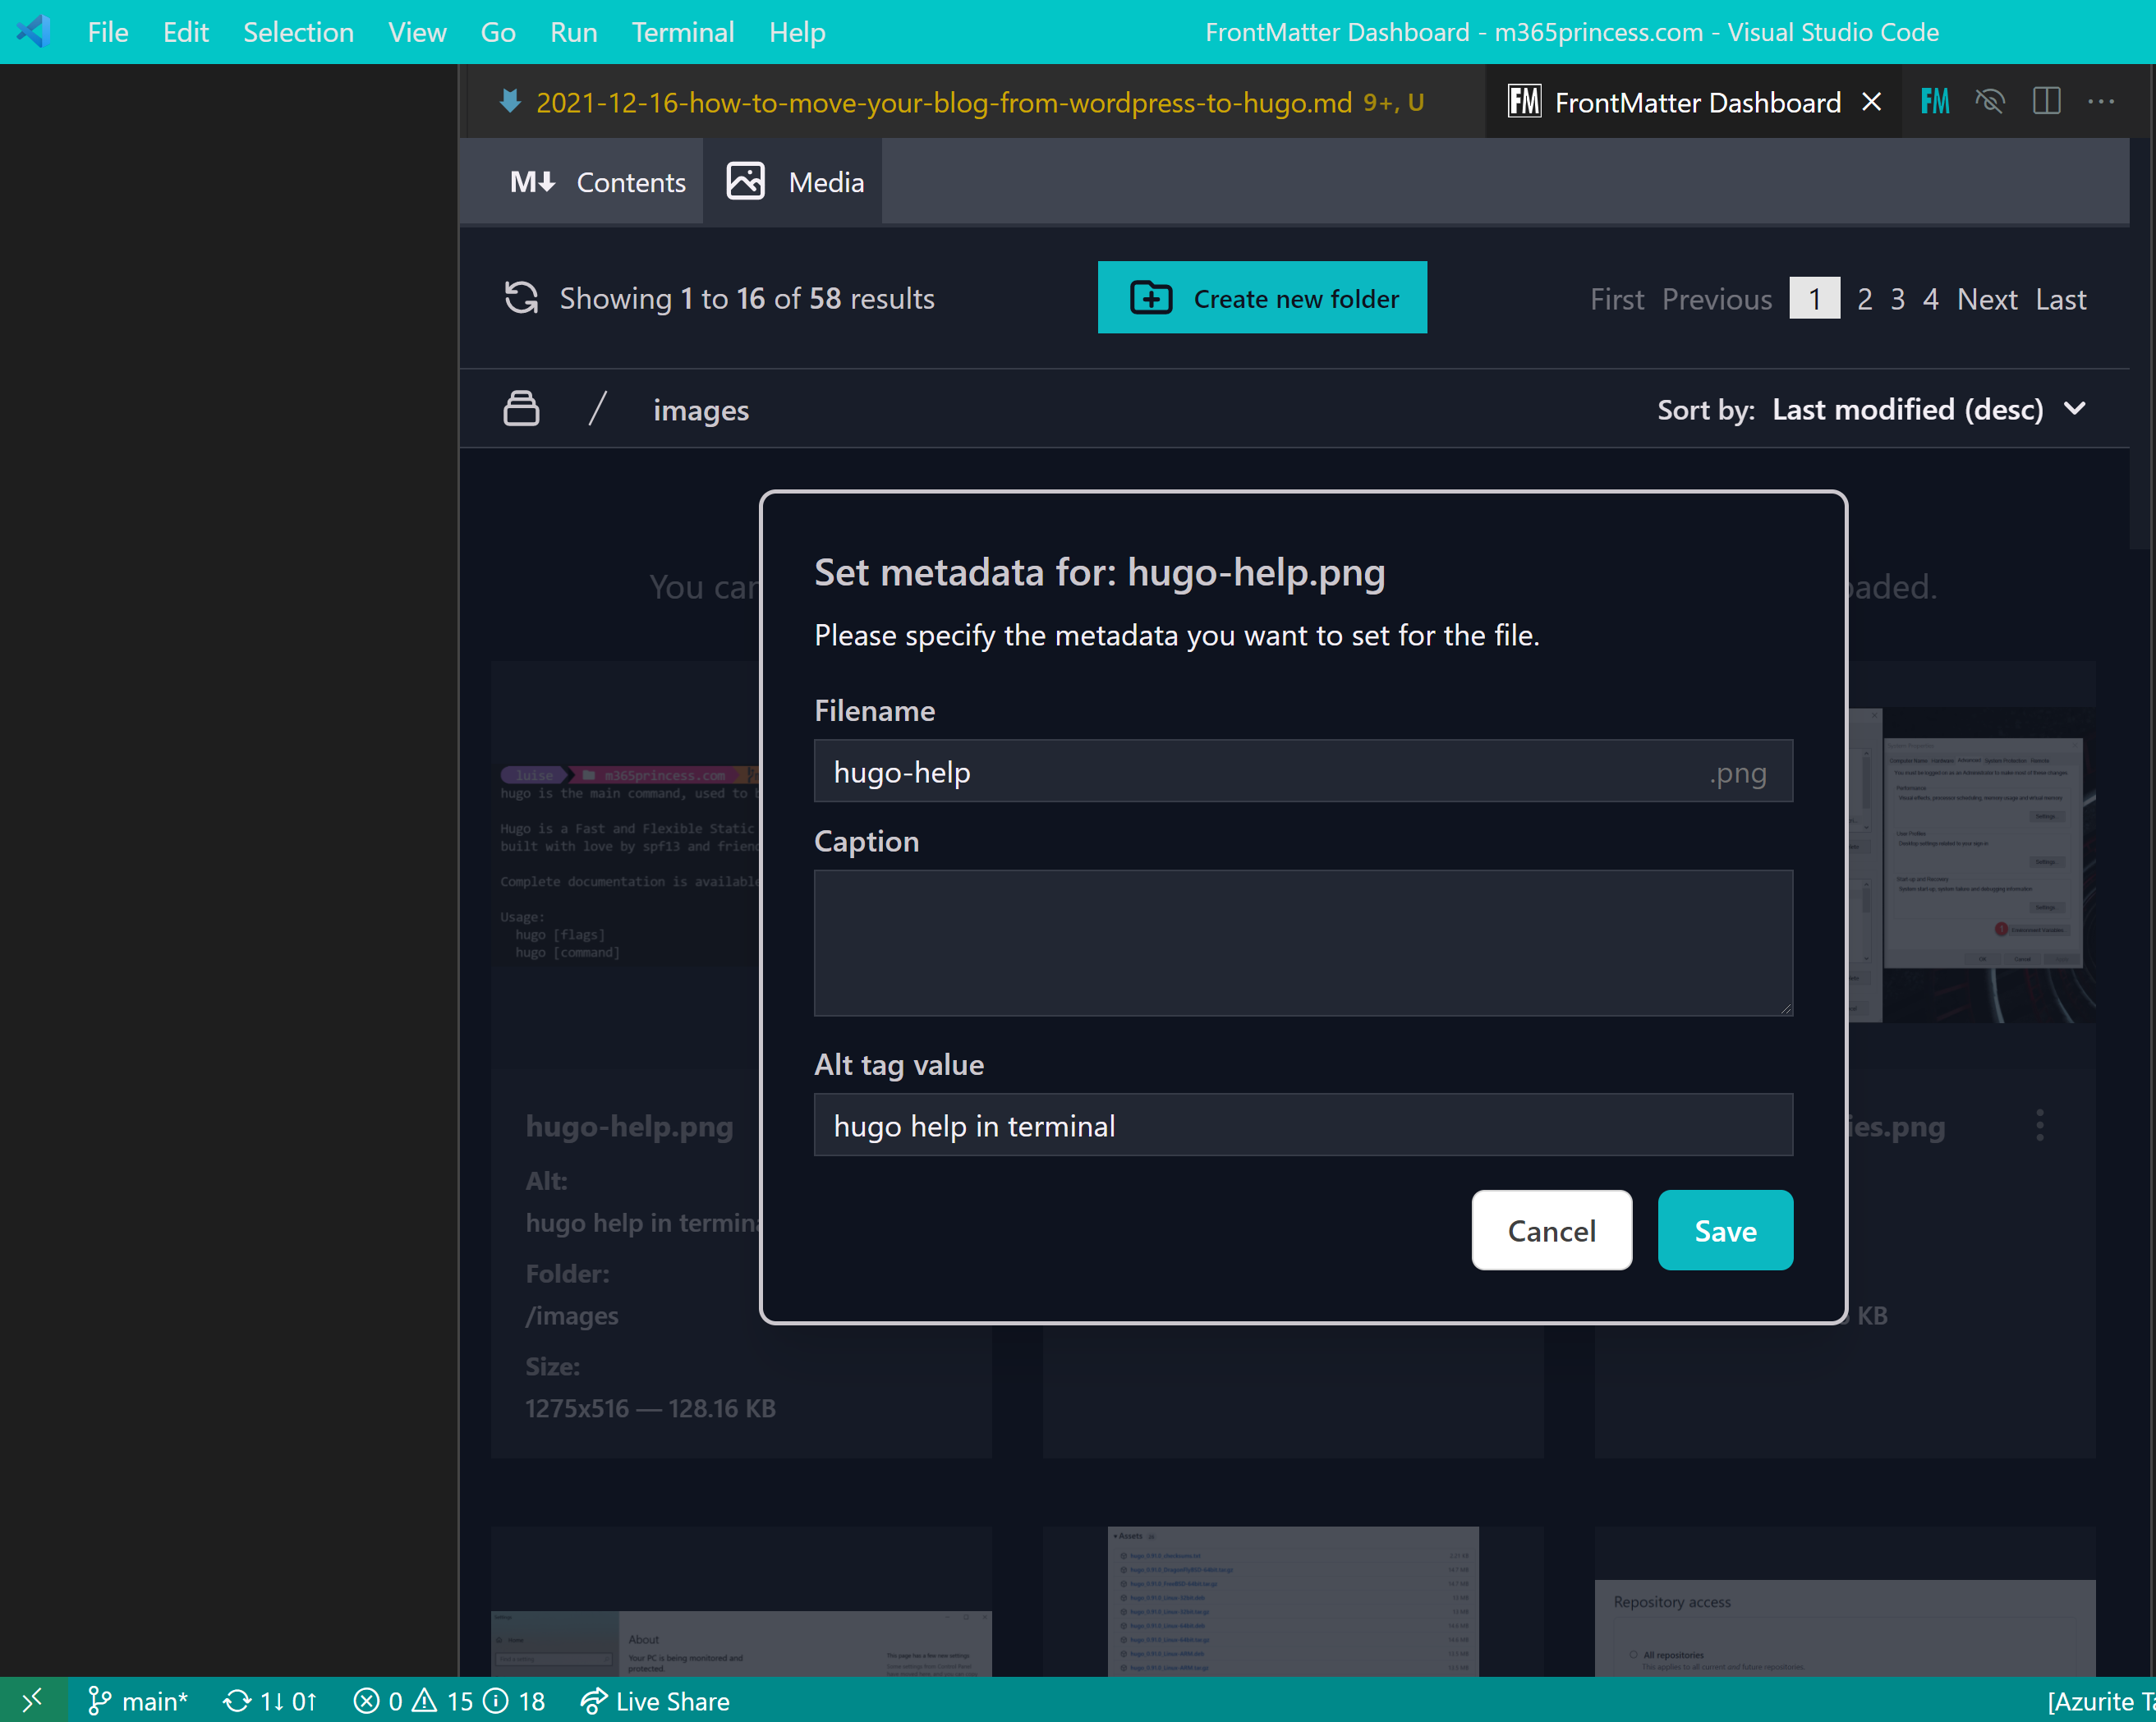
Lucky you, there is an amazing extension for Visual Studio Code to handle the front matter - and more. It’s called Front Matter. It’s a headless CMS and works with every static site generator, also with Hugo. It allows you to author and preview your content in VS Code and lets you set the front matter with ease. It gives recommendations for SEO and lets you easily preview and insert images into your blog posts. The media dashboard also lets you add metadata to the images so that you can manage the alt tags for them. Best thing: Its open-source. If you like it, consider to sponsor its creator and give Elio a shout out.
static
Images need to be in the static folder, I have a subfolder images in here. If you use Front Matter, you can insert images into your blog post by selecting the Insert image button or link to the image.
a theme
If you don’t like to create your own theme, you can install a Hugo theme and then adjust it to your needs. I can recommend getHugoThemes.com, but there are free themes available on the thing called internet as well. Follow the documentation to install the theme.
Now its time to actually create your site. Depending on your skills you can copy/paste from example sits of the docs of your theme and then replace with the values you need for navigation, site, content, or write the site from scratch.
Deploy
If you now want to create a new post, I’d recommend to do this with Front Matter. You will need to do this in the contents folder. Once your blog post is ready to be published, make sure that the draft property is set to false.
- Push your changes towards your stage branch
- Change Site settings on Netlify
- Build command =
hugo - Production branch =
main(in case you used an old repository it could also be that the default repository is calledmaster) - Branch deploys =
Deploy only the production branch
- Build command =
- Merge from
stageinto main which deploys your site - Time for a happy dance
The beauty of having several branches now is that you have more control - with only one branch each and every push will rebuild your site.
Conclusion
Either way, you can now author and manage your blog post straight from VS Code. You will use git to commit and push your changes to re-deploy your site.
You can benefit from the entire cool ecosystem around VS Code with all its extensions, great docs and awesome community around.
Let me know, what you use to blog? If you don’t use Hugo, would you now like to migrate?

My name is
Luise Freese
You May Also Like
How to deal with many to many relationships in Dataverse
While building an app that stores data in Dataverse, I came across a not easy to resolve problem. If you already follow me for a bit longer, you may assume that this is about ProvisionGenie, and so I …
How 3 makers, 2 devs and a princess came together to save kittens for a hackathon
How 3 makers, 2 devs and a princess came together to save kittens for a hackathon The Story (Michael) Just before Southcoast Summit 2021 got started, the organizers hosted the Automate Everything - …
4 ways to level up your Power Automate flows
Intro A while back, I wrote about How to use a custom connector in Power Automate showing how easy you can create a connector to a cloud service that is not already in the very long list of connectors …