
How to rotate secrets with Azure Logic Apps, Key Vault and Managed Identity
Do we REALLY need to rotate secrets?
Ever wonder why we’re always harping on about rotating secrets in Microsoft Entra App Registrations? Rotating secrets is kind of like changing the locks on your house. Sure, you might trust your neighbors, but what if someone made a copy of your key without you knowing? Yikes, right?
That’s pretty much what we’re dealing with when it comes to secrets in the cloud. Unfortunately, sometimes these secrets can accidentally end up in places they shouldn’t, like that one time you left your house key under the doormat (we’ve all been there, no judgment). So, rotating these secrets is our way of staying one step ahead of the bad people. But hold up - is it always necessary? In case you can use Managed Identities, it is not - as then Microsoft manages secrets for you and you don’t even have access to the secrets. But that is not always possible and lots of people asked me how one could rotate secrets. Happy to explain! So in case you ever wondered how you could rotate secret automagically 🦄, then this blog post is for you.
Create a Logic App that will rotate secrets
We will do it as simple and as secure as possible: We will use a Managed Identity in a Logic App that will create a new secret and store in a Key Vault. Why? For me everything starts with identity - so if we needed an app registration to change an app registrations secret, that would be a chicken/egg problem, as this app registration’s secret needed to be rotated as well. So a good way to prevent this secret-ception would be a Managed Identity. If we want to use a Managed Identity and still stay low-code, the easiest way to do that, is to call Power Automate’s big sister - Azure Logic Apps and leverage two HTTP actions to create and store secrets securely.
Our Logic App will look like this
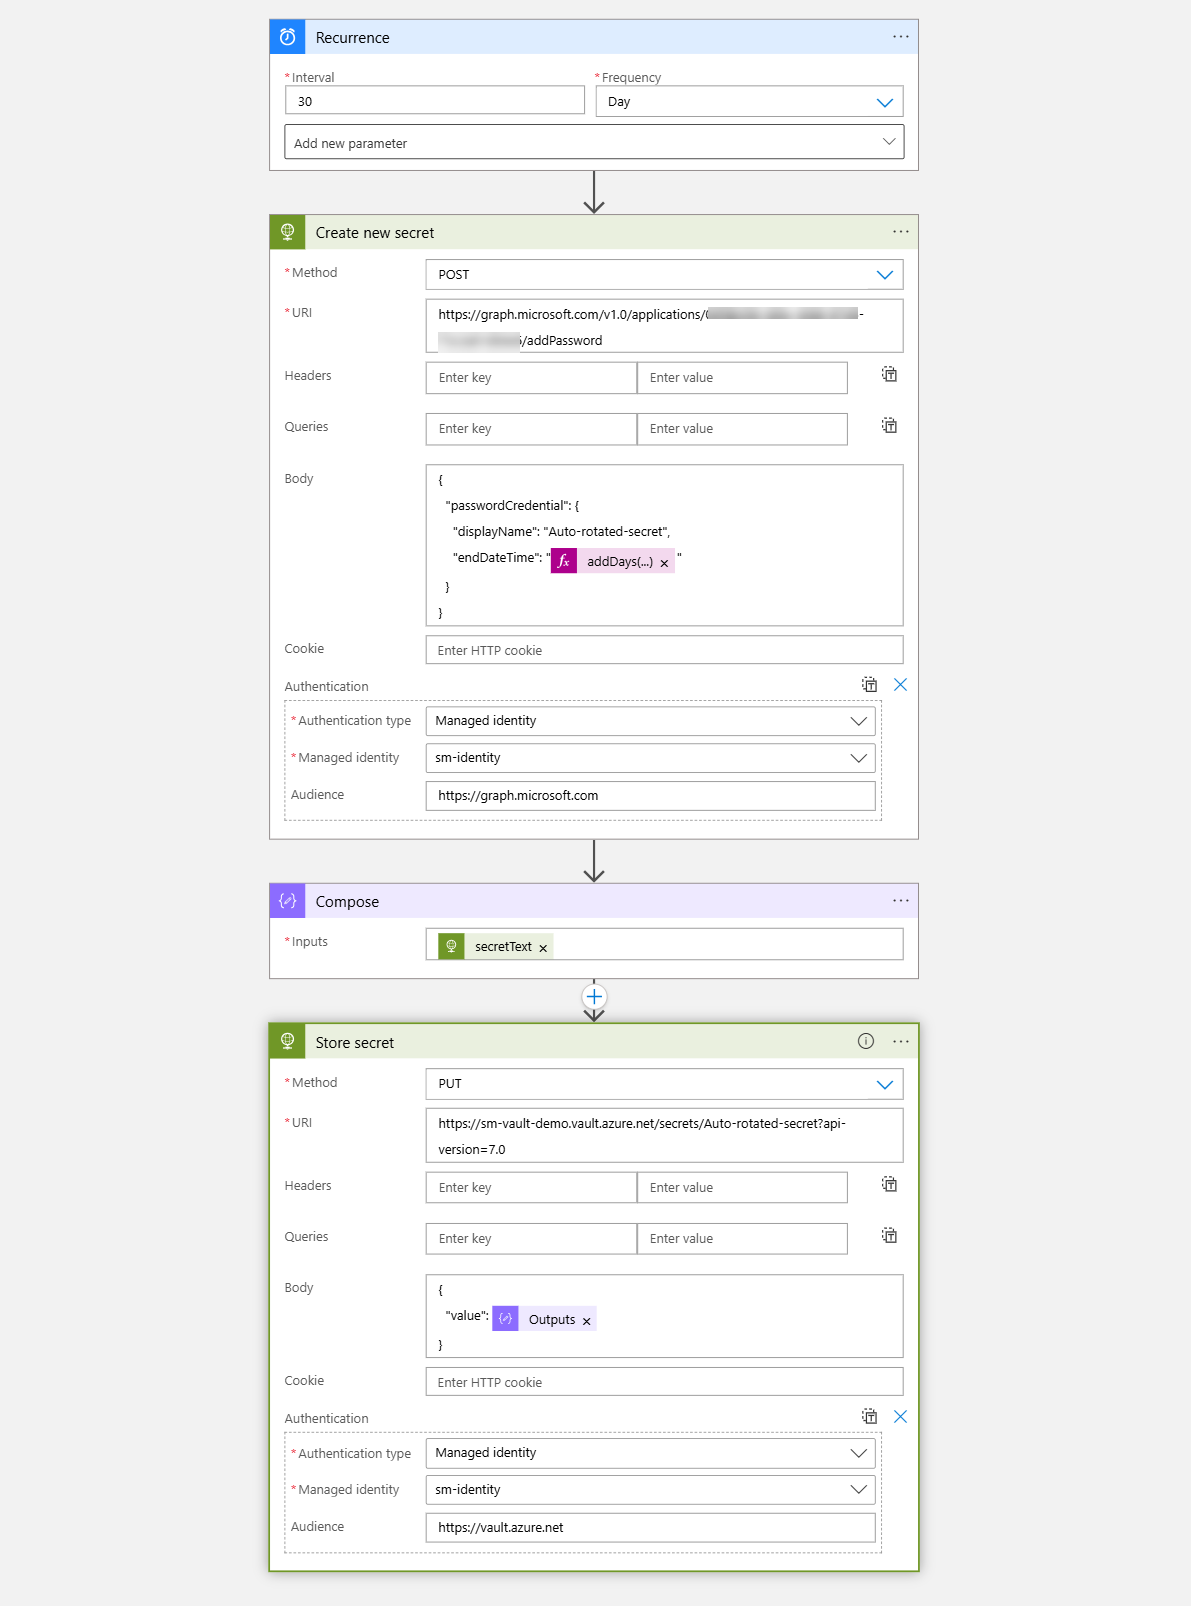
You can create for now an empty placeholder Logic App in the portal, with Bicep, or right away with the definition I provided a bit further down in this post. Once you did that, let’s create our Managed Identity.
Create a Managed Identity
I chose a user-assigned Managed Identity here:
# Define our variables
$ResourceGroupName = "<your resource group>"
$Location = "<your preferred location>"
$LogicAppName = "<name of your Logic App>"
$UserAssignedIdentityName = "<Name of the managed Identity>"
$SubscriptionId = "<Id of your Azure Subscription>"
$GraphAppId = "00000003-0000-0000-c000-000000000000" # don't change!
$KeyVaultName = "<name of the Key Vault>"

# Create the user-assigned managed identity
az identity create --resource-group $ResourceGroupName --name $UserAssignedIdentityName --location $Location

# Get the User-Assigned Managed Identity ID
$UserAssignedIdentityId = az identity show --resource-group $ResourceGroupName --name $UserAssignedIdentityName --query id --output tsv

# Assign the User-Assigned Managed Identity to the Logic App
az logic workflow identity assign --resource-group $ResourceGroupName --name $LogicAppName --user-assigned $UserAssignedIdentityId
Create an Azure Key Vault
Next up, we will create our Azure Key Vault
$KeyVault = New-AzKeyVault -ResourceGroupName $ResourceGroupName -VaultName $KeyVaultName -Location $Location
Grant access to Graph API and the Key Vault to a Managed Identity
Now let’s solve how we can access our resources! We want two things to be assigned to the Managed Identity:
- Microsoft Graph permissions
Application.ReadWrite.All(this will allow us to add secrets to an App registration) - Azure Role assignment (RBAC)
Key Vault AdministratorandKey Vault Secrets User(this will allow us to read from and push secrets to the Key Vault)
Assign Microsoft Graph permissions on a Managed Identity
This is the script that does this:
Connect-MgGraph -TenantId $DestinationTenantId -Scopes $MgRequiredScopes

$AssignPermissions = @(
  "Application.ReadWrite.All"

)

$MgRequiredScopes = @(
    "Application.Read.All"
    "AppRoleAssignment.ReadWrite.All"
    "Directory.Read.All"
)

$ManagedIdentityObjectId = Get-MgServicePrincipal -Filter "displayName eq '$UserAssignedIdentityName'"
$ServicePrincipal = Get-MgServicePrincipal -Filter "appId eq '$GraphAppId'"

$AppRole = $ServicePrincipal.AppRoles | Where-Object {($_.Value -in $AssignPermissions) -and ($_.AllowedMemberTypes -contains "Application")}

foreach($AppRole in $AppRole)
{
  $AppRoleAssignment = @{
    "PrincipalId" = $ManagedIdentityObjectId.Id
    "ResourceId" = $ServicePrincipal.Id
    "AppRoleId" = $AppRole.Id
  }

  New-MgServicePrincipalAppRoleAssignment `
    -ServicePrincipalId $AppRoleAssignment.PrincipalId `
    -BodyParameter $AppRoleAssignment `
    -Verbose
}
Assign Azure Role assignments to a Managed Identity
Now we want to assign the Key Vault Secrets User and the Key Vault Administrator role to our Managed Identity:
# Assign the managed identity the Key Vault Secrets User role
New-AzRoleAssignment -ObjectId $ManagedIdentityObjectId.Id -RoleDefinitionName "Key Vault Secrets User" -Scope $KeyVault.ResourceId

# Assign the managed identity the Key Vault Administrator role
New-AzRoleAssignment -ObjectId $ManagedIdentityObjectId.Id -RoleDefinitionName "Key Vault Administrator" -Scope $KeyVault.ResourceId
Once we have that, let’s take care of our Logic app. In case you did not already create the entire definition, you can now update it. Make sure that - if you use the Designer - you select the correct managed Identity for authentication.
💡 You can find the json definition in this gist.
Conclusion
What this does is exactly what we wanted: Every 30 days (you can change that to any other value) it will create a new secret and store it in the Azure Key Vault using a Managed Identity. If you like to, you can also delete the old secret. But as this automatically expires, there is no need for this :-) Now I’m curios: How do you rotate secrets?

My name is
Luise Freese
You May Also Like

How to use Azure Policy to enforce resource naming conventions in your DevOps pipelines
Lets talk about Azure naming conventions I know, I know, you are probably thinking, “Seriously? We’re gonna talk about names?” But trust me, this stuff matters. Why Should You Care …

How to automate vulnerability scans in Azure DevOps with Microsoft Defender for Cloud
You know how it goes. You are working on a project, pushing code left and right, and then someone asks, “But is it secure?” Cue the collective groan. Well, what if I told you …

Go Go governance! Enforcing Azure Policies with Azure CLI
This post is part of a series about Deployments, Role Assignments and more! How to deploy Azure LogAnalytics Workspace and link Application Insights to it How to use Azure Container Registry to …