Before I talk about the solution I came up with, I want to introduce to Miss 8- my most important user MIU. Miss 8 struggles a bit with calculating. The fact, that she can’t go to school during these difficult times or attends lessons, doesn’t make it easer. So I wanted to help her.
So very obviously, this will be an app for kids. I want a pretty simple UI, without fancy elements and a color scheme that is compelling for my MIU. Miss 8 even asked me to take a photo of her favorite #Lego Minifig to make this a background of the app.
Challenges
There were in total three main issues for me with building this app:
I am not a professional developer and I am truly intimidated by all the tech that is available and impostor a lot about it — although I already made progress
I have dyscalculia, which means I have difficulties in understanding the meaning behind numbers and that it it’s very hard for me to get the logic in a calculation
I never built an app before!
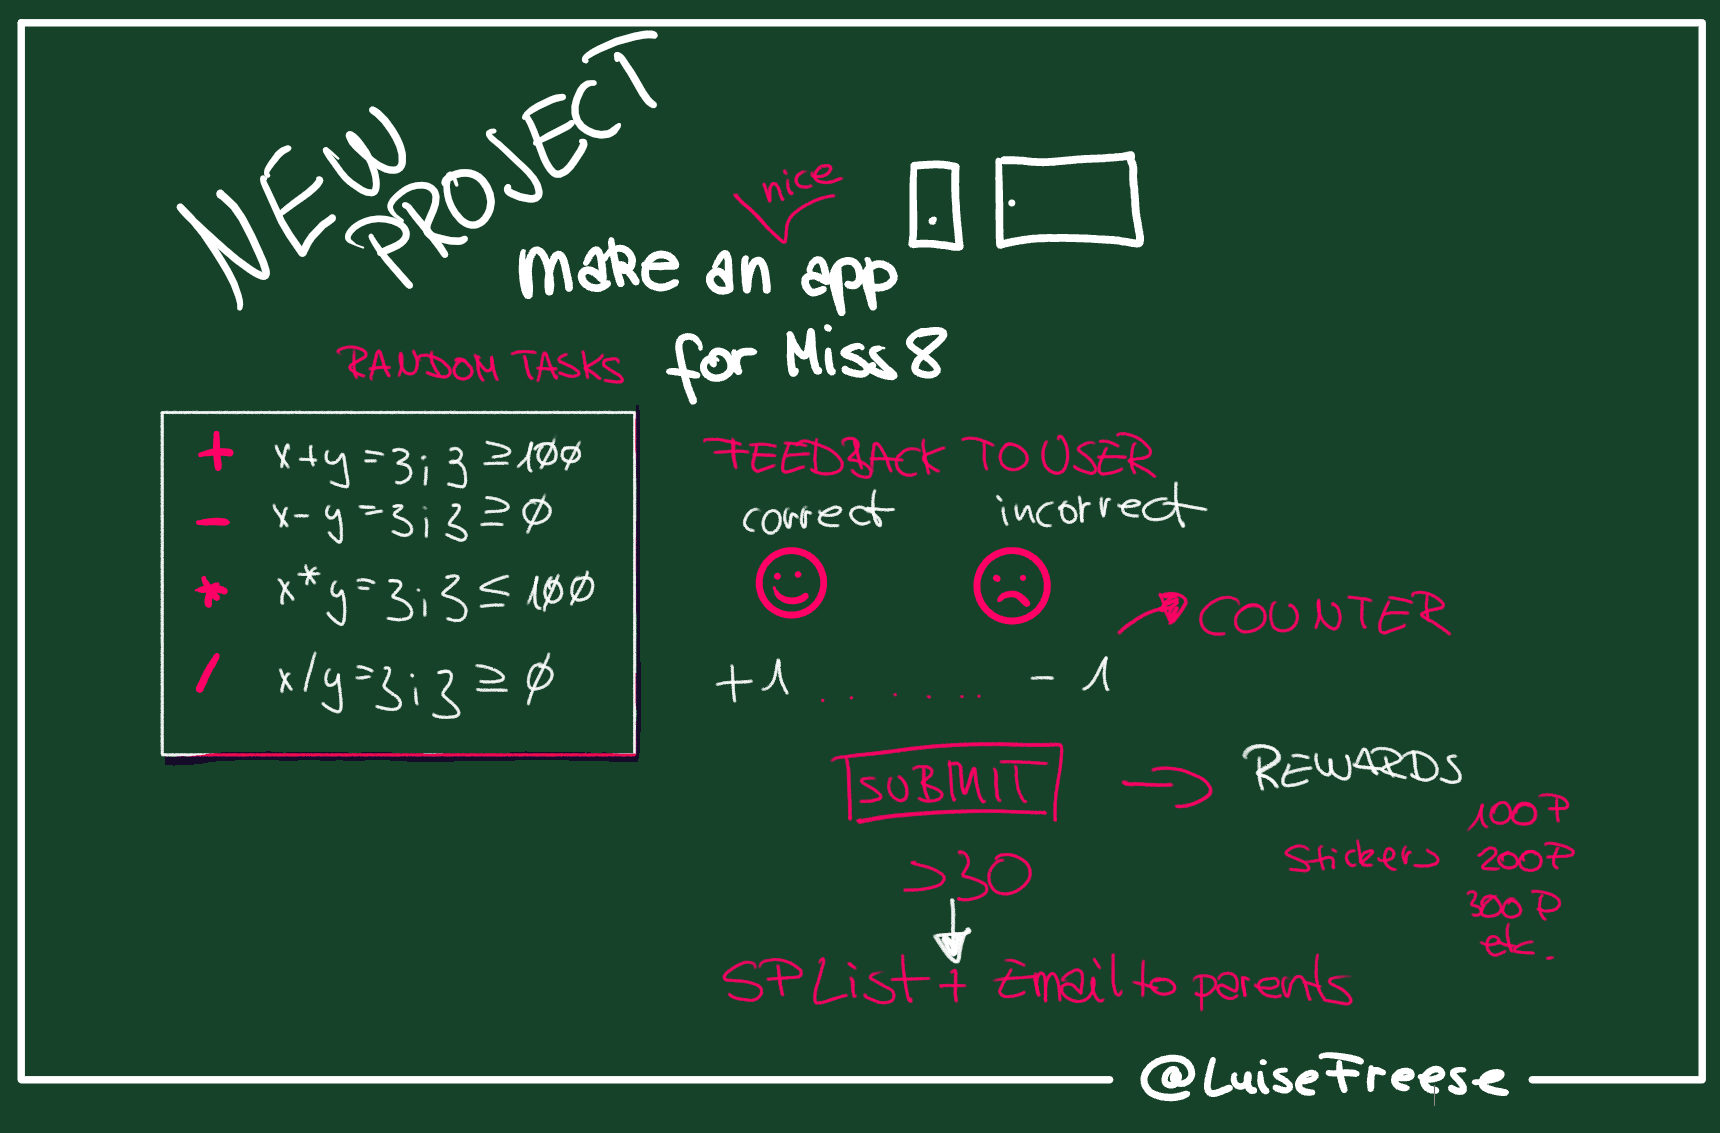
The list of requirements:
random tasks for exercises
for the four basic calculation operations: +,-, *, / only with natural numbers
addition: x+y = z; z ≥ 100
subtraction: x-y = z≥ 0
multiplication: x*y = z; z≤ 100
division; x/y = z; z≥0
show if result is correct or incorrect
so that user gets an instant feedback
count correct and incorrect answers and calculate a score
and display this during the game
let user submit results only if a score of 30 points is reached
to ensure Miss 8 stays focused and spends a while with doing exercises
write results into a list
so that parental account can see results as well
display scores for a user and send confirmation to parental email address
so no way to cheat
reward user for getting 100, 200, 300 points
with stickers to collect in the app
make it compelling for Miss 8!
Not too bad for a first app? This is what I thought as well. So here is how I did that.
Preparations:
If you haven’t already, get a free PowerApps license and log in. Click on Create, provide a name and here we go:
Working on our app
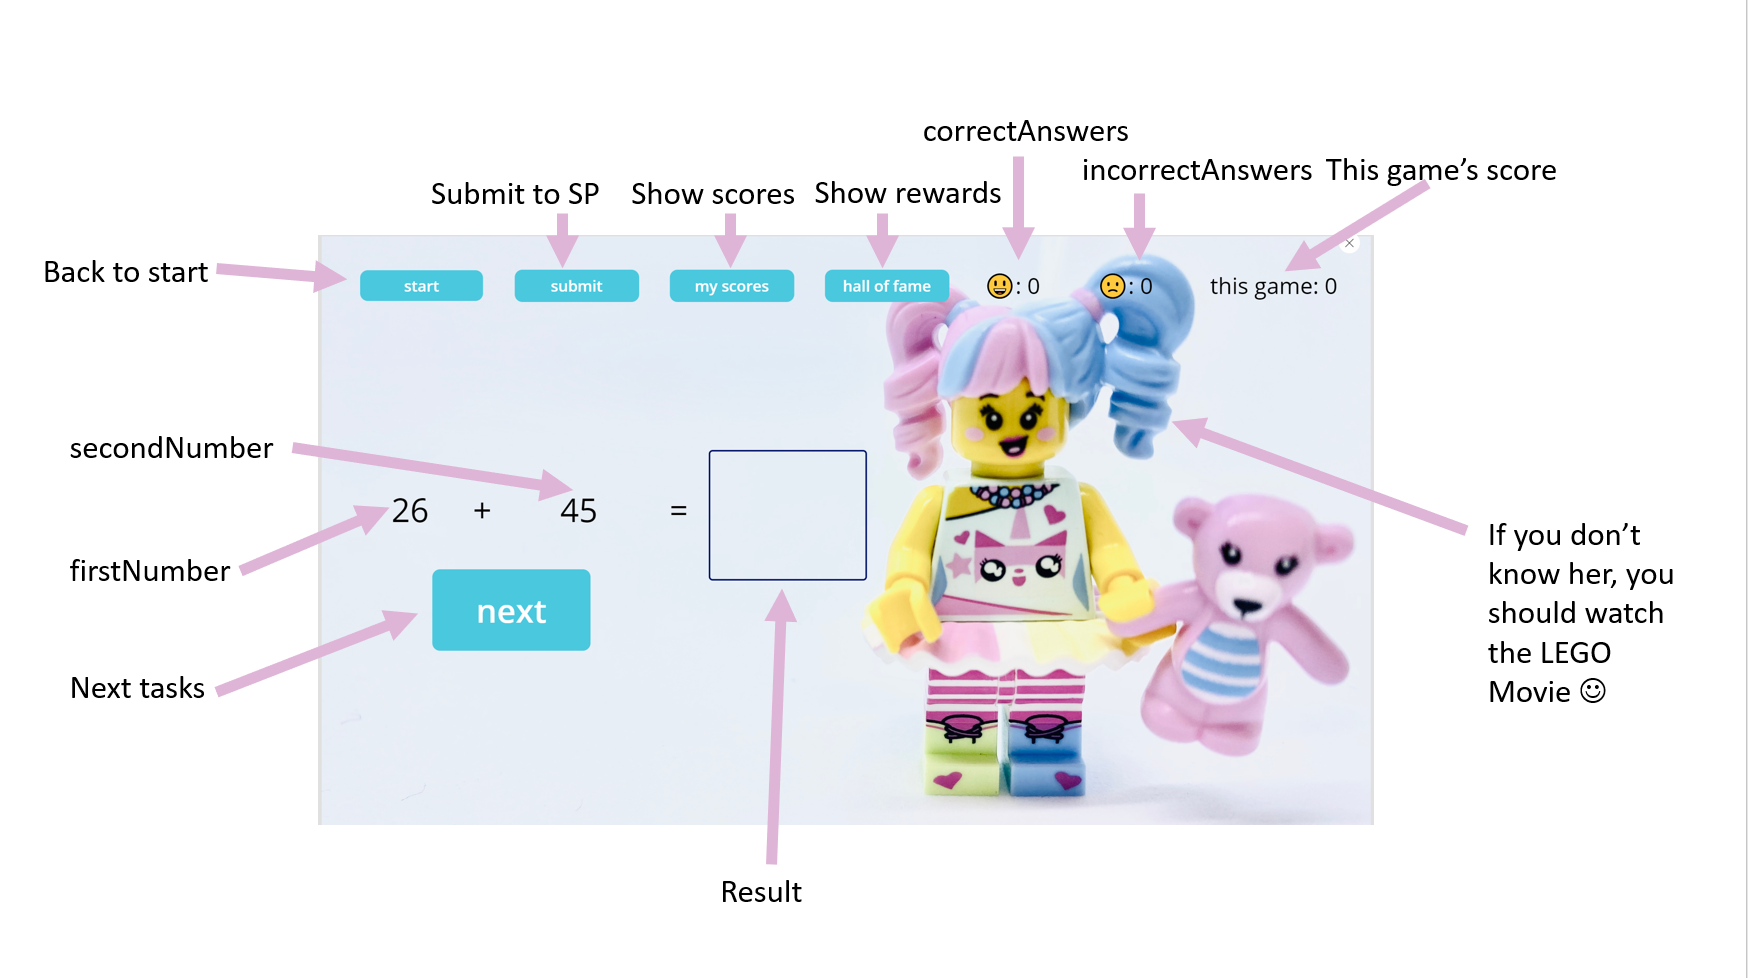
as we need four exercises for the different basic calculation operations, I decided to go for four screens. Each screen contains
text labels
firstNumber
secondNumber
operator
equals
result
amount of correct answers
amount of incorrect answers
this game’s score
buttons
next (to create the next task)
navigation (back to Start, submit to SharePoint, show my scores, hall of fame)
Let’s have a look at this (and also reveal the design):
logic
Of course, these text labels and buttons don’t do anything unless we tell them what they need to do.
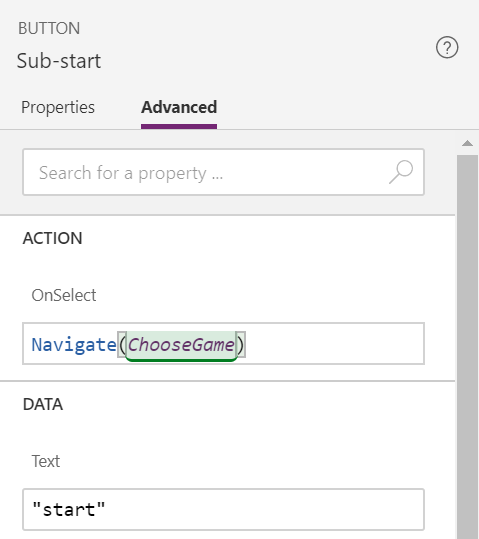
START, MY SCORES, HALL OF FAME will be just links to screens we will create later on. To let your user navigate between screens, just select the .onSelect property and type navigate(- your other screens will now show up and you can just select from this list. Don’t forget to close your parenthesis (round bracket).
As we want two numbers AND make sure that our user gets an instant feedback, we need do the following in the .onSelect property of NEXT button:
This ensures, that if the answer to x+y = z (correctly), we will set a variable named varQuestionCorrect to the value true, else we will set a variable named varQuestionIncorrect to the value true.
We will need 3 functions to meet all requirements here:
rand() — gives us randomized numbers between 0 and 1 with lots of digits after the comma — we will need to multiply this random number with 100 to get numbers up to 100: rand()*100
round(,0) — makes sure that we round the value and get 0 digits after the comma. Our value is the randomized number between 1 and 100from our previous step: round(rand()*100,0)
now it’s getting a bit ugly. The mod() function returns the remainder from a division. So we can have any random number and then use Mod(, 100) to get a random number between 1 and 100
After we learned the functions, we will use them like this — again .onSelect of our NEXT button:
a) First we need to create z- as this is the highest number (≤ 100)
b) Now we create y and make sure that y is between 0 and z
c) After that we already know x: it’s just z-y
After that we just reset our Result text label, to make it more convenient for MIU:
Reset(‘Add-Result’);
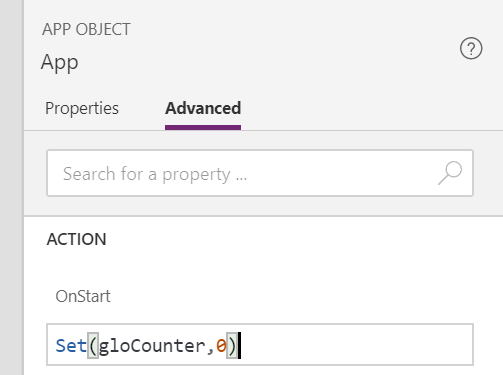
As we want to add/deduct one point to/from our Counter, we need to do two things:
a) Set a global variable on app Start
b) set a condition, that if the result was correct (we know this already by our varQuestionCorrect), then add 1 to our counter, else subtract 1 from our counter:
Pretty easy, hm?
Next thing I want is to give Miss 8 an indicator, if her answer was correct or not — show i want to show a 🙂 for a correct answer and a 🙁 for an incorrect answer — but only for 1,5 seconds. Plus: I want the colors of these emojis with my color scheme. Let’s do this!
a) First, I created a happy face icon — and guess what? An icon has an icon property .
Again, a simple if statement (now in the in the .icon property of the icon):
b) Next small feature: colors of the Emoji. If it’s the happy face, it shall be the light blue I use”, else it shall be pink. So on the .color property of our icon we do:
c) Now I want to make sure that the Emoji will only be visible after Miss 8 clicked on the NEXT button:
So I need to set a variable in the .onSelect property of my NEXT button:
(we will need the varNextclicked in step c)
so whenever the NEXT button is clicked, the varShowface variable is set to true.
Now we will work on the .visibility property of our icon:
It should only show up, if the NEXT button is clicked — we know this from the value of the variables of the previous step — so we just type:
varShowFace
d) Now let’s work on this 1 1/2 seconds:
I added a timer and set its .duration property on 1500 (which means 1500 milliseconds or 1,5 seconds).
The Start property is varAddNextclicked = true (we did that in step b) and the .onTimerEnd property is set to:
to make sure, that the icon will be visible on next NEXT click again.
e) I wanted to show the amount of correct and incorrect given answers, not only the earned points, so I set two variables in the .onSelect property of my NEXT button in an if statement, depending on if varQuestionCorrect equals true or false:
All I need to do now is to set three additional text labels, that display my variables. I found it nice to do it like this in the .text property:
Now the easy part — at least for me. We want to write results into a SharePoint list, display the list in a nice way in the app, notify parental account by email and make sure that Miss 8 needs to have at least 30 points to be able to submit her records. Here we go:
Preparation for this step: Create a SharePoint list
a) Create a button which is only visible, if the gloCounter is ≥ 30. We will do the following in the .visibility property of this SUBMIT button:
b) in the .onSelect property, we want to run a flow, so we select Power Automate in the menu and create a flow — there is even a template to do this:
Back in Power Apps, we need to specify the arguments of our run function:
The contextual help will guide you through this like in an excel formula. Basically, all your fields in Power Automate need to now be defined in this step.
Now that we got our records in the list, I want to display it to my MIU. To make this work, I created a new screen and in this screen new form. I connected in the DATA tab of Power Apps to my SharePoint list and now wanted to show the values of my SharePoint list sorted by highest points. A couple of questions, answered by her Queen of Canvas Apps Clarissa Gillingham, google search and RTFM I found out how to do this: We first need to create a new collection (we call it colSortedData) and define the order in which we want to display it:
We do the same thing for our other screens in which our user can practice the other operations.
Additional Screens and logic
As we already made a button for the hall of fame, we should make a screen as well 🙂 In this hall of fame, Miss 8 gets stickers /images if she reaches a defined amount of points overall her games. To get this, we need another global variable, I called it gloOverallPoints — so what we need to do is:
and display the variable gloOverallPoints in our HALL OF FAME and/or MY SCORE screen in a text label
A Start Screen to navigate through the app and a Success Screen to let Miss 8 know, that she submitted results make the app complete. Let’s see this app in action:
Learnings:
I learned: a ton! As this was my very first app and I didn’t touch Power Apps before, everything that described in this post was new to me. But I’d like to share, what helped me the most:
View on variables- You can not only see here all variables that you used globally or in context of a screen, but also have a look at their current value and where you used them. Invalueable while debugging!
Train your eyes! We often oversee things because we are too fast- rubberduck debugging works in Power Apps as well. Talk something or someone (thanks again to Clarissa) through your code- this slows down your thinking and likelihood that you understand what you did wrong will be so much higher.
The importance of docs.microsoft.com — especially when it comes to all functions- some of them are perhaps familiar to you, but it’s a good idea to read that list of functions to know what’s possible and then lookup syntax when you need it.
Curiosity helps you to find the little gems like: you can rename everything in your tree view with F2 (like in Excel) or make a new screen like with CTRL+m (like in PowerPoint).
My two Cents on Power Apps after this experience:
Microsoft introduced Power Apps (and the whole Power Platform) as something no-code / low-code -ish environment — and left some people behind with that. Actually, there is lot of code in an app made with Power Apps, but you can’t see it in one view. There are a lot of tiny boxes and panes, which you need to open to see all the code that you have written. So it’s more a trojan horse: it hides the code very well 🙂
Also, there is no easy way to document your solution (this is one reason why I wrote this blog… quite sure that I will forget at least one thing that I learned by making this app and I will google that in a few months and will be overly excited to find my own blog post ).
What’s next and Feedback
If you liked the post, learned something new, reactivated knowledge or just like the #Lego Minifig, then please clap for this blog post. Also make sure that you follow me on twitter. I already have ideas for next apps to make, but I am open for suggestions as well. May the force be with you.
About Me
My name is
Luise Freese
Azure & Power Platform Architect, Microsoft MVP for M365 development and Business Applications and member of M365 PnP team, based in Germany. I’m into open-source, Lego, and running. My favorite number is 42 🤓.
Continuing my learning journey with #MSGraphToolkitLap to make good use of the Graph Toolkit I read Cameron Dwyer’s blog about the power of the mgt-get. You can catch up here to read part 1, part 2 …
This is part 3 of my blog series about the Microsoft Graph ToolKit Lap — a very hands-on approach by the Microsoft Graph Team to engage the developer community to start using the Toolkit. If you …
This is the second part of my learning story with #MSGraphToolkitLap — a series by the Microsoft Graph Team to drive community adoption and developer satisfaction. My goal is to learn something new — …
This site uses cookies for analytics and to improve your experience. Choose your preferences below.